The o-rings for the water softener meter-bypass valve connection came Tuesday morning. By now all the plumbing aligns, and a good shove got the unit seated and joy, joy, no leaks there.
Yesterday I called Charlie Moore at the Ohio Pure Water Company and had him walk me through the process of setting the meter for the right number of gallons per regeneration cycle. Mine is set to regenerate every eight to ten days. I'm a little concerned that the program wheel isn't engaging, though; at least, it hasn't shown any water usage since yesterday. I'll check it tomorrow and call if nothing has changed.
What has changed is that the blankety-blanked elbow joint between the outflow riser and the pre-existing horizontal run above the water softener is leaking again. Noticed it when I was on the phone with Mr. Moore. Could very well be that the water wasn't totally out of the old pipe. Or the new one, either.
I'm not panicking because those runs won't be compromised by being shortened up when the bad joint is cut out. So I made yet another trip to Lowe's last yesterday afternoon for yet more copper fittings. I was actually planning to buy me a torch and some solder and redo it myself, but the salesman convinced me to try a GatorBite instead.
GatorBite won't do, though. There's too many drips and bumps of excess solder on those pipes. In any event, Steve* says he'll try to come over after church on Sunday and take care of it. (I bought the fittings for him to do it, don't you worry.) I won't be able to be there myself, since I'm preaching way down in West Virginia and won't be home before he leaves, probably. I'm not totally happy with that, because I'd like to see what he does and how he does it. But I need to be grateful for what I'm given.
In the meantime, I've got the leaky joint plastered with plumber's putty, wrapped in duct tape, wound with a rag, wrapped with more duct tape, clamped, and wound again with an old piece of terry cloth towel. And I've laid a towel over the WS plumbing and bypass valve, to catch any drips before they hit the floor. It's a slow enough leak that so far the piece of towel around the pipe and the dehumidifier are taking care of most of it. But I'm not embarking on any big laundry campaigns until the leak is fixed.
And if Steve can't do it, I'll bring in the Big Guns: A real, live, professional PLUMBER.

Showing posts with label water softener. Show all posts
Showing posts with label water softener. Show all posts
Thursday, September 1, 2011
Saturday, August 27, 2011
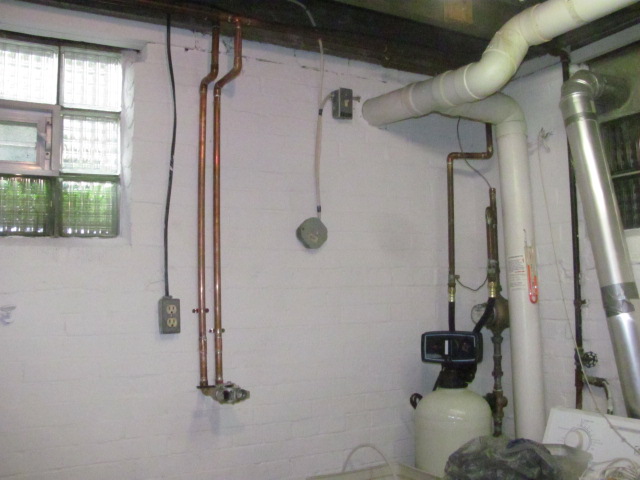
Five Thirty-seconds of an Inch
 |
| The angle makes it look even worse |
To understand the problem, you have to be able to visualize how the Fleck 2510 valve is put together. Starting with the basement wall, there is
- The copper plumbing (by owner). Two stubs stick out perpendicularly from the wall and make a permanent connection by way of male connectors with . . .
- The Fleck stainless steel bypass valve. This has female connectors on both the wall and room sides, and it connects with . . .
- The meter. It's a dome-shaped part made of heavy black plastic and equipped fore and aft with male connectors. On each side there are stainless steel clips with hex-headed screws, four in all, that secure the connections. On the room side, the meter fits into . . .
- The valve body. This is what actually screws into the top of the resin tank, and it's attached somehow to . . .
- The capacity and timing mechanism/display. This is a large retangular thing with a door that swings open and allows you to make your settings.
They should have aligned perfectly and allowed me to shove the valve assembly right in. But somehow, maybe it was when Steve* spliced the riser pipe when he redid the plumbing into the bypass valve, the connectors out the back of the meter were just about 5/32" too high. I could not make them go into the openings of the bypass valve.
So I got an idea. Maybe if I detached the meter from the valve body and slid it free into the bypass valve, that'd give me more leverage to make the critical connection between the meter and the valve body. So I started taking off the clips between the two. But before I got the second one off, I had misgivings. What if I tried to slope the bypass and the meter up to force the connection, and broke something? Besides, look at those risers against the wall. They go into horizontal runs up in the space between two joists. No reason why I can't get some give there, correct?

Hmm. Next door neighbors are sometimes at home during the afternoon, but not today. Try the people on the corner. Good. Their big door is open.
The only one at home was the mother of the man of the house, helping them clean after their floors were refinished. But she was willing to come over and push up the inlet and outflow pipes for me while I manhandled the tank and valve, and it was enough. I gave it a push and the connectors went in. Quickly, I screwed in the other two clips, thanked her sincerely for her help, and let her get back to her own project.
All right, all I needed to do now was retighten the wall clips I'd unscrewed to allow the risers to move . . . okay, done . . . and make sure the unit was sitting solidly and wasn't wobbly . . . and finish connecting the line to the brine tank . . . and thread the drain hoses through the hold-down on the edge of the laundry sink. Done and done and done. Then finally, finally, at 1:55 last Thursday afternoon, I was ready to pull the handle on the bypass valve and have soft water for the first time since last April and maybe before.

A few minutes later, I went to admire it. What's this? A little drip of moisture between the bypass valve and the meter on the inlet side? I took another look at the directions. Oh! I was supposed to open all the faucets in the house and make sure the air pressure was equalized or something. I'd thought that wouldn't be necessary, since I'd been using all the faucets on the bypass since Wednesday morning. Guess I was wrong.
Went up and down and ran all the faucets and flushed both johns. Yeah, there was still air in the system. Back down the basement and eased the handle back to Service and waited a few minutes. Phooey, there was still a drip between the bypass and the meter. And it actually seemed worse.
Huh. Then I remembered that the screw hadn't gone in sweetly when I was putting the clip back on the inlet side. I pushed the handle back to Bypass, and began to ease the screw out. But even with it gone, the clip had to be pried off with the tip of a screwdriver.

Handle back to Service, water flowing through again, all should be well.
A few minutes passed. Oh, crumb! The drip was still there between the bypass and the meter, and now I had a regular little jet squirting out between the meter and the valve body on the inlet side! Didn't I get those clips back on straight? Or was this because I still had air in the tank?
Put in a call to the Ohio Pure Water people. I guess they were at lunch, because I got the answering machine.
Back down the basement. Went through the drill again. Unscrew the clip. Clip is stuck. Pry off the clip, trying to do it carefully.
Fffllllppppzzzztt!

A little before 3:00, Jean at Ohio Pure Water called me back. She said there's a chance the o-rings on the wall side of the meter got damaged when I pushed the connectors into the bypass valve. No problem, she'd put a couple of new ones to go out in the mail tomorrow morning.
They'll get here by Monday at the earliest, since their office isn't in Ohio, as I'd thought, but down in Texas (the billing office and warehouse are in Ohio).
Of course I had to keep poking at it . . . I mean, was that an ooze I felt between the meter and the valve body on the outflow side? Didn't I have that clip on straight, either?

Wow! I got that one right in the face! The force of the blowout pushed the whole unit, valve body, timing mechanism, tank, resin, water, and all, a good inch or more away from the meter into the room! I again removed the clip from the inlet side and tried pushing everything back together. But I was afraid of harming this strange ring-like piece of black plastic hanging out of the outflow orifice of the valve body and pretty soon I stopped.
That should have been the end of playing with the water softener for Thursday. But I went upstairs and when I came down again, that ring-like piece was nowhere to be found. I looked everywhere and couldn't lay eyes on it! I'd taken a photo when the connection first blew, and it was definitely there then, but now, forget it.

Charlie didn't get back to me Thursday afternoon-- out of the office-- but I spoke to him yesterday morning. The strange circular piece was the rim of a device that focusses the outflow or something, and I guess I'd managed to push it back into the orifice of the valve body. Just as well that I spoke to him, because whoever put my 2510 valve together at the factory put that device in the wrong way. It should sit with the point of the conical strainer thingy pointing out, in the direction of flow.
Well, hallelujah. I hadn't broken anything after all!
I suppose while I'm waiting I could go ahead and redo the connection between the meter and the valve body. And it's just possible that there's nothing wrong with the o-rings and once I get the clips all in straight I'll have a functioning water softener with no leaks. But I'm not messing with it. I'll wait till the new rings get here next week, and deal with it all then.
In the meantime, I'll enjoy the job the new whole-house water filter is doing. No more yellow water! No more chlorine stink! No more orangey flakes floating in the bottom of my tea kettle! When it comes down to it, adding the filter in was the reason for all this bother and hassle and wait, and I'd say it was worth it.
Wednesday, August 24, 2011
Getting There
So everything got soldered in the right way and Steve drilled the pipe hanger/retainers into the wall at convenient brick joints, so the whole system doesn't get knocked into the next county every time I bump my head on the valve. We turned the water back on, Steve looked at his work, and said, "Great! No leaks! I always have at least one!"
But not this time, it appeared. This time, solder joint success at the first go.
Apparently.
He and the kids leave, and I go to enjoy the luxury of a toilet that actually flushed. I come out of the basement bathroom, and go to admire the work. Yes, it was messy as to solder drips and so forth, but it was done! But wait a minute. There's water on top of the bypass valve. I look up. Oh, no. There is a leak, up above, coming from the elbow at the top of the outflow riser.

There's a wire that connects the inside meter with the outside one the Borough reads, and we'd pushed it up out of the way so it wouldn't get burned by the torch. If I was planning on running water despite the leak, I needed to reconnect it. Got up on my stool, and as I was sliding the wire and its plastic tie down the pipe, I felt, oh, no, water at an upper joint. In the elbow about 2" away from the plastic radon exhaust pipe. It would be in an inconvenient place, wouldn't it? But maybe why that's why it's leaking.
About that time, Steve called and said frankly, "We're coming back to take care of that leak now. I want to get this done and over with."
"Good, because there's actually two leaks."

They all left. I put away tools, used some more water. About a half hour passed. I was up on the stool again, cleaning the hardened splashes of solder off the top of the meter, when I felt, oh, no, drip, drip, drip! This time, more frequent and forceful than before. This is not a place I can put a bucket under. I called Steve again.
And shortly after lunch, back they came. And Steve tried it again. He loaded on so much solder the elbow looked like a messy silver-plating job. Then we waited.
Steve felt the joint. "Yeah, it's still wet."
All was not lost, however. Because of where that assembly is (connected at the bottom to flexible line leading from the outlet side of the water filter), we could afford to cut out a bit of both the horizontal and vertical runs and eliminate the bad elbow. And because I bought three elbows first thing this morning, just in case, we had one to use.
Steve made one more attempt, this time with the new fitting. It's several hours later, and the joint seems to be sound. No side of leakage. Hurray!

It'd be nice to say I was finished putting everything together, with or without setting the meters and timers, and the treated water is beginning to flow. But there are a couple of things still:
a) I overlooked the fact that this brine tank is bigger than the one on my old Kenmore. The instructions say, right there, "add 3-4 bags of . . . salt." I only bought two.
Then, b) There's a part, a top distributor basket, that the instructions say I'm supposed to fit to the top of the riser tube before screwing that big honking 2510 Fleck meter on top of the softener tank. Or rather, there's not a part. I've either misplaced it since June, or they didn't send me one. The directions say this device is used "when the unit is subjected to higher than normal water pressures . . . which are present in a few areas of the U.S." Maybe my area is not one of them (my water pressure is normal), so it didn't come in my shipment. I'm making no assumptions; I'm going to call the Ohio Pure Water people about it in the morning.
After I've gone back to Lowe's for more salt.
Tuesday, August 23, 2011
Well, Almost

My friend Hannah's* husband Steve* came over this morning with their kids Stevie* and Letty* and by 2:45 or so had all the piping soldered and in place before he had to run to keep another obligation. All I had to do then was finish replacing the old or missing hangers and fill the filter and softener with media and water and set them going.
Only one thing: Steve's* not big on reading instructions, and though I printed out the directions last Saturday and skimmed them over, it slipped my mind to tell him one very important thing as I was assisting today: You have to have the stainless steel bypass valve in the "Service" position before inserting the horizontal input and output fittings into it. So there I was early this evening: I'd gotten the filter tank all filled with media and water (from my neighbors' hose tap) and fitted with its valve, and I'd connected it into the water system with flexible connectors. Now I could turn on and use my own water to finish filling the brine and softener tanks, assuming that the softener bypass valve, which as yet was hanging off the pipes separate from the meter and the tank, was on "Bypass." It was, but from my reaction you would not have thought so.

Steve came over later this evening and we took the stems off, unsoldering the 90 degree elbows from the vertical risers.
Well, you can guess what happened. It's why this will be a short post, for me, with a paucity of pictures. We couldn't get the elbows back onto the bottom of the verticals. And of course, despite I'm embarrassed to say how many trips back and forth to Home Depot and Lowe's, I didn't have any spare 90 degree fittings lying around. And it probable doesn't matter, since Steve thinks he'll probably have to cut off the soldery ends of the verticals anyway. Meaning we'll need a couple of unions, too.
Steve plans to be over here at 9:00 tomorrow morning "to get this done and over with." So guess who has to be up and over to the local Lowe's at the crack of dawn?
___________________________
>As it turns out, Steve's return trip was necessary anyway. When I'd gotten it through my head that a) the softener valve was in the Bypass position, and b) that meant I could safely turn on the water, I found that he'd turned the service entrance valve off so hard that I couldn't budge the handle. It's still off till tomorrow, and I'm making do with water I put aside for this project, and hand sanitizer.
Saturday, August 20, 2011
"A Stitch in Time . . . " . . . or Overkill?

Why? you ask.
Because earlier this evening (Friday) I was taking out the washers from the plaster repair I did on Wednesday, and I noticed three things:
- The screws were still a little sticky. Oh-oh. The adhesive I used in those was from the tube I'd cut open two years ago. Does it go bad? Maybe I'd better leave the rest of those washers in awhile longer, to make sure the glue is really cured.
- Yes, that crack was a paper tape repair that was coming loose. No telling why it chose to delaminate now, but I should be grateful it did. Could've popped off after I'd repainted the whole ceiling. At any rate, once I get the tape fragments and the loose paint layer and skim coat off, it's going to take a few coats of spackle/joint compound to smooth off. At least. And . . .
- I was pushing on the plaster in that area. Guess what. Yeah, it gave. Obviously, I didn't get it all secured on Wednesday. The gap wasn't much, maybe an eighth of an inch of so, but enough to make me want to stop it now.
Couple of hours later, I'm doing the push test again. Did I just feel some give in the area around where I just did the previous repair? Yes. Guess I needed closer coverage. So I went through the process again.

So let's do the calculations: Allowing the full 48 hours for the newest ones to cure (and I think I'd better, this being a ceiling), that puts me to after midnight Sunday night. Maybe I might get two coats of spackle in the holes applied, dried, and smoothed down on Monday. Maybe. And a last coat over the messy spot Monday night.
Which brings me to Tuesday.
But nothing's getting done on the 3rd floor on Tuesday, because that's the day my friend Hannah's* husband Steve* has said he's going to come over and help me install my water softener and filter.†
Wednesday, maybe?
_______________________________
†My friend Frieda's* son Mike*, who incidentally is Hannah and Steve's nephew, called me last Saturday and told me his schedule wouldn't allow him to get to it till next winter. So Steve's going to tackle it, and I hope he doesn't do it all, but teaches me how to solder.
Tuesday, August 2, 2011
Study in White, Gray, and Copper. And a Little Beige.

But now I've got that behind me,* I've made some progress. Not a lot of progress, but some.
Which is to say that last Wednesday, I got the coat of gritted Sherwin-Williams "Pearl White" onto the basement stair wall. It was probably a good thing to let the primer sit since the first week in July. That way I could see if any water stains bled through. None did. Missed a few spots, which I touched up on Saturday. And it's nice that with the normal basement lighting and the radon exhaust pipe in the corner, the new.y-painted outside wall and the (unmildewy part of the) unrepainted interior wall match up pretty well. I think I'd have to call attention to it for anyone else to notice they weren't the same.

Got a second coat of the gray on this evening. It needed it. It also needed two or three days for the first coat to fully dry. I keep the dehumidifier going down there, but even so, it's humid these summer days. I'll give the second coat time to dry, too, then move the metal pantry shelf back against the wall. And touch up where its legs were.


At least, I thought I did. Talked to an older guy after church on Sunday, a man who's been doing general contracting of the residential sort all his life, and he tells me that Home Depot copper is all seconds, and I should return it and get it at a plumbing supply store instead. Oh, joy. Anybody else hear anything like that? I'm not unwilling to take his advice, but it was such a pain getting that 10 ft. piece of tubing home in my PT Cruiser, and now I've got to rope it in again and take it back? And how am I supposed to explain why I'm bringing it all back? And then I'd have to price out the local plumbing supply stores. Fun, fun, fun. Maybe I should talk to Mike and see what he thinks.


_____________________________
*Should say, "Now that I've got that behind me for now." These tests are in two parts each, and while I did very well on the multiple choice part of the second one, I didn't finish the essay in part two, and I'm told that spells certain doom. So I'm looking at applying for a retake and trying again.
Thursday, July 7, 2011
It Never Ends

 |
(Here's a highly-instructive progress shot of the corner where the water softener used to be. No more red and gray. [Please disregard the smudges from the camera lens: it needs cleaned.])

It's taken care of now, so as soon as my friend's son gets back from vacation, he should be coming over and maybe we'll make some progress towards actually getting the water treatment equipment installed.
However. However. It's true, I spent Sunday through Tuesday in the garden, back and front, putting in the last of this season's annuals (yes, they are the last! Haven't I said so!?). But I've been going up and down my basement stairs past a very disgusting and grotty brick foundation wall, and I've been poking at that wall here and there, and chipping loose paint off that wall, and I've been thinking how awful that wall looks in comparison to the Two White Walls in the laundry room. And yesterday I said to myself, "To hell with it. Something has to be done!"
 |
| After scraping, before scrubbing |

I've sometimes thought that if and when I sell this house I'd refer prospective buyers to this blog to show them what I've done to the place. And I wish I had nothing but a bone-dry basement to report. A local dry-basement expert told me a few years ago that my biggest problem is humid air and not water infiltration, and what I need is to keep running the dehumidifier. The fact that I had mildew stains on the perpendicular wall supports this position, since it's an inside wall-- my workshop is on the other side. Still, I'd be a lot more complacent on the basement waterproofing subject if I could get all the brick joints repointed. I mean, it couldn't hurt.

 |
| I'm going on faith that the POs' can of gray floor paint is still good. |
Thursday, June 23, 2011
You Want I Should Think of a Clever Title at This Time of Night??

Yes, I know it's well after 3:00 AM. I didn't start till after 9:30 PM, so what do you expect? The garden work has to be done sometime.
Anyway, it's primed. Had to use a brush on the section that used to be behind the cabinet or whatever, for however good a job I thought I did last weekend of scraping and flaking and scrubbing it, flecks of the old paint would come off on the roller. With the brush it's a much cleaner process: the latex primer goes on, the old paint stays on the wall, the latex primer gets under the broken edges of the old paint, it wrinkles up, and I come around with the five-in-one tool and scrape it off. And reprime the bare places. And now the wet flakes are on the floor, not on the roller. See how much better that works?

Even without the paint coat, those two walls are making the rest of the basement look bad. But the point is not to tart up the basement. The point is to do whatever painting needs done before the new water filter and softener go in, so I'm not struggling to paint behind them later, and to do it so the laundry room doesn't look totally half-@$$ed.
(Half a donkey. That would never do.)
Thursday, June 16, 2011
Ray of Sunshine
 |
| I believe the black rod is the dip tube |
No, I told her, I'd been wondering the same thing, and might end up using the mechanical-connection GatorGrip or SharkBite fittings instead of solder, even if they are more expensive.
What she was calling to suggest was, would I mind if she mentioned my job to her next-door neighbor? He does plumbing work, and would charge me a lot less than going rates. Or, if I didn't need the work done right away, her grown son would be willing to take a look at it, and he'd do it for free.
Oh, no, said I, with all the painting (and cleaning) I still need to do down there, it will be at least a week before I'm ready to do any plumbing. At least.
Well. that's good, because (with all due respect to my DIY abilities) she knows that if you get the plumbing wrong you can blow out the equipment. Yeah, I said, or spring a major and very annoying leak.
I am not proud. If she wants to send her son over to sweat these pipes for me and he knows what he's doing and he's willing, I'm all for it. It'd actually be a relief. Thanks!
 |
| Slurp, slurp, slurp! |
 |
| Not pie material |
 |
| Notice broken place at bottom |
The bags of resin went in the trash for pickup first thing tomorrow morning.
So hurray! that's done. Maybe I'm making progress after all.
Half-Baked and Fed Up

I got the problem area primed with Kilz on Tuesday. But no, my previous owners didn't leave me any of the flat white basement wall paint. Wottoodoo, wottoodoo . . . I didn't want to have buy a whole new gallon of paint for that little corner, but a quart always seems like a bad deal.
Well, here's this: I had a whole gallon of flat white, untinted, that I got on sale last Fall. It's for redoing the ceiling up in my study. I don't need all of it for up there . . . maybe I could use part of it for repainting the basement wall in the water softener corner. I'd pretty much decided on the shade of white I want for the 3rd floor, and I brought the chip down the basement and held it against the old paint. Yeah, good enough.
So I got the paint tinted yesterday and had a packet of anti-mildew powder added in. This morning I added some perlite grit (which the POs did leave me) to a quart of it to match the existing texture, and got to work.
Yes. Well. It really looks nice where the new paint is. But it isn't a match to the old paint by any stretch of the imagination.
I don't regret going with the color I want for the 3rd floor. It couldn't've matched the existing basement walls unless I wanted my study ceiling to be dirty tan. What I do regret is not foreseeing this, and failing to wash down the entire wall while I had the bucket of TSP going. Actually, I should have washed down both the outside wall and the one behind the washer and dryer. Because both of them will have to be repainted to make the basement laundry room look decent, and it has to be done before the new water treatment equipment is installed.

Oh! oh! I was so hoping to have this step finished today so I could get on with the floor! Now I have to go buy more TSP, and I can't use it for two or three days because the new paint has to harden up a little before I go scrubbing over it, because of course the dirty spots are above it, oh, yeah . . .
Tell me, when does the fun begin, anyway?
Thursday, June 9, 2011
Amendments to the List

Like washing down the walls and floor with TSP then rinsing it off. (Yeah, duh, simply spraying on the mildewcide over the dead mildew would not get me a good paint job.)
That's done, not without a lot of slop and mess. Slop happens. Slop gets mopped.

Regardless of its history, the spalled place was there. "Was" being the operative term, because I patched it. Mixed up too much Sak-Crete; not sure how I miscalculated so badly, and too bad it was after dark and I couldn't use the leftovers for the holes in the sidewalk outside.

Add this item, too: Rooting around in the paint cupboard in the workshop. If I'm lucky, my previous owners will have left me a can of the basement wall white paint. If I'm even luckier, it'll be usable.
On the other hand, I'm deleting the items about cleaning up and repainting the whole laundry room floor at this juncture. Yes, it needs it. But it's not directly relevant to getting the new water treatment system installed. I'll just paint the bit of the floor where the new equipment will sit. That'll do for now.
Tuesday, June 7, 2011
But First . . .

 My new water treatment equipment has arrived. It was unloaded around 12:20 PM last Thursday the 2nd by a nice Pitt-Ohio delivery man who took all three humongous cartons down the basement and set them in the laundry room for me. From the previous post on the subject, you'd think it should have got here by the 21st or so of May. But no, I spent a good two weeks cogitating on how I was going to pay for it, and didn't finalize the order (online) till late on Memorial Day evening. (Two and a half day order processing and delivery turnaround. Chalk up points for the Ohio Pure Water Company.)
Yesterday, I borrowed a blowtorch, some solder, and some flux from my friend Steve*. Immediately, now, you'd think I'd be running up to Lowe's and purchasing the right tubing, elbows, T-joints, and any other needed supplies.
Wish I could. But first, I need to
- Scrape the walls in the corner where the old softener was, to remove the hard bubbled paint off the bricks where the high humidity got in and lifted it.
- Scrape any loose paint off the floor where the old WS was (the floor was wet when I pulled it away).
- Use the shop vac to clean up the debris.
- Use an anti-mildew agent to kill the mold in the remaining paint, then let it dry.
- Slap a coat of Kilz or B.I.N.s over any bare bricks.
- Give the floor in the WS corner a good washing. Let it dry.
- Give the floor in the corner a coat of Kilz or B.I.N.s.
- Realize, O carp, there's no point in repainting just that corner when other parts of the laundry room floor need redoing, too.
- Figure out how to take the old water softener apart so I can get at the resin tank and empty it.
- Take the old water softener apart so I can get at the resin tank and empty it.
- Use the shop vac to suck the resin and water out of the old resin tank. Drain off water and dispose of resin in the trash (it's just plastic and nontoxic).
- Once it's light enough for me to carry it, get the old WS out of the basement.
- Make sure all the piles of laundry, jugs of laundry aids, buckets, cat litter pans, boxes, etc., are out of the way.
- Wash all the laundry room floor. Let it dry.
- Give the floor, especially the corner that still flaunts the previous owners' old red and gray paint jobs, a nice coat of pale green floor paint. Put up a gate so the cats don't track in it. Wait 24 hours.
- Give the floor a second coat of green paint. Wait another 24 hours.


Then I can move the new backwash filter and the new water softener into place and start measuring for copper pipe. (I think that while I've got the primer out I'm going to label the system as it exists so I don't end up softening the water that goes to the basement toilet and sending all the untreated junk to the water heater.) By the time I finish the list above and can head to Lowe's, maybe I'll get lucky and Steve will find his big pipe cutter gadget. One less thing to buy.
Hoping to get the scraping, mildrew-removal, and priming done before I go to bed tonight.
But first, I have to plan worship for the church I'm supplying this Sunday. But first!
Monday, May 16, 2011
Fort Necessity
 |
| From Treebeard's Fotolog |
But I'm afraid I have to. I've experimented with doing without one these past three or four weeks, and it's piling up into more and more trouble.
No amount of soap suffices for hand washing. The high-concentrate laundry liquid won't suds. Most disgusting of all, my dishes come through the dishwasher cycle with a coating of gray grease on them, and the glassware that wasn't etched before now is. I've resigned myself to doing all my dishwashing by hand for the time being, but even a little sinkful takes a lot of detergent.
Then there's what I can't feel or see. I don't even want to imagine what's going on in my pipes, or how long it'd be before they'd need a cupric angioplasty.
And this makes my stomach feel like I'm about to lose my lunch.
(Only to be expected when your water tests out at 41 grains hardness per gallon, and the sediment level is off the EPA chart.)

By itself, this softener wouldn't put too severe a dent in my resources. But I've learned these past weeks that much of what frustrated me about my water even before my old Sears softener broke had nothing to do with the softener at all. It was the Culligan man who pointed out, when he came by a week or so ago, that the cold water line to the kitchen sink bypasses the softener, as does the line to the basement toilet and probably the upstairs toilet as well. A new water softener, no matter how efficient, won't do a thing about the iron sediment in the toilets or the scale in my cooking water and tea kettle. If I want to be happy with my water after the new WS is in, I'll need to install a sediment filter to clean out the mineral gunk before the water gets to the softener at all.

But oh, do I really want to spend another three or four hundred bucks for this? Even if the unit that works for me is On Sale?
Writing it out like this, I frankly wonder if I could have put up with the hard water after all. But doing that will run me time and expense, and I'd have to get a new system in sometime, after all that and after more damage is done. And I guess I'd better get it all done at once and get it over with.
So the order is in. And when the equipment arrives, guess what? It'll be necessary for me to lay in a supply of tubing and elbows and figure out how to plumb the whole system. To keep the price down, I've got to do the job myself.
(But that, I'm actually looking forward to.)
Tuesday, April 26, 2011
Soft Water Is Hard

A couple months ago, I started noticing a little water on my basement laundry room floor. From the washing machine, I thought, and since it wasn't bad and dried fairly quickly, I ignored it.
About two weeks ago I observed that the wetness was really coming from around my Sear's Kenmore water softener, a few feet up the basement floor slope from the washer. I looked inside the tank, and it was full of water! I've never seen that before. Never, ever. I tried regenerating right away, but the water only crept higher. Not what one wants, right?
So I unplugged it, found out from the manual (which was hanging there in its plastic envelope) how to activate the bypass valve (good job for a rubber mallet), and went upstairs and called Sears. Oh. $65.00 just to come out and look, before parts and labor. Not in the budget.
I sent out a veiled SOS to my friends on Facebook. Too veiled, obviously, because I got no response, not even one word of useless advice. Oh, well, there's always the Internet. So I Googled "Kenmore water softener full of water leaking." And got advice there, yes, I did. There were at least four different things various posters recommended be tried, each one of them looked complicated, and each one of them seemingly had to be done first.
Please understand: My water softener is in a dark corner of the basement, my eyesight is not very good, I never can see that stupid gray-on-gray display, and I couldn't find the place in the manual to show me where to find the venturi or the resin bed or anything else that needed to be cleaned or adjusted or whatever it was. So I put it off.
On the weekend, at the customary front porch gathering, I asked some of my neighbors if they'd ever serviced their water softeners. No, they hadn't. In fact, the guy across the street said they didn't even have one.
Well, if they can get along with hard water with a family of seven, I supposed I could for awhile, too. And I left the softener on bypass the next ten days.
But yesterday I think I spent a half hour or more rewashing supposedly clean dishes from the dishwasher. I folded some white laundry last night and it looked yellow and dingy. I can't get my shampoo to lather, and the water tastes funny. Still I was putting off doing anything about it, until this afternoon after work.
I have lots of laundry to do. I'd really like it to come out clean. Oh, phooey, I had to try cleaning the venturi at least. I mean, come on, buck up. Found the diagram in the manual (I'd been looking at the installation guide before--oops). Found the venturi on the appliance. Took it apart. Barring a little red iron scum, it was clean. Put it back together and turned the softener on. Made no difference-- water level still high. Found the page with the Manual Regeneration Check. Put the softener through its paces: brining, brining rinse, backwash, fast rinse. Water level actually went down a little bit, out through the drain hose-- then started filling up, higher, higher, scarily higher. Oh, no, you don't! Unplugged it and hammered the bypass back in place.

Time for the hot water to melt it out.
Hot water, hot water, hot water. Ram it with the mop handle to break it up. Ram, ram, ram.
Take a look to see if I'm making any progress. Poke the camera down in to document the event. Take a few pictures, using the flash.
Review the pictures to see what's going on, since I can't see down there very well.

Did I do that damage right then, myself, with my plastic mop handle? But no, the picture I took right after I got the water sucked out shows the crack already there. And I haven't gone after a salt bridge for several months. No, that resin tank cracked by itself.
I've been on the Internet (did I mention that before?). I've learned that a cracked resin tank is doom for a water softener. That if it ruptures, it can be doom for whatever's in your basement (especially if the water's still running through the WS). That the resin in a broken tank can go running throughout your whole plumbing system, and while I haven't delved into what that means, it sounds bad. And that replacing the resin tank and its contents can cost more than buying a new water softener.
My resin tank is toast. I am not going to experiment with running the WS with the tank in that condition. So what do I do? This is not in the budget. Do I stretch my credit even further and buy a new water softener? Do I run hard water for the foreseeable future and ruin my clothes and coat my plumbing with lime?
Blast it, what do I do?
Subscribe to:
Posts (Atom)