Showing posts with label previous owners. Show all posts

Saturday, March 23, 2013

Creeping Along

I really expected to be a lot more excited about this.

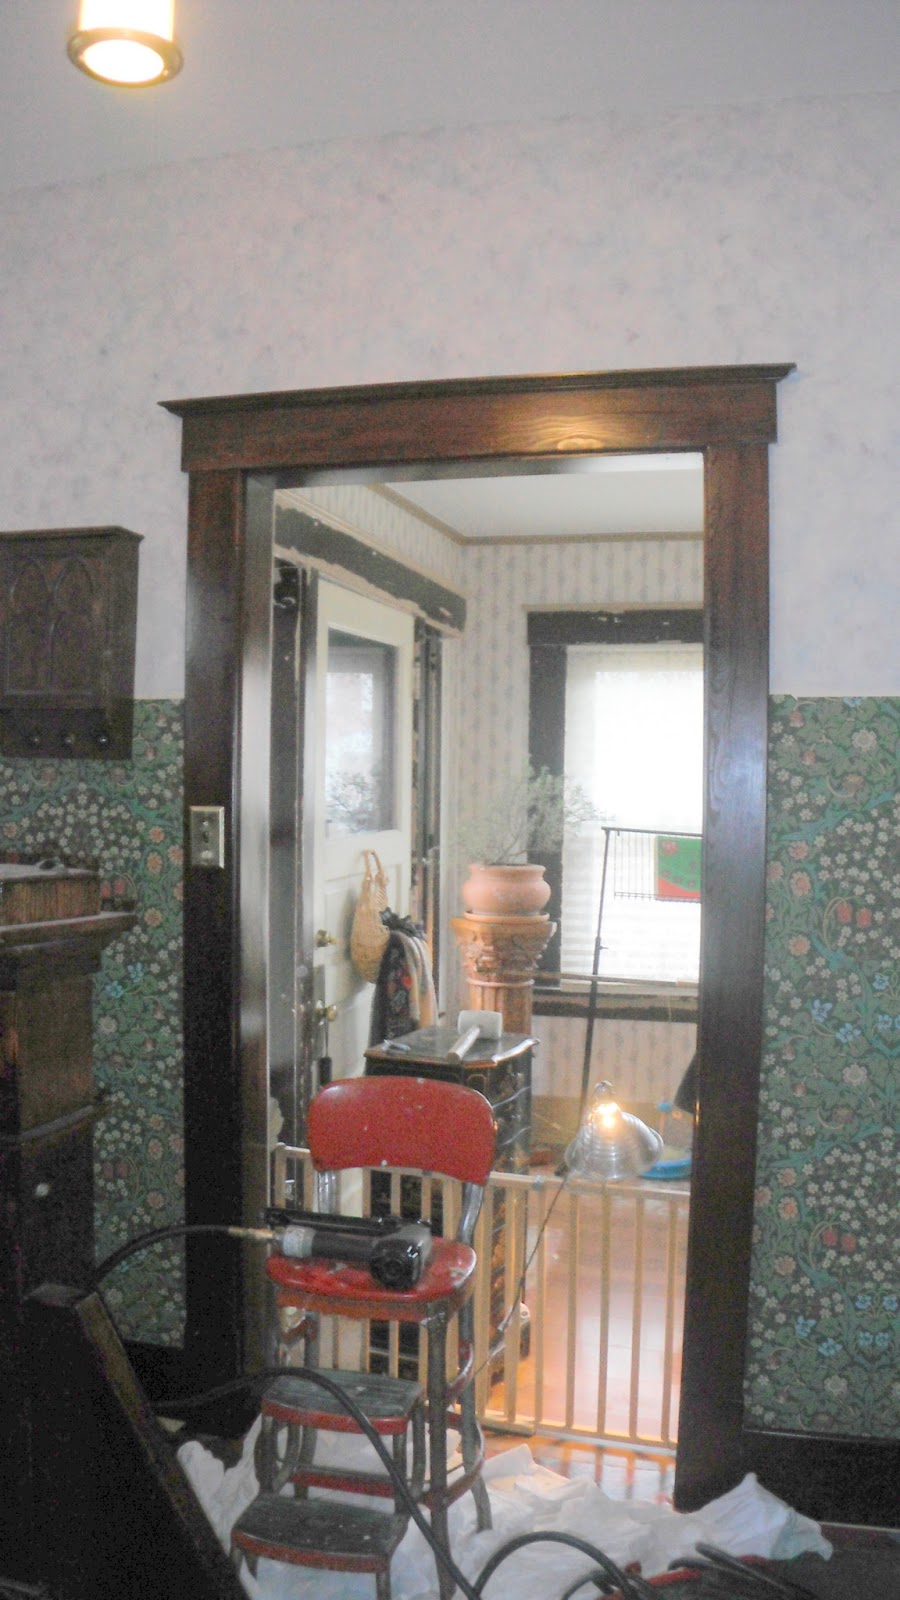
Reinstalling the trim in my 1st floor hall, I mean.

After all, it's been down and the space has been looking scabby since September of 2008.  On summer evenings these past four years, every time I've hung out with the neighbors on their front porch, I've looked through my hall window and been faced with the busted plaster that should be concealed behind the trim.  And I've thought, "Damn!  I can hardly wait till I can get that woodwork shellacked and back up. It sure looks like hell from here."

But like Martha in the Gospels I've been worried and distracted lately by many things and tired out by the flu and now that the time has come for me to remount the hallway trim, I'm not that enthusiastic about it.  But my intellect tells me it needs done and urges that I may feel better about things if the house is neat and assembled and orderly.  So here I go.

All this is to explain that each day I do what I'm up to doing, and when I get tired or feel like I'm about to scream, I stop.  Which may be all that can be expected, when I've already spent the bulk of the day substitute teaching.  Which cannot be stopped when one gets tired or feels ready to scream.

So, the thrilling and breakneck progress since Tuesday:

Wednesday, the big deal was to redo the switch to the outside light, the one over the front door.  The switch is cut into the jamb trim on the lefthand side of the doorway to the front room.  I'd been subjecting the previous owners--whichever one it was-- to direst obloquy because obviously they'd failed to install the switch in an electrical box, nor did they use a wire nut to secure the two neutral wires, the style of switch not having screws to fasten those into.  Instead, everything was wrapped with electrical tape.  How foolish and dangerous!

No box, no wire nut-- tsk, tsk
But as I was shoving the new box into the front of the trim and pulling the existing Romex through the knockouts, I had to notice that oh, look, the cutout in the trim is exactly the size and shape of a standard electrical box.  And it crept in on me that four and a half years ago when I took that trim down, I was afraid of messing with that switch myself (it had to be dewired to get the woodwork off the wall).  So oh, yeah, I got the professional electrician I was using at the time to come and pull it out for me, didn't I?  Along with the two in the long living room baseboard.  I now recalled him asking me if I wanted him to take the switch out for the time being, me saying No, I needed the light, and him, yes, taping everything up as a temporary fix, because what was the use of him putting it back in the box when it would just have to be taken apart again when I remounted the trim?

Back together and boxed
So who's the danger-mongering fool?  Nobody, I guess, since a pro did it for me.

Don't know what became of the original box.  I utilized one I bought for another location and didn't use.  Used the original switch, since it's more solid than the flimsy modern one I thought to replace it with.  It's all back together, the outdoor light lights, the jamb trim and the lintel are nailed back up, it's all fine.  Previous owners, my apologies.

Then came a step that I really should get excited about. Wasn't excited Wednesday night, but I guess I'm getting there now. It's when I nailed together the replacement casing for the doorway to the kitchen and got it nailed into the ragged, nasty opening that's been taunting me for months and years on end.

New casing ready to rise

This casing is the thickness of the wall, unlike its predecessor
Fun, fun, the new white pine had a little warpage and on neither side did the jamb pieces automatically snug up to the edge of the cutouts in the plywood over-floor.  And they had to, or the plinth blocks would be sticking out into the opening.

Warped at the bottom

Blocked and shimmed into submission
Didn't feel like messing with it then.  I saved the fun for Thursday night.  Got them persuaded out as well as I could, but I think some caulk will be in order on the left side.

Other than that, Thursday and today, the jollification has been with the face trim in the northwest corner, between the portal to the living room and the doorway to the kitchen.  It was a bit of a Chinese puzzle, how it was all supposed to go back together, and I was glad I took pictures back in 2008 when I took it down.   There ensued a saga of blocking and shimming which I won't bore you with (though I have to say it amused me to be putting the original blocking back in, especially the pieces I used to test shellac colors)..  Some of it had to be done twice in the same place, when I realized (in time, thank God) that what the woodwork needed for proper reassembly was not notching and cutting and trimming, but a bit more blocking and shims behind a piece I'd already nailed up.

(Gimme that pry bar, will you?)


2nd attempt. This butt joint was really off before.
Finally together


So finally the vertical pieces are back up in the northwest corner, left of the kitchen doorway.

Not so the jamb trim on its righthand side.  It's overlapped by the nosing of the hall bench, and a notch was put in in days of yore so the trim could slide in between the bench nosing and the wall.  But when I test-fitted it, the trim sat a quarter of an inch too high.  In relation to its plinth, in relation to the head casing, in relation to the jamb trim to the left side of the doorway.  Weird.  Had no compunction about taking the Dremel and bringing the notch the required distance higher.  This piece of trim is presently down on the basement sawhorses in the process of receiving a few coats of shellac on the enlarged notch.

Enlarged bench notch in progress.  Dremel battery needed to recharge
But in addition to this, I couldn't get it to sit snug to the horizontal trim at the end of the bench.  Kept rocking, with the bench seat as its fulcrum. On Thursday I thought it had a bump I'd have to take out to get it to work.  But bother that.  The level says it's straight.  Silly to start butchering the woodwork.  Just pry the horizontal trim off and reinstall it flush left to the jamb trim once it's up.  Still have no idea why the gap is there, but since it is, it can go in the dark corner and get a bead of clear caulk.  Easier and less destructive that way.

A little retrograde motion


Well, easier and less destructive until I cracked the board down the middle prying it off.  I'll do my best to hold the pieces together and put it back up as is.  If I have to glue or fasten them, I'll ruin the shellac job.

That's all for tonight.  Once I get that jamb trim up, it really would be nice to get the lintels up.  The lack of them is what has been so glaring from the neighbors' porch.  But the way the cornices are mitred together, it may take an extra pair of hands.   Or two.

It's not like I don't still have plenty to do in there without tackling that . . .

Monday, July 30, 2012

What You Callin' 'Easy'?

Remover applied
I've always wanted ceramic tile in my 1st floor hall.  Had it all picked out.  I'd doodle my tile job detail during choir practice--underlayment, Ditra, thinset, tile, and all.  Then late last winter I got the depressing news:  A trustworthy tile pro informed me I shouldn't do it unless I tore the whole floor out and sunk a new one between the joists.  For even if I reinforced the springy place in the existing floor I'd still be out of Code with a too-shallow bottom  step.  Feasible, but pricey.

Frankly, I'm out of Code already, thanks to the ½" plywood my previous owners two back slapped down to underlay the ever-so-(un)attractive sheet vinyl they chose.  The bottom riser is that much shorter than the rest even now, and it doesn't bother me.  Would another half inch or so of tile, etc., matter that much?

Test for riser comfort/safety
Late in May I bought one of my chosen tiles at the Big Orange Store, set it on the floor at the bottom of the stairs with some thick cardboard under it to simulate the setting materials, and walked down the stairs a few times.  No.  Ow.  Yep, it would matter.  "Watch that bottom step, Ethel, it's a doozy."

Well, maybe I could pry up the plywood and make something out of the original tongue and groove floor beneath. 

It was no go.  I think the POs-1 didn't merely nail it, they glued it down as well.  And I wasn't up to getting down with the circular saw and cutting it up into little puzzle pieces and heaving them up one by one.  No telling what that'd do to the T&G.  And there'd still be the dried adhesive to deal with.  Hmm, no.

Withal, I've decided, the only thing for it is to fill and sand the plywood (which is a decent, regular, knotless, interior grade) and paint it.  In a faux tile pattern that'll simulate the Gothic Revival tiles I always wanted.  But first, I have to get the vinyl adhesive residue off.

The product in question
Could be worse.  It's only around the perimeter of the L-shaped space and along the verges of the floor heating register.   I rejected trying to sand it off.  Chemical methods should be easier and more economical, I thought.  So I bought a bottle of Henry EasyRelease Adhesive Remover a few weeks ago, and today, I tried it.

Ohhhhhhh, my.  Easy release?  Not so much.  The label says to dilute it 4 to 1 with water, apply it to your dried, hardened glue, then wait one to two hours for the loosening action to work.  I sprayed on the first application around 2:30 PM and according to the instructions renewed it every so often (every twenty to thirty minutes) to keep it wet and working.

After two hours, I went at the (theoretically) softened glue with my 5-in-1.  No joy.  It barely made a dent.  Tried adding more adhesive remover to the bottle to make the mix more like 3 to 1.  Squirted it on and waited another hour or so, reapplying at intervals.

The ordeal begins
By this time it was nearly 5:30 PM.  Upstairs in my bedroom my two younger cats were sequestered behind the closed door, to keep them and their tender paws out of the adhesive remover.  Neither of them was happy to be held captive, and might have been plotting all sorts of dire revenge in the form of poo in the shoes or smelly yellow puddles on the bed.  They had to be sprung as soon as possible.  Meanwhile, the dog, exiled to the back porch, was leaping at the screen door and barking in protest at having to be outdoors without me.  (My oldest cat would stay outside all day and all night if I let her.)  Okay, kids, I'm working as fast as I can!  I went at the old glue again with the 5-in-1, a putty knife (useless) and the paint remover hook.   And went at it, and went at it, and went at it.

Done, barring the gunk hung up on the nailheads
I'm tired, I give up
The old glue started coming up, but it was hard work.  I kept at it steadily but by a few minutes before 8:00 I had less than half the ring of residue removed from the plywood, my knees were hurting, red, and swollen despite the pads I wore, and I was thoroughly fed up.  If this product brings up adhesive residue easily, I'm Mike Holmes' new forewoman.  I had to stop.  Rinsed the application sites with cold water per the directions, including the places I'd sprayed with remover but didn't/couldn't scrape, put everything away, and liberated the captive pets, indoors and out.  Thank goodness the kittens (five-year-old kittens) had controlled themselves.

Still to do, and only part of that


I'll try to get the rest tomorrow.  Pretty tired and disgusted now.  The sander might be an option after all.

Monday, July 2, 2012

Side Trip

My find, as of September 2009
Haven't done a lot on the house this past month or so.  Life's realities have intruded and needed attention.  But what little I have done has had nothing to do with shellacking trim or prepping the living room for paper or cleaning up the 1st floor hallway floor for paint.

No.  I've been off on a side trip, seeing what I can make out of my new-old back screen door.

The existing door is a bog-standard aluminum convertible number that some previous owner forced into the opening.  For the past three, maybe four years it's been hanging by one hinge on the bottom and the door closer at the top.  The screw holes in the top and middle hinges are stripped, and try as I might I couldn't get the screws to stay in or hold.

So it was nice three years ago on the eve of the Borough's semi-annual large-item trash pickup that I spotted the perfect screen door dumped at the curb the next street over.  It fit the style of the Sow's Ear perfectly, had all its original hardware, and it was in one piece when I rescued it.  Well, two.  The screen insert was separate.  But though the stiles and rails and panel were all sound, by the time I got it off the porch and down the basement the dowels gave way in several places and the door fell apart.

Never mind.  I could replace the dowels and put it back together.

But with that and it's needing stripped and, oh, look, the hinges and latchset are on the opposite sides from what I need, oh, yeah-- dealing with the salvaged door has taken a back seat.

But this spring I got tired of hearing the aluminum door bang.  I figured the neighbors were tired of it, too.  It won't be long before the last hinge gives out and then were will I be?  I don't run the AC in the summer if I can help it, my kitchen door would be standing open, and the flies would be in and the dog would be out-- out eating dropped rose of Sharon blooms and getting the runs.

So before this summer is out, I'm determined to fix up and install that salvaged screen door.

Mortised into the door edge!!
Front screen door
Slow process.  First thing, I needed to remove the hardware.  Rotten difficult, as the screws were rusted in or painted in in most cases.  After three or four weeks of coming back and coming back and working at it, I finally got the hinges and latchset off, but I'm not home free.  The hinges are the half-surface kind, where one leaf is supposed to mortise into the jamb and the other, which is broader, is screwed to the surface of the door.  My front screen door is hung just that way.  But the previous owners of the new door had to get creative.  They mortised the narrower leaf into the edge of the door (patching work to do there), and the wider leaf they must have attached to the jamb in some way.  I'm not sure how, because all three have two 1/8" thick aluminum shims attached to them.

Aluminum shims.  I wonder why.
And that's where the difficulty lies.  A lot of the Philips head screws that replaced the originals in those leaves are stuck, broken off, and plain won't cooperate.  I've tried everything with sprays and oils and clamps and pliers, but there's still four of them I can't get out.  Grrrrrr!!

On top of that there's the jolly screw-cams that hold the screen insert in.  Oh, those were nasty.  Worked at them literally for weeks.  But I finally realized that it was doing no good to pump loosening solvent over the heads of the screws on the face of the door, the thing to do was to squirt it into the grooves in the sides to get to the rotating tongue part.

Washed
That, and get the pieces outside into the light where I could actually see what I was working with.  Had to do that anyway this afternoon, to wash the dirt off the surfaces.  Finally, finally, I was able to work the screws around so I could get hold of the tongues with my Vise-Grips.

The cam rotates!
So now they're free, and all I have to worry about is the fact that the tongues look a little bent.  And about stripping the pieces, redowelling them, getting those stupid shims off the hinges, getting the insert rescreened, etc., etc., etc. . . .

Thursday, March 8, 2012

Oh, Fudge

I've been working on resecuring the plaster on the south wall of my living room since this time in February.  I'd been contemplating repairing that plaster since July of 2007 at least.  Now, a major cause of procrastination is the fear that a project won't come out the way you hope and visualize.  A major cause of depression is when you discover that your fears very likely were right.

The only problem with the plaster, as I originally perceived it, was up at the righthand corner of the cased opening between the living room and dining room, where the doorway jamb and head casings come together.  When I pulled off the trim to strip it, lo these many years ago, I found that the plaster protruded beyond the room face of the casing a good half inch.  Meaning that the face trim gapped more than a little.  Previous owners had fudged that over with spackle and paint, but I'm going back to natural wood. 

When I learned about Rory Brennan's Big Wally's PlasterMagic® system, I knew it was just the thing to take care of that protruding area and make the plaster nice and flat to receive the newly-shellacked trim. 

But things have not been that simple.  Back on the 9th of February when I started drilling the holes for the conditioner and adhesive, I noticed, for the first time in eight and a half years of living here, that the entire top fourth of the south living room wall bulges outward.  On the righthand side, especially, the protuberance was a half inch and more.  Clearly, I was going to need more Big Wally's adhesive than I had on hand.

Insert interval while I got around to ordering more tubes, while it shipped, and while it sat in the box in my dump of a living room waiting to be used.  All right.  So this past Sunday, I got to work.  And noticed two odd things:

First, that the plaster bulge on the righthand side, where I started my operations, went in a little with the washers and screws, but not as much as I expected.  Only a quarter inch at the most.  But the plaster wasn't flexible and it didn't give, and the wall developed no cracks as I drilled the washers in, though that's what you might expect if the keys where pressing against the lath.

Second, that up at the crucial corner the plaster wouldn't move in hardly at all.  At this point I did have cracking before and the washers caused more yet.  It wasn't salvageable.  So I pulled some goodish-sized chunks of it out, and saw-- And saw that up there the lath sits at the most an 1/8"back from the room face of the wood casing.  Seriously.  I poked the lath and it's in there solid.  It has no place to go.  Around that area the plaster thickness ranges from 3/8" to 1", and it's no wonder the door trim needed some fudging before!  It's going to need some fudging again when it's time to fill in the holes--but I'll describe that when I get to it.

But what did this mean?  That maybe the plaster at the top of the wall is thicker and the old wallpaper concealed the problem?  No idea.  The plaster I'd treated seemed well-secured enough, and I let it go because I was out of washers anyway.

Well, now.  Give it a few days for the adhesive to try and for me to take care of other business.  So Monday night I'm up there on the ladder snugging up the areas above the doorway and on the lefthand side.

And what's this?  In these places, where the bulge wasn't as bad, the plaster moved in a good 3/8" or more, with a soft, subdued, stomach-squeezing whhummphh!   What the dickens?  Why did that pull in but not the worse area to the right?  Was there something wrong with my drill bit, and did I not drill the holes deeply enough on the right-hand side?  Did the whole wall actually need    to be done?  After all this labor and material, was I still at risk of it failing and falling down?

Not to mention that where I power-screwed the anchors in too hard, the plaster just crumbled.  But the surface of the wall looks fine!  What's up with this?

Oh, fudge.  Aggrieved, aggravation, frustrated, crabby.  Last night I tried the conditioner and adhesive in a few more places on the upper righthand part of the wall, trying to pull that bulge in a little farther.  Drill penetrated more than an inch, inch and an eighth even, but the pull-in when I tightened the washers was a fraction of that.  Maybe the plaster is extra-thick at the top of the wall.  Or maybe the big hairy plaster/lath gap is there-- full of keys cushioned by all the Big Wally's I pumped in.  However it is, I can't do anything more to true it up-- and no, demolition and drywall is not an option.

This is not what I had in mind nearly five years ago.  I'm holding my breath that a lot of joint compound and the new wallpaper will disguise the mess.  I even have visions that the wallpaper will end up holding the wall together.  But I have no call to throw rocks-- or chunks of plaster-- at my fudging previous owners.  It's a pot we're all in together.

Sunday, October 23, 2011

Sometimes It's Good to Be Wrong

Tackled the attic insulation removal this afternoon and evening.  The process disabused me of a few false notions.

Starting at the back end, literally:  The knob and tube wiring I discovered yesterday is disconnected; it isn't live.  The receptacle I thought it served is wired up with standard white three-wire cable.  Nice not to have to be concerned about that.

(Incidentally, there's also a long disconnected strand of yellow three-wire cable [sorry, I should be able to remember the gauges of these things-- yellow is 12 gauge?  Or 14?  Oh, never mind!) on the back side of the knee wall; I uncovered it when I took a piece of cardboard tacked to the studs down, and happily, it's not live, either.  I think my electrician must've put that in; why didn't I have him connect it up?  I certainly could use another outlet under my work table!)

I was also wrong in thinking there was a lot of loose-fill rock wool between the batt insulation and the underside of the sheathing.  No, there was rock wool in there at one time; I could see little tufts of it stuck to the rafters and sheathing planks here and there.  But for the most part, it was gone.  So I didn't have to endure clouds of rock wool tumbling down on my head, as I'd anticipated.  True, I was encased in a hooded Tyvek coverall suit with attached booties, my face armored with an P100 anti-mold particle mask and goggles with no vents, but I hadn't fancied the prospect, all the same.

And I was wrong in thinking my roof is structured with 2x4 rafters.  No, they're 2x6s, or 1-5/8 x 5-3/4, to be exact.  The foam insulation guy was calculating on spraying on six inches, covering rafters and all, to get me to an R-value of 24, at least.  Not sure how this development will affect things.  Technically it could mean they could spray on eight inches or more, and maybe get me to the R-38 that's recommended for attics these day.  But that'd up the price beyond the just-barely-manageable figure I have from him now.

What else was I wrong about?  I was wrong in thinking that the black I was seeing on the back face of the kraft paper vapor barrior was mold.  Ha, silly me, that paper is black on the back side!  And, examining the insulation itself more closely, it's possible that the dark stuff I saw in the pink was only dirt, and not mold at all.  At least, it didn't look growy, just like dust.

Does that mean I was wrong about the whole project?  Not at all.  The batts were definitely damp that day in mid-September, and dirt is a classic place for mold to lodge in fiberglass insulation.  And with the facing paper hanging in tatters in so many places, the vapor barrier was grossly compromised.  I would rather not spend the money on this at this time, but it'll be money well-spent.

I was wrong in thinking the batts were held up solely by the lath battens that ran horizontally from rafter to rafter.  Yes, they gave some support, but mostly the pink stuff stayed put by means of staples-- lots of staples-- driven though the kraft paper wings into the rafters.  So I didn't have that stuff falling down on me, either.  Very glad to be wrong in this case.  And I was wrong in planning to roll up each batt in a piece of .5 mil plastic before I put it into the 55 gallon black bag.  I tried it once, on the first piece I took down, and the plastic got woefully out of control and simply would not stay put.  So I gave up on it and just rolled the batts in on themselves, taped them with cheap masking tape, and stuffed them in the bags.

Speaking of the bags, it's good that the insulation guy was wrong in predicting I'd end up with thirty bags of the stuff.  Nope.  Four bags of insulation and one of cardboard, small pieces of batten, and dirty dropcloths.

I've mentioned the cardboard.  It appears I was wrong in thinking that it was a pis aller employed by my POs-1 (who were, I believe, the ones who installed the pink insulation) to cover the gaps at the toe of the batts.  In the first place, the batts ran all the way down below the floor level, into the soffit space.  In the second place, it was abundantly evident that that cardboard dated from way, way before than my previous owners two back.  The cardboard lining the brick gable wall on the north end was clearly installed before the wood floor.   It was wedged between the floorboards and the brick and I had to cut it out with a utility knife. Whether it dates from the time the house was built in 1915 or so, or whether it was put in to protect the wall when the attic was finished later, I don't know.  I'm pretty sure that the room I use as my study wasn't original, as the 1916 tax assessment only lists three bedrooms.  But I saw at least one place where cardboard was used as shimming between structural members, so it's entirely possible that the house was built with a wholly-floored attic, with exposed rafters and the stairs leading up to it, and the knee walls and plaster came later.  I estimate that the room was done fairly early; pre-WWII, at least, since the trim matches what's downstairs (sans cornices) and the woodwork was originally shellacked, like the rest of the house.

Found something else curious, deeper in towards the front of the house:  There are three or four bays where the tongue-and-groove flooring doesn't go almost to the toe of the rafters, but there are wide planks of removable joinery notched in between the rafters instead.  I didn't lift any of them out the whole way, but when I shifted them I saw galvanized metal below.  Duct work?  A cold air return?  From where?  I think this would be over my dressing room, but the location is all wrong.  This really looks original.  What can it be?  Those planks will be immovable once the foam is in; will that matter?

In fact, speaking of the cardboard again, I found vestiges of heavy cardboard nailed to the underside of the rafters (which I found about impossible to remove, by the way), and I strongly suspect it was used to contain the rock wool that used to be in the roof.

On the back faces of some of this cardboard I saw evidence of water marking.  But it was dry now and I can only hope that that was from earlier leakage, like that which moved the POs-1 to remove the slate roof and put up fiberglass shingles.  (I found a piece of a slate at the eaves!).  There was also some water staining on the floor near the stub of the old kitchen chimney.  I don't say I won't give that a good scrubbing with borax, but it was dry, too.  In fact, the whole space was dry, and in some cases, too dry.  I didn't like the way pieces of wood would flake off some structural members when I was brushing them clean after the insulation was down.  I'm thinking a nice coat of spray foam will protect them, yes?

There were some things I was wrong about that I don't find so gratifying.  The Tyvek suit was a success, overall (pun!), and getting one that fit me by ordering online was the right way to go.  But I wish I'd gotten the gloves with the longer arms to them.  The 12" cuff kind I got you'd think would be long enough.  But the sleeves of my sweatshirt kept pushing them down, and they would creep out from under the elastic cuff of the suit.  I did pretty well at keeping fiberglass itchies off my skin-- except for that half inch of so at my wrists.

And despite my trying to order goggles in a "women's" size, they were still too big and conflicted with the particulate mask.  Great goggles, great mask, but my head simply isn't that big.  The two pieces of equipment got in each other's way and prevented me from having a proper seal on either.  The goggles quickly fogged up so I was working half blind, and the mask didn't sit tightly, so stuff still got up my nose and made it run.  Every three batts or so I'd have to take off the mask and blow my nose, it was so bad.  I'm still rather stopped up now.

But getting the headlamp was a fine idea; really, the only way to go, even though it barely perched on what was left of my forehead.  From the packaging I'd expected the batteries to last only five hours, but they kept going a lot longer, and are still good now.

I mentioned the 55-gallon bags.  My bright idea of throwing them out the north window once they were filled didn't turn out quite as planned.  The first one rolled off the back porch roof quite easily, but the next one landed square in the middle of the roof and stayed there. And my attempts to use the second and third to dislodge it only succeeded in creating a logjam.  So there I was, at maybe 11:00 o'clock at night, out on my porch roof trying to shove these big black trash bags down into the yard.  Still in the Tyvek suit, which wasn't the cleverest thing I've done all evening.  The booties on it give no traction whatever, so walking on the shingles was out of the question.  I had to lie on my side and kind of slither down till I could put a foot to the bags and send them over.  Of course they wouldn't go the with the first kick, and I had to creep lower and lower towards the eaves, hoping to gracious that any momentum I gave the bags wouldn't carry me over with them.  "Wrong" wouldn't've half described that!

They finally teetered on the edge of the gutter and rolled down, taking their sweet time about it.  Meanwhile, I saw that my thirteen-year-old calico cat had taken advantage of the open window from the guest bedroom to hop out onto the roof and do a little exploring of her own.  Happily, I had no compulsion to go lunging after her.  I slithered back up the way I came and called her to me once I was back on the sill.  She came, but changed her mind at the last moment and veered off.  Too bad, my girl! and I picked her up by the scruff of her neck and hauled her safely in. 

One last happy example of my being wrong:  It only took about three and a half hours to get the insulation down, rolled, bagged, and out the window.  It took the other three and a half hours to brush down the rafters and sheathing, remove stray pieces of rock wool, and clean up the floor.  One push-broom and three vacuum cleaners that took!  I think the hose of my shop vac is almost shot, which doesn't help.

Is the job done?  Well, almost.  I found there's rock wool in the soffit space, and I haven't removed it, since I'm not sure how that'll interface with the spray foam.  I want that area insulated, but somehow I don't see filling that whole space with the icynene.  I mean, won't that drive up the price, and what if I do get a chance to remove the aluminum exterior trim and the wood board underneath needs replaced?  On the other hand, does the foam have to run all the way to the gutter to prevent ice dams?  I may have to cut 1x boards and run the floor all the way to where the roof comes down.  Job for the portable circular saw, I expect.

I have the same question about the rock wool in the far southeast corner behind the lefthand closet.  There's a little triangle of space with insulation blown into it; will they foam that, or do I need to create a barrier to separate the two?

There should be no question about the old birds' nest materials in the northeast corner behind the old chimney.  It's got to go.  But somehow I didn't want to remove it out tonight.  Don't know why.  May have something to do with the kink in my shop vac house.  Maybe I want to see if there are any ornithological specimens in the mess.  But I'd rather deal with it in the daytime.

All cleaned up, barring the camera lens
Just sitting here typing this, I can feel that the room is colder than usual.  Even failing, that batt insulation did a reasonable job keeping the 3rd story warm.  Here's to the spray foam doing the job even better.

Monday, September 5, 2011

A Bird in a Guilted Cage

I confess it:  When I moved into the Sow's Ear eight years ago, I painted over the wallpaper on the 3rd floor.  Lately, I've been excusing myself by saying that I had to get my home study set up as soon as possible so I could hit the ground running on my new pastor's job.  But the fact is that though I moved in in mid-September, it was more like late October before I got it all finished and the furniture and books were fully arranged.  I had plenty of time to remove the wallpaper, if I'd been so inclined.  But I wasn't.

So it's eight years later.  And I've been working away (off and on) since the middle of August patching, mending, readhering the ceiling plaster up there.  Finally, about a week ago, I gave it a good look and declared the job done.  Time the get out the primer.

Except for one thing.

At the south end of my study is a window, and on either side of the window are two closets, their doors perpendicular to the window wall.  When you look inside the closets, you see that their other walls are painted wood plank.  On the room side, each of these walls has a built-in bookcase to the height of about four feet, and above these is a triangle of drywall.

These triangles of drywall had wallpaper on them when I moved in, and I painted them-- I painted over them-- to match the ceiling.  The bit above the righthand bookcase looked all right.  But the one to the left was a bubbly mess.  It's been hiding behind my reference books for years, but now, here it was, staring me in the face and laughing at me.

Should I just repaint, put back the books, and go on ignoring it?  Did I have to strip the wallpaper on that portion?  Or could I just open up one or two of the bigger bubbles and fill them with joint compound?  I blush to admit that that's what I did.

But the nagging guilt wouldn't go away.  It looked so awful, the paper must've been like that before, and I'd painted over it!  And in the angle where the wall meets the sloped ceiling, the paint-stiffened paper curled distortedly, as if whoever hung it had thought to paper the ceiling, too, and at the last minute changed his mind.  Was I going to let this abomination remain?  Was I going to connive at this transgression of every rule of home renovation?

For a few days-- mea culpa!-- I was.  But last Friday I knew I was trapped.  I got out the Paper Tiger, the spray bottle of vinegar and hot water, and the 5-in-1, and had at it.  For my sins, that paper was nasty hard to remove.  Took several applications and a lot of time to get it all.

I found out why the wallpaper was so ineptly applied at the top.  It had nothing to adhere to.  There was a gap ranging from an eighth to a good half of an inch between the wall and the ceiling, and nobody had bothered to tape it, they'd just filled the joint the best they could with caulk (now hard and crumbling) and covered it with the wallpaper.

Huh.  I discovered the same lame technique when I painted my kitchen in 2004.  Bought some drywall tape to take care of the problem then; maybe the rest of it was down in my workshop.

Couldn't find it anywhere.  So I tried to make do with a length of foam backer bead stuffed in and covered over with spackle.

Nope, that didn't make it.  So this morning I was on for yet another trip to Lowe's, to get a new roll of paper drywall tape.  It's on now, it's bedded, and we'll see how much fiddling it's going to take me to get it properly mudded.  I bought a corner trowel once, but decided I'd never use it, and took it back.  Ha.  If only.

Nevertheless, the now-paperless wall looks so much cleaner and freer and better than it did before.  Te absolvo. 

Does this mean I'm going to be thoroughly virtuous and remove the rest of the painted wallpaper before I recoat it?

NO.

Wednesday, August 17, 2011

Two Steps Forward, One Step Back

Or is that "one step forward, two steps back"?

No priming got done in the 3rd floor Study today, and none will till sometime on Friday.

Or not.

It's not so much that I've gotten perfectionistic about the ceiling patches I've been working on.  It's true that I've wet sanded and reapplied at least two more coats of spackle today, but that's because in the stark light of day I was able to see a lot of irregularities I missed last night.

No, something else is causing the slowdown.

Ever since the Great Plaster Disaster of 2007-2009, I've had the nervous habit of pushing on the sloped plaster ceiling of my Study wherever I notice a hairline crack.  I've had enough of crashing plaster for one house, and while I enjoy the pillowy, organic effect of my 3rd floor ceiling, I need to know, and know right away, if any curve or bow actually means key failure and imminent doom.

Enlarge to see cracks.  Sort of.
So I push, and I wonder, "Did that give, or was that just my fingers flexing?"  Worrywart!  It's just the fingers.  But early this afternoon, I was going round with the wet sponges smoothing out the spackle I applied last night, and there, towards the bottom of the ceiling slope on the northwestern side of the room, I saw a horizontal crack I hadn't noticed before.  Actually, it looked like some previous owner had used paper tape for a repair, and it'd picked now to begin to come loose.  Should I peel it and see what happens?  No!!  Give it the push test.

Oh, dear.  That gave.  That plaster definitely gave.

All right, I know what to do.  Time to call in Big Wally.

Downstairs I go.  Plastic dropcloths from the back porch.  Painter's tape and the unopened box of PlasterMagic adhesive from the living room.  Drill, drill bit, caulking gun, Big Wally's conditioner and anchors (with screws) from the basement workshop.

But wait a minute.  Where was the 3/16" masonry bit?  It should be in the top drawer next to the workbench.  And where, o where did I put the rest of my Big Wally's supplies?

Eventually I found the latter in their box underneath the workbench, safely out of the way.  But I could not find that drill bit anywhere.

O well.  I needed to go to Home Depot anyway to exchange that 10' length of copper tubing (that's another story).  So off I went, and while standing in the tool aisle consulting with the clerk, I realized that, Idiot! I'd been suffering from some sort of brain glitch and visualizing a three-eighths inch bit when I'd searched that drawer.  My 3/16" bit had been in plain sight all along.

No matter.  It was probably dull anyway.  It certainly is dirty.  And there was that copper to take care of.

Once I got home, I had the target area of the Study ceiling drilled and conditioned in good time (something to do while the oven was preheating for my supper pizza).  Earlier, I'd been happy to find one full tube and one partial tube of Big Wally's adhesive in the box under the workbench, the latter still in the spare caulking gun.  When it came time to inject it into the holes, I gave the handle a good hard squeeze to clear out the dried stuff from the tip, asking myself, "I wonder if this adhesive is still good and liquid?"


Gray smudges are on the camera lens, alas!
Whoop!!*  Yes, judging from what ended up spattered around the wall and on the file cabinet, it was.  That's when I realized that the bucket of water and the sponge needed to be brought back upstairs.

But that didn't take long to clean up, and I had the adhesive injected and the anchors screwed in in time for me to go down and eat my pizza.  And for my boikitteh Huw to get the oven door fully open and steal a piece, but that's another another story.

Got the repairs done a little before 6:00, which, if I gave the adhesive the minimum twenty-four hours to cure (directions say 24 to 48), would mean I could remove the anchors tomorrow evening, spackle over the holes, and maybe prime on Friday.

But now that looks doubtful, doubtful indeed.  For later this evening, I was doing the push test again.  And even though I indulged in what surely is overkill in the spacing of my holes and anchors, I was still detecting some give.  And then I let my nosy fingers range to the left, especially around another, vertical, hairline crack.  Push, push.  Oh, dear.  Let's put the drill bit back in and check.  Oh, dear, oh, dear.   That bit was going in way too far.  In a lot of places.  Definitely some significant plaster-lath separation along that crack, and in the field between it and my earlier repair.

It's treated now, and the only thing flexing in the push test is my fingers.  But the earliest I could think of taking out the anchors would be sometime Friday morning.  And the way spackle tends to sink in holes, that'll mean at least two applications to get them smoothly filled.  So Saturday, maybe, at the earliest, to be thinking about primer?

I can always amuse myself teaching myself how to sweat copper pipe in the meantime.
________________________
*Not the word I actually used.