Showing posts with label products. Show all posts

Saturday, February 2, 2013

The Clock Is Ticking

As it turned out, I did use the orbital sander to knock down the bubbly, lappy coat of rolled-on acrylic finish on my stairhall faux tile floor.

After having at it with the Bosch half-sheet orbital sander

Hilarious irony:  In the process the inevitable nubbins and high ribbons of paint got levelled down and eh voilĂ !  again is revealed the yellow-buff color under the brown.  Which I spent three days on my knees a week and a half ago concealing.

Yellow streaks and flecks after sanding


This time I wasn't so dedicated with the touch-up brush.  My sanity can take only so much.  Dotted over the really bad places and let the rest go.  The floor almost never gets direct sunlight, and what wattage bulb do I have in my ceiling pendant?  60, maybe?  All right, then.

Using the roller the other day pretty well cleaned me out of Polycrilic finish.  Got one complete coat out of the can on Wednesday, brushing it on with the 2" sponge brush, but you could still see the bubbles and uneveness of the rolled coat.

Just after midnight, Thursday the 31st

Another coat was mandatory, but only a few drips remained in the can.  Sailed into Home Depot just before closing Thursday night and picked me up a second can, nervously venting to the paint guy the whole time.. Nice having him tell me in the nicest possible way that the finish is likely to start peeling in a couple of years . .  .  But so does polyurethane.  (Long live shellac!)

So!  Late Friday night I get to it.  I get to it, I brush on another coat, and guess what?  Guess, guess!  Tell me, what did I notice after I'd used up the first can and gotten a few rows into the second one?

 That's right, I was so busy running my mouth Thursday night at HD that I neglected to check the can I bought to see what gloss it was.  I didn't even think of checking what gloss it was.  So the area at the foot of the stairs was satin, and the expanding area in front of the doorway was semi-gloss.

Oh, yeah.

Nothing I could do.  I couldn't take the stuff back. My paint brush had been in the can.  Sticking the semigloss on the shelf and buying another can of satin sheen wasn't an option--I can't be wasting money on supplies I don't use, just to cater to my perfectionist urges.  The whole thing was going to be semigloss instead of satin and I was just going to have to like it.

Coat No. 5 (dual sheens), early Saturday morning
  Late this evening I brushed on the all-semigloss coat.  The one-and-only, by golly.  This makes what?  six coats?  That.  Is.  Enough.

Last coat of acrylic, this evening.  The unevenness doesn't come up in the photo
 Enough, even though I can already tell the application and shine are not uniform.  Well, I'm sorry, but if it's my technique that's at fault, laying down a seventh coat isn't going to mend matters, especially after another sanding.  Try as I might, I wouldn't be able to apply it any differently.   What's done is done.

(Thinking again how much I like how shellac goes on . . . )


But I resolved before I started this phase of the floor project that I'd give the finish at least a week to cure before I took down the baby gates and allowed the dog (and me in street shoes) onto the surface.  All right, then.   The clock is officially ticking.   I'll continue to tiptoe over it till then.  I've got enough to do with the quarterround in the living room, anyway.

Though prior to removing the barriers I may apply a coat or two of clear floor wax to even things out.  Historically, didn't they wax those Victorian tile floors to give them some shine?  All right, then.

Monday, January 28, 2013

Disaster, Tragedy, and Woe

Well, more or less.

First a photo of what makes it a tragedy.

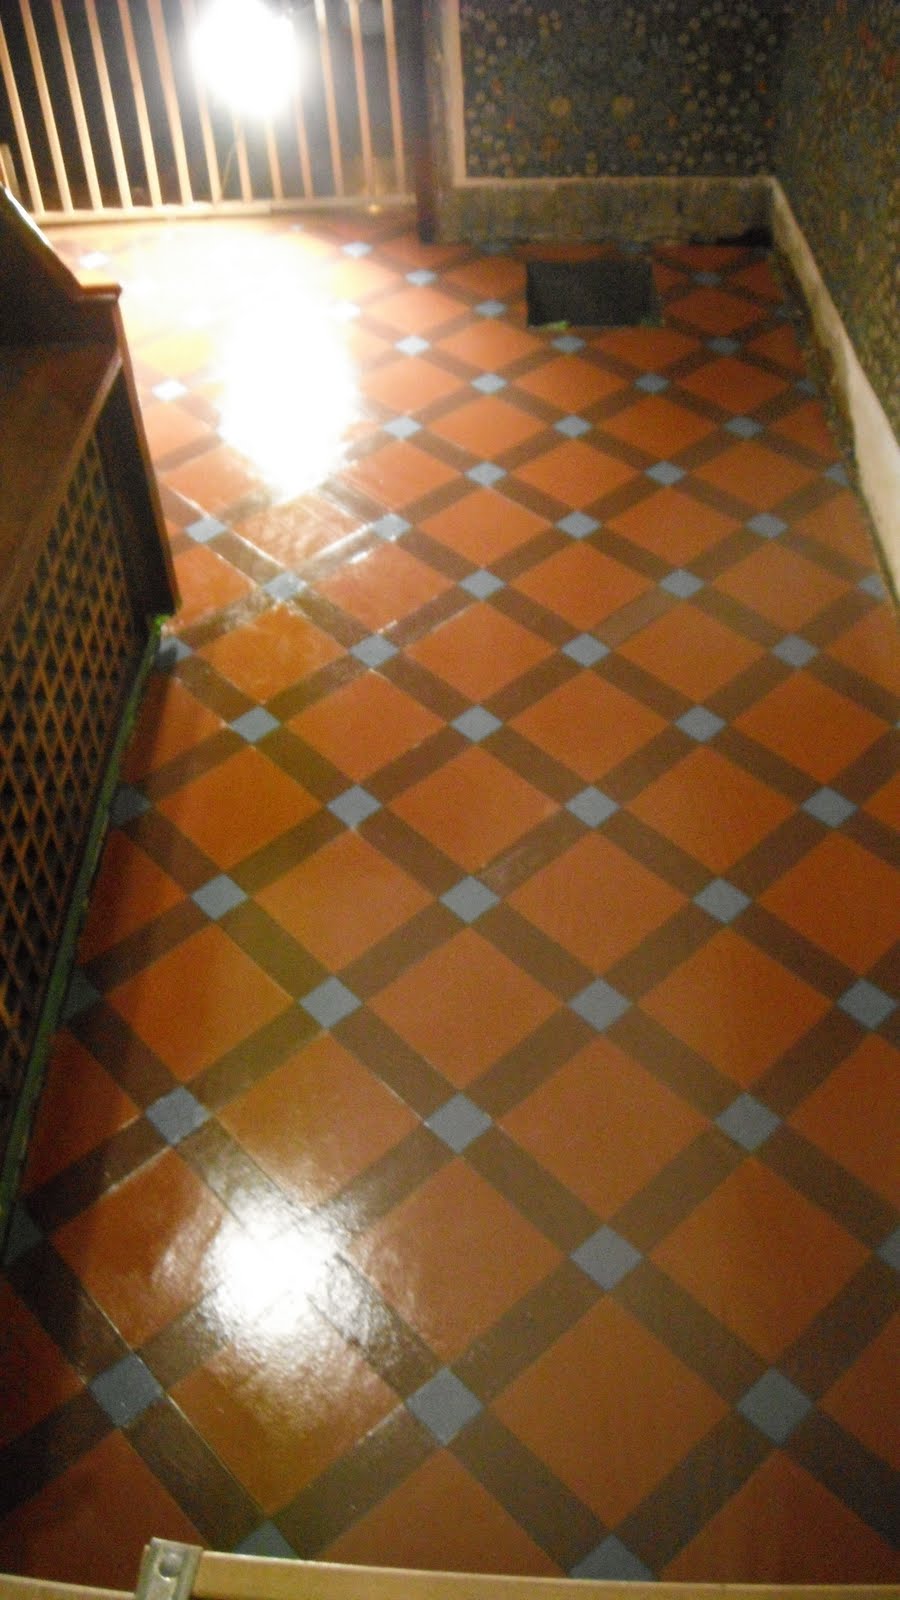
. . . Well, good grief, looks like I neglected to take a picture of how my 1st floor hallway floor looked once all the painting and touchup was done.  Guess I was too heartily sick of the effort to  think of it.  Suffice it to say that by the afternoon of the 21st I finished getting the second coat of the brown color (Lowe's Porch & Floor Latex Satin, tinted to match Pratt & Lambert's "Brandywine" tone) onto the 2x6 fake tile shapes on the floor of my 1st floor stairhall. The yellow/buff attempt was covered, and the too-bright "Hot Pepper" tone on the 6x6s was supplanted by the more-appropriate "Barn Red."


It looked pretty good.  It looked even better that night when I peeled off the striping tape and revealed the "Slate Gray" ersatz joints.


(Got a cute squeeze ball out of it.)


Only thing is, in some very obvious places the brown didn't wholly cover the yellow. In fact, the yellow had seeped under the tape in several places, so I couldn't expect the brown to cover it.  To be frank, the red-orange and the blue had seeped here and there too, despite my best efforts to burnish the masking tape down, but they weren't so glaringly noticeable as the yellow.  The daylight of  Tuesday morning revealed that the yellow was showing a lot more than I'd thought.  The brown "tiles" had a nice build up in comparison to the "joints" which gave a nice, realistic effect.  But you could often see the yellow under the brown along the edge when the light hit it the right way, especially towards the front room end where there were two coats of the lighter color.


Thus ensued three, yea, four gruelling days of creeping along on my hands and knees with gray paint on a fine detail brush trying to cover all that yellow, trying to get a hair or two of the brush just to catch that thin but maddeningly visible edge peeking out along my nice gray joint, repeatedly thinking I'd got it all and what I still saw was just highlights and shine, and repeatedly having to go back and try again once the sunlight or the illumination from the ceiling fixture fell upon it.  In all, picking up spilled salt with one's eyelashes would have been preferable.

 By Friday the 25th the yellow wasn't completely covered, but the effect was good enough considering normal lighting conditions.  So I began applying my clear sealer topcoat.  Since I was using floor paint, you'd think four coats total over primer would be enough to stand up to normal use.  But I've used fhe same product in the basement, and after a year or two it does begin to wear.  I've put too much work into this paint job not to give it some protection.  Due to its non-yellowing properties (I don't want my blue squares turning green) and going on the advice of the paint counter guy at Home Depot and following the example of Jayne over at The Kelly House, I went with the Minwax Polycrylic finish.  I wanted a bit of texture to it; maybe I should say, a bit more texture added to what I'd already rolled and stippled on, so that night I applied the first coat using a four-inch long, 1/8" nap mini-roller.

Meh.  Didn't work.  The roller didn't hold enough of the liquid so it dried too fast.  Rolling it back and forth left visible tracks and they didn't level out.  Carp. 

So on Saturday after hand-scuffing it with 220-grit sandpaper,  I said, "Oh, all right," and used a brush, like Jayne did.  A good-quality, synthetic one, like the can recommended.  Focussed on getting the stuff down and not overworking it.

Well, the mini-roller tracks were no longer obvious, but I'd missed several places.  "Holidays," real painters call them.  So I went online to see what the forums said about rectifying holidays in a Minwax Polycrylic finish.

Oh, crumb.  Carpity carp.  Found a site that addressed the problem, but it was referring to furniture finishing.  All the forums were uniform in declaring that Minwax Polycrylic is not recommended for floors.  Including the Minwax website.  And the back of the Polycrilic can.  But what are we supposed to do if we don't want our painted finishes to turn yellow?  There's really nothing else out there that'll dry clear.  So I guess we're stuck.

Maneuvered over to a YouTube video where somebody had done a tromp d'oeil painted wood floor and coated it over with six (count 'em, six!) coats of clear acrylic.  And another one where a professional floor finisher was using the product to redo a wood floor.  He was using a paint roller on a pole.  It appeared that he was getting good, even coverage without premature drying or lap marks.  Hey, it might be a good idea for the next coat.  And it would have to be a whole next coat, because not only did I have holidays, I had brush marks as well.

So on Sunday I put my roller and pole together and went to work.  Aaaaggghhhh!!!!  Lacymosa, dies illa!!  It left lap marks.  Baaaaaaad ones.  They showed up white even after the finish had dried.  And even though I tried to be careful and not push it, the nap on the roller left bubbles all over my beautiful painted floor!


Lord, don't let me cuss.   Though I really, really want to.  I really, really, really want--!!

I don't know.  It looks so bad.  All that work, to come to this.  I don't see being able to hand sand that out.  I'm considering using the orbital sander.  Which might rip up the whole paint job, even with 220-grit paper on it.  Whatever happens, it'll need another coat of the Polycrilic afterwards.  This time I think I'll do what I should have done in the first place:  Lay the finish on with a sponge brush and apply it to the "tiles" individually.  And do it very, very, very gently.

Though gentle is not at all how I'm feeling right now.  Aaaaaaagggggghhhhhh!!!!  Disaster!  Tragedy!  Woe!!!!!

Tuesday, July 31, 2012

Scraping Along

Midmorning today I was glaring at the old dried-up vinyl flooring glue around the perimeter of my stairhall floor, and decided, oh, phooey, I've got the stuff, I'd give the radically-misnamed "EasyRelease" adhesive remover another shot.

Only this time I really disobeyed the instructions.  This time I mixed it with water one-to-one.  Thanks to that, or maybe because yesterday's application had some residual effect, this time it worked.

Not until after two hours of soaking with periodic reapplications, and not without a good three or four hours of scraping.  But at least today the scraping yielding results with less wasted effort and frustration than yesterday.

Didn't bother to sequester the kittens today.  Barricaded the wet strip with a very wide baby/pet gate a friend let me have when she moved.  But they got a whiff of the chemical and made themselves scarce.  But once I started working I barely prevented my going-on-14 calico from jumping down into the open heat register to explore the ductwork.  Oh, no, you don't!  Outside with you!  The dog, however, was content to watch from the front room. 

Started with the west wall.  Didn't start spraying the bit at the foot of the hallway bench on the east side until I started scraping the first application.  I was thinking maybe it might help to keep the work area wet.

Maybe it did.  At least, I got the result I wanted-- the old adhesive off the floor.  I also got a few gouges in the plywood, but the filler material will deal with that.  At this moment, I Do Not Care.

Monday, July 30, 2012

What You Callin' 'Easy'?

Remover applied
I've always wanted ceramic tile in my 1st floor hall.  Had it all picked out.  I'd doodle my tile job detail during choir practice--underlayment, Ditra, thinset, tile, and all.  Then late last winter I got the depressing news:  A trustworthy tile pro informed me I shouldn't do it unless I tore the whole floor out and sunk a new one between the joists.  For even if I reinforced the springy place in the existing floor I'd still be out of Code with a too-shallow bottom  step.  Feasible, but pricey.

Frankly, I'm out of Code already, thanks to the ½" plywood my previous owners two back slapped down to underlay the ever-so-(un)attractive sheet vinyl they chose.  The bottom riser is that much shorter than the rest even now, and it doesn't bother me.  Would another half inch or so of tile, etc., matter that much?

Test for riser comfort/safety
Late in May I bought one of my chosen tiles at the Big Orange Store, set it on the floor at the bottom of the stairs with some thick cardboard under it to simulate the setting materials, and walked down the stairs a few times.  No.  Ow.  Yep, it would matter.  "Watch that bottom step, Ethel, it's a doozy."

Well, maybe I could pry up the plywood and make something out of the original tongue and groove floor beneath. 

It was no go.  I think the POs-1 didn't merely nail it, they glued it down as well.  And I wasn't up to getting down with the circular saw and cutting it up into little puzzle pieces and heaving them up one by one.  No telling what that'd do to the T&G.  And there'd still be the dried adhesive to deal with.  Hmm, no.

Withal, I've decided, the only thing for it is to fill and sand the plywood (which is a decent, regular, knotless, interior grade) and paint it.  In a faux tile pattern that'll simulate the Gothic Revival tiles I always wanted.  But first, I have to get the vinyl adhesive residue off.

The product in question
Could be worse.  It's only around the perimeter of the L-shaped space and along the verges of the floor heating register.   I rejected trying to sand it off.  Chemical methods should be easier and more economical, I thought.  So I bought a bottle of Henry EasyRelease Adhesive Remover a few weeks ago, and today, I tried it.

Ohhhhhhh, my.  Easy release?  Not so much.  The label says to dilute it 4 to 1 with water, apply it to your dried, hardened glue, then wait one to two hours for the loosening action to work.  I sprayed on the first application around 2:30 PM and according to the instructions renewed it every so often (every twenty to thirty minutes) to keep it wet and working.

After two hours, I went at the (theoretically) softened glue with my 5-in-1.  No joy.  It barely made a dent.  Tried adding more adhesive remover to the bottle to make the mix more like 3 to 1.  Squirted it on and waited another hour or so, reapplying at intervals.

The ordeal begins
By this time it was nearly 5:30 PM.  Upstairs in my bedroom my two younger cats were sequestered behind the closed door, to keep them and their tender paws out of the adhesive remover.  Neither of them was happy to be held captive, and might have been plotting all sorts of dire revenge in the form of poo in the shoes or smelly yellow puddles on the bed.  They had to be sprung as soon as possible.  Meanwhile, the dog, exiled to the back porch, was leaping at the screen door and barking in protest at having to be outdoors without me.  (My oldest cat would stay outside all day and all night if I let her.)  Okay, kids, I'm working as fast as I can!  I went at the old glue again with the 5-in-1, a putty knife (useless) and the paint remover hook.   And went at it, and went at it, and went at it.

Done, barring the gunk hung up on the nailheads
I'm tired, I give up
The old glue started coming up, but it was hard work.  I kept at it steadily but by a few minutes before 8:00 I had less than half the ring of residue removed from the plywood, my knees were hurting, red, and swollen despite the pads I wore, and I was thoroughly fed up.  If this product brings up adhesive residue easily, I'm Mike Holmes' new forewoman.  I had to stop.  Rinsed the application sites with cold water per the directions, including the places I'd sprayed with remover but didn't/couldn't scrape, put everything away, and liberated the captive pets, indoors and out.  Thank goodness the kittens (five-year-old kittens) had controlled themselves.

Still to do, and only part of that


I'll try to get the rest tomorrow.  Pretty tired and disgusted now.  The sander might be an option after all.