Sunday, March 28, 2010

Et Voila!


No, I didn't have my surgery this past Thursday. More on that later.

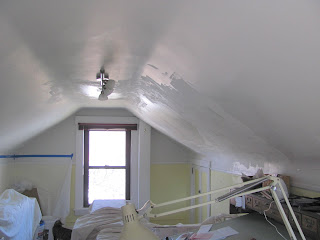
But a week ago Friday, the 19th, Joe Venn the plasterer did make his fourth and final visit to finish up the work on my 3rd floor Study ceiling. Things have been a little . . . distracted . . . around here, so it was only this afternoon that I got around to taking any After pictures.

Today's task was to sand the finish coat he applied on Wednesday, and touch the surfaces up with spackle wherever that might be needed. He nearly wasn't able to accomplish that, because I had to be out this morning and totally forgot to carry out the arrangements I'd made to let him in. Thank goodness he had some time after lunch to come back, since his bookings this past week would have prevented him from working on my job for who knows how long.

Anyway, here it is nine days later and I think it's pretty amazing to have a nice, smooth surface after months of staring at lath and broken keys. And damn! am I glad I didn't give in to the suggestions that I patch in a piece of drywall and skim coat it over. Would have been asking for trouble, since there's no way the materials would have worked well together over time. I'd forever be reminded of where the patched places were.

Not that there won't be any stress cracks in the new plaster. Joe said that would be normal, as it cures. Any that appear, I can skim on a little joint compound and sand it down, before painting.
One thing he was very emphatic about, is that I should prime the new plaster at any cracks, before I apply the compound. I told him that made sense to me. Otherwise, the bare plaster will leach all the water out of the patching material and hey, presto! there's your crack again. If it's primed with BINS or Zinsser or something like that, you won't have that problem. Yeah, he said, but I'd be surprised at how many clients of his don't believe that and think they can leave out that step.

I was very gratified to have him tell me I need to wait at least a month for the new plaster to cure before I can even think of painting it. Oh, good, that means I don't have to feel guilty for being physically incapable of doing that while I'm recuperating. I can look at the filled-in places and say, "That plaster is curing. It's Not Time to paint it yet."

It's definitely been curing the past week or two. A sharp, fizzy smell, that gets up your nose. Nice, that the weather hasn't been too chilly, and I could keep the Study windows open.

I think Joe did a good job. Maybe I could have done as well . . . if I practiced for five or ten years. The money was well-spent. So if anyone in the area northwest of Pittsburgh needs a plasterer, leave me a comment and I can put you in touch. Or just look up "Venn Plastering" in the Yellow Pages.

But . . . as I intimated above, my surgery was postponed. Because in all the errand-running and cleaning and preaching and concert-singing and staying up way too late I engaged in the end of last week and the beginning of the week just past, I managed to pick up the local cold. And a runny, drippy, sodden, snowplow-run-over-your-body-achy cold it proved to be, too. I called the surgeon's office last Wednesday morning to get their advice and the nurse said No, they weren't operating on me like that. The stupid tumor's got to come out, but it isn't that urgent.

And the reason it slipped my mind to make sure Joe the Plasterer could get in the morning of the 19th? Oh, that was a little matter of a followup ultrasound I had to go get because the CT scan from the previous Monday had revealed a suspicious "indeterminate lesion" on my liver. Thank God, thank God, the sonogram showed it to be a benign cyst.

But you can see why "distracted" has been the operative term!

Tuesday, March 16, 2010

Calling in the Reinforcements


Well, I said I was going to do it, and I did.


I hired a plasterer instead of redoing my DIY Drama disaster study ceiling myself.


Joe the Plasterer got started yesterday morning around 9:00 o'clock before I went off to the local hospital for a CT scan (please, God, could it please reveal that my tumor is benign!). By the time I returned a bit after 11:00, he'd chipped the rotten plaster off the flat part of the ceiling and pulled off the pieces I'd reaffixed crookedly to the sloping part over the stairs. The new metal lath was almost all up in both places, and it was time for him to mix up the perlite-enhanced gypsum plaster for the brown coat.

I came up and watched him for a time while he was putting that on. Funny, to me, to see plaster without hair, but the perlite performs the same function.

Having a noontime lunch appointment, I left Joe at the house to finish. When I returned around 2:30, he was gone and the brown coat was finished.

Last night, I got up there with my razor blade scraper and sliced off the glue nubs left from the Big Wally's plaster anchors. And scraped off some more of the loose latex paint.

Joe was back this morning and put on the first finish coat. Damn. It looks nice already.


And he put a finish coat on the places where I'd done my PlasterMagic work, yay! Hadn't expected him to; I have a whole bucket of joint compound and I'd hoped to get to that myself before he came.

He's to return tomorrow to apply a second finish coat, since today's will shrink a bit. Then again on Friday to sand it and do any final finishing.

I told Joe about the blog. "If I don't like a contractor's work, I give them a fake name. If I think they did a great job, I give their real name, if they like, and how to contact them. Free advertising."

He keeps this up, he gets the real name treatment. And yes, his given name really is Joe.

Monday, March 15, 2010

Bits and Pieces

I'm making haste slowly on the 2nd floor hall crack filling, piece by piece, bit by bit.

The other day I tried scoring the thin filler strips with a utility knife to split them in half lengthwise. Uh, no. Wood grain is wood grain and it splits where it will. But a scrap wood board set next to the table saw fence allowed me to cut the strips in two, as long as I started them from one end and finished them from the other, to keep my fingers away from the blade. And yes, I use that plastic guard thing that came with the saw.

The first thing is to clean out the cracks. I tried using a dental tool first, but soon found that the angle of an ordinary five-in-one tool works the best. Scrape, scrape, scrape, vacuum, vacuum, vacuum. Scrape some more, vacuum some more. Until finally I can see the surface of the floorboard's tongue.

Then I look over the different widths of filler strip I have and figure out which size will work best. Cut the right length using the hacksaw in the mitre box, spread on the glue, fit the strip in the crack, then tap it in with the rubber mallet.

Or not, if I've miscalculated the fit. Then I have to pry the piece out, wipe it off with a wet rag, then use the plane to remove whatever I need to. Or maybe that's time to select a different size.

Then I take the next smaller size, cut it to the right length, and do it all over again. And again, until the crack is too narrow to accept anymore wood strip. I'm trying to butt the pieces closely but not too snugly end to end with each other. If you don't look at it too closely . . .


It's fiddly work, but I think the final effect will be very pleasing. I made some good progress Friday night, and even more last night and early this morning. What hampers me the most is the cramped conditions of my hall. What with miscellaneous tools (contained and loose), wood strips, glue, wet rags, vacuum cleaners and yards and yards of extension cords, it's hard to get at the gaps that need filled.

So each evening I do what I can, clean up the mess completely, go to bed, and start the process over the next day.

It's coming along.

Thursday, March 11, 2010

A Girl's Gotta Do What a Girl's Gotta Do. Well, Mostly

One salutary (Attention! Irony alert!) effect of facing possible cancer is that it focusses one's mind on what's important and on what one can let go. Including when it comes to floor renovations in a 2nd floor hall.

Would it be ideal if I could rip strips of old flooring as long as each individual crack and taper them perfectly to fit, end to end? Yes.

Is it essential that I rip strips of old flooring as long as each individual crack and taper them perfectly to fit, end to end? No.

Could I fill each crack with different widths of wood, depending on how big the gap is? Yes.

And once the floor is shellacked, is anyone going to notice that the strips aren't continuous-- other than me, that is? Not at all.

I have some old floorboards, handily nailed up as blocking around the doorway to my bedroom. So what's stopping me from slicing off what I need from there?

So Monday afternoon I pried one off and hied me and it down to the basement workshop and the table saw, where I cut a selection of filler strip widths. And did not to slice my fingers. And after I got home from choir practice, I nailed the now-slenderized floorboard-blocking back into place.

Tuesday evening I was very naughty. I took one of the wood strips, one that had come from the groove edge of the board, and determined that, once cut to length, it would be perfect for my widest gap, just outside the bathroom door. And it was, for about half its length. But then the crack narrowed and the piece wouldn't fit. I got out my grandfather's plane (which I'm sure needed sharpening) and went to work on it. And went to work on it. Around 8:15 PM I felt overwhelmingly frustrated and sleepy and decided to lie down on the bed for just a little rest. And, since it was cool in the house, why don't I just pull the quilt up over me?

You guessed it. I conked out and fell asleep. Until nearly 8:00 Wednesday morning. In my workclothes. With lights blazing upstairs and down. Poor dog didn't get his evening constitutional and nobody got fed.

Much as I hate losing the income, I was glad I didn't get called in to work that day. I wasn't looking forward to tackling that filler strip again, but it had to be done. Besides, I got nearly twelve hours of sleep. What was my excuse?

It took some more planing. And some sanding. And more than a little doing other things that did need to be done, like cleaning out part of the back garden. And finally, at nearly 2:00 AM last night-- ta-da! I fitted my first wood filler strip in a crack in my 2nd floor hall floor. Used Tite-Bond wood glue, and I'l leave it to dry 24 hours. The websites say to glue the piece only on one side, to allow for movement. I tried, but it didn't seem like enough. On my head be it.

But here it is. Looks real purty, don't it? That slight rise at the end is over one of the nails. It'll come level when I sand the floor.

I would have done more, but first I have to figure out the best way to split the 7/8" thick slices lenghwise. That'll give me more strips per board and keep my hall from feeling like a bed of nails while I'm waiting for the glue to dry.

Wednesday, March 10, 2010

Spring? Spring!


I had a lot to do inside today. But when I took my dog out this morning and felt how warm it was and saw everything that's coming up, I couldn't resist. I grabbed my pruners and rake and spent a good two hours or more cleaning up my back garden.

See what's poking up:

Tulips!


Spanish bluebells!


My maverick crocusses are in bloom!


The flowering quince is budding out! (Wonder how the fruit will be this year?)


And so is the Japanese daisy! (It got a haircut. And I brought some cut branches in and put them in water in the dining room window.)


The backyard daffodils were buried in last year's leaves . . .


. . . but a little raking soon took care of that. Poor things, they're all blanched. High time they saw the sun.


The Nikko Blue hydrangea is sporting fat red leaf buds (click the picture to embiggen). (I gave it a pruning, too.)


And of course my dog


And my cat


were out enjoying the day as well.


I tell myself that it will surely snow again before Spring comes for real this year. It always does. Nevertheless, the soil and its plants are tired of Winter, and regardless of its curtain calls, Spring is surely on the way.

Monday, March 8, 2010

Mind the Gap

Some people build castles in the air. I imagine I'm going to get a finish on my 2nd floor hall floor before I go into the hospital for surgery two weeks from now.

The old shellac finish and the random paint drips are off and the 3¼ x 7/8 tongue-and-groove yellow pine floorboards are (relatively) bare. No problem.

The next step hasn't been so easy. That's deciding what to do about the gaping cracks between the floorboards. Should I ignore them and say they're part of the house's history? Don't think so. With three cats and a dog, too much gunk gets into them. And sticks out of them. It's filthy. It's nasty underfoot. It looks horrible. In some places the loose tongue has broken off and there's an opening down into the floor-ceiling cavity. Can you just see shellac running down that "drain"? Uh-uh. Unfilled gaps are not an option.

Neither can I take the floorboards up and hammer them back in place correctly, as some websites urge. These boards are subfloor and finish floor in one, and they have an interesting habit of running under the partition walls and into adjacent rooms.

After some investigation, I've rejected commercial wood fillers. Nothing I read tells me they can bear up under floor use. Besides, I wanted something that'd match the existing yellow pine flooring.

The people at This Old House recommend filling the cracks with stained rope. Can you see me at Lowe's, standing there by the rope display, trying to figure out how long of each thickness I was going to need? And the mess of staining it! Besides, that looks better in early 19th century Colonial-type houses, not in 1910s kit-Craftsman foursquares like mine.

So up until recently, my filler of choice was to be sanding dust-- from the floor itself-- mixed in with wood glue. But I've been experimenting with it for the last year or two, using it to fill gouges and missing areas in the wood trim. And I'm not sure how it'll take stain. And oh, it's a bear to sand. It certainly seems to dry hard and inflexible. Some of my gaps are pretty wide. Would my homemade filler come popping out in the summertime?

So, maybe two or three months back, I went on the Internet and entered a search for wood floor crack filler. And someplace I came across a website for an historic house someplace in Virginia or Maryland; I think it was built by one of the framers of the Constitution. And it had a video of a workman plugging the gaps in one of the floors there with long narrow strips of matching wood.

That's the way to go, I thought. I even have the matching wood to use, since my POs-1 used leftover floorboards for blocking around their new openings when they remodelled in the '80s. Trouble is, my cracks aren't uniform in width. They taper from as much as 3/16" at the wide end to almost nothing at the narrow. How was I going to cut strips like that on my table saw? I don't even own a pushstick! And you're asking me to cut long whippy tapers? No thanks. I'd like to keep my fingers.

Then there's the roofing nails some PO toenailed into the gaps to keep the loose floorboards from lifting. I'd glimpsed those pieces of metal sticking up and hoped they were some sort of staple they'd used instead of proper squareheaded flooring nails. No such luck. And no, you can't countersink an angled roofing nail. How could I get wood filler strips to fit over them?

But something had to be done. Stay tuned for what that turned out to be.

Sunday, March 7, 2010

Preemptive Strike

Last summer the spider mites about did in my Alberta spruces. It didn't matter how often I blasted those tree-blood-sucking crawling web-building red dots off with the hose, they kept coming back. I bought some Bonide all-season horticultural oil, the kind that comes in the hose-ready bottle, but I couldn't get the mixing feature on the bottle to work.

And the mites kept on eating. The shrubs looked so brown and bad, especially the taller one, I was afraid at first to put my Christmas lights on them, lest they catch on fire. I went ahead and lit them up, but I had to wonder if that would be the last season I could. Bad as they looked, by next Christmas those Albertas could be gone.

It was a comparatively warm afternoon today, in the 50s, ideal for applying dormant oil. Recently I learned that spider mites actually do most of their chewing damage in the cool spring months, then, when the hot sun hits the stressed plant in the summer, it turns brown and you see those needles go dead. I didn't really want to go out and apply dormant oil once I got home from church; I wanted to take a nice nap. But who knows what the weather's going to do this coming week, and who knows if I'd be able to get to it again before I go into the hospital for my operation the end of this month. By the time I've recuperated enough to go out and deal with it in mid-May, the spider mites will be most of the way through their yearly feast. Bye-bye bushes!

Yeah, but that applicator bottle is not working!

Never mind. I have a garden sprayer and I could mix up the dormant oil and water in that and get it done.
But that garden sprayer isn't working, either!

Yes, it is. I just didn't connect all the parts right when I last used it two years ago. Mix up the dormant oil and go prevent some spidermite damage!

And I did. I sprayed both the little trees as thoroughly as I could, inside and out. It wasn't easy, since the needles are pretty dense on sides where the mites didn't eat them away last year. Hope it works. Those Alberta spruces make good anchors for what I'm trying to put together in my front border and I'd hate to lose them.

And About Time, Too

Yes, I know it's late. Or early. Whichever. But at about 11:45 last night I finally pulled myself away from the computer and got downstairs to finish stripping the 2nd floor hall.

Ran through the last of my current stock of Western Wood Doctor refinisher doing so: that's ok, I have more on order.

The floor as stripped also looks a little blotchy. That's ok, too: I have to give it a moderate sanding and that'll even it out.


Discovered something interesting as I worked. Remember that teal blue distemper that apparently was the original color on the plaster walls? I know they-- probably the original owners back in the 1910s-- got it on the woodwork. Well, apparently they also slopped it on the floors, too.

Anyway, this stage of the work is done. Hey, I got the Project Tracker to prove it! What's next?


Well, there are all those cracks and gaps to be filled. The best material for that will come from the leftover T&G floorboards they used to block in around the bedroom door. My idea is to pry them off, slice off the groove part, then put them back up. Oh, yes. And then take my handy-dandy rubber mallet and slam the slivers into the cracks.

That is, if I can work out how wide they ought to be . . . and how to get them properly tapered, where needed . . .

I'll deal with that later. But not too much later-- I go in for my surgery in less than three weeks and whatever I get done before then is what I get to look at for two weeks, more or less. With no way to do anything about it.

Thursday, March 4, 2010

A Breakthrough

My mom was talking about coming up and staying with me while I recuperate from surgery the end of this month.

That means getting some heat into the guest bedroom.

Not that there's no supply duct in there; there certainly is. It's just that it's never had a grille that fit. When I only had my senior cat, it didn't matter that it was uncovered. Rhadwen has no interest in spelunking the ductwork. But my little girl-cat, Gwenith, is an intrepid duct explorer, and ever since she and her brother Huw came to live with me, I've had the guest bedroom HVAC outlet covered with a piece of screen affixed to the wall(paper) with duct tape (stupid, stupid, stupid! I actually like that paper!), with a piece of 1 x 12 board over that , and the bed pushed against the wall over that.

The room is freezing.

I've tried to install the fancy Victorian grille the POs-1 left me. Over two years ago I even butch-- I mean, notched out the 8" high baseboard to accommodate its lower rim. But I had no luck making it stay.

But now it was time to call in the heavy artillery. I phoned a local HVAC contractor on Tuesday and yesterday one of their guys came.

He was very nice. He actually pushed the grille into place and screwed in the setscrew (helps having some strength). Says after I get it painted, he'll come back and do a proper job of it for around $75 or so.

Meanwhile, it's in there! And it's been made to fit! For the first time in over fourteen years, that bedroom register has a grille on it!

I feel bad for the HVAC guy, though. I talked to my mom this morning and due to some health issues of her own, she's not going to be able to come up to be with me after all. I don't say I won't have them come install the grille properly before I go into the hospital. After all, I'll need somebody here with me for a night or two. But for my mom, I think I would have made more of an effort to get it done and not settle for Good Enough.