Wednesday, August 24, 2011

Getting There

I'm almost done getting everything put together to get my new water filter and softener system up and running.  Steve* made it over (with the kids) by 9:15 or so to correct the problem with the stems going into the back of the bypass valve.  Since the riser pipe had to be cut to get rid of the ends with bad solder on them, he used the unions I bought this morning at Lowe's and a couple more sections of the 3/4" tubing.  (I think we've used nearly all the 10' length I bought).  Didn't have to replace the elbows, but if we had, I'd bought them.  (Yay for me.)

So everything got soldered in the right way and Steve drilled the pipe hanger/retainers into the wall at convenient brick joints, so the whole system doesn't get knocked into the next county every time I bump my head on the valve.  We turned the water back on, Steve looked at his work, and said, "Great!  No leaks!  I always have at least one!"

But not this time, it appeared.  This time, solder joint success at the first go.

Apparently.

He and the kids leave, and I go to enjoy the luxury of a toilet that actually flushed.  I come out of the basement bathroom, and go to admire the work.  Yes, it was messy as to solder drips and so forth, but it was done!  But wait a minute.  There's water on top of the bypass valve.  I look up.  Oh, no.  There is a leak, up above, coming from the elbow at the top of the outflow riser.

Called Steve to let him know.  He said, "There's things I have to do today, but I'll come take care of it tomorrow.  Put a bucket under it."  I wrapped the leaky joint in a strip of the old faded pink and white towel that had belonged to my grandmother (I remember back in the early 1960s when that towel was bright and  new), then encased towel and pipe in the last of my duct tape.

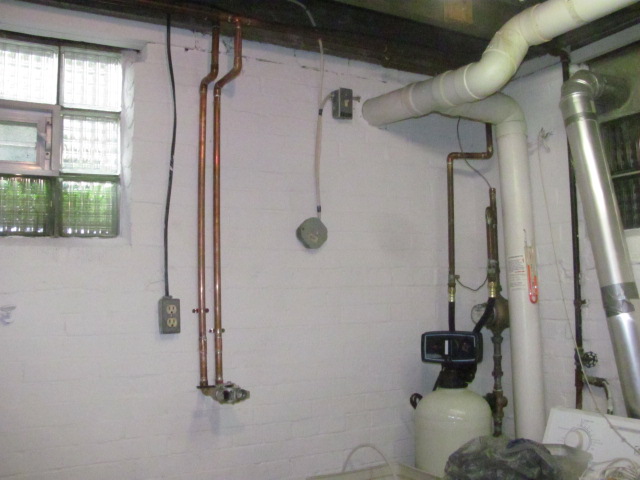
There's a wire that connects the inside meter with the outside one the Borough reads, and we'd pushed it up out of the way so it wouldn't get burned by the torch.  If I was planning on running water despite the leak, I needed to reconnect it.  Got up on my stool, and as I was sliding the wire and its plastic tie down the pipe, I felt, oh, no, water at an upper joint.  In the elbow about 2" away from the plastic radon exhaust pipe.  It would be in an inconvenient place, wouldn't it?  But maybe why that's why it's leaking.

About that time, Steve called and said frankly, "We're coming back to take care of that leak now.  I want to get this done and over with."

"Good, because there's actually two leaks."

Steve, Stevie*, and Letty* showed up soon, and Steve was able to redo the joint above the bypass valve so it was sound.  And he thought he got the one above the water meter taken care of, too.

They all left.  I put away tools, used some more water.  About a half hour passed.  I was up on the stool again, cleaning the hardened splashes of solder off the top of the meter, when I felt, oh, no, drip, drip, drip!  This time, more frequent and forceful than before.  This is not a place I can put a bucket under.  I called Steve again.

And shortly after lunch, back they came.  And Steve tried it again.  He loaded on so much solder the elbow looked like a messy silver-plating job.  Then we waited.

Steve felt the joint.  "Yeah, it's still wet."

All was not lost, however.  Because of where that assembly is (connected at the bottom to flexible line leading from the outlet side of the water filter), we could afford to cut out a bit of both the horizontal and vertical runs and eliminate the bad elbow.  And because I bought three elbows first thing this morning, just in case, we had one to use.

Steve made one more attempt, this time with the new fitting.  It's several hours later, and the joint seems to be sound.  No side of leakage.  Hurray!

Anyway, with one thing and the other, it was very late this evening before I got downstairs to actually finish installing the equipment.  This mainly involved fitting and routing plastic drain lines and filling the softener tank with water and resin (Safety Note:  Sweep up any resin beads that fall on the floor as quickly as possible.  They're slick and dangerous underfoot).

It'd be nice to say I was finished putting everything together, with or without setting the meters and timers, and the treated water is beginning to flow.  But there are a couple of things still:

a) I overlooked the fact that this brine tank is bigger than the one on my old Kenmore.  The instructions say, right there, "add 3-4 bags of . . . salt."  I only bought two.

Then, b) There's a part, a top distributor basket, that the instructions say I'm supposed to fit to the top of the riser tube before screwing that big honking 2510 Fleck meter on top of the softener tank.  Or rather, there's not a part.  I've either misplaced it since June, or they didn't send me one.  The directions say this device is used "when the unit is subjected to higher than normal water pressures . . . which are present in a few areas of the U.S."  Maybe my area is not one of them (my water pressure is normal), so it didn't come in my shipment.  I'm making no assumptions; I'm going to call the Ohio Pure Water people about it in the morning.

After I've gone back to Lowe's for more salt.

Tuesday, August 23, 2011

Well, Almost

I got my new Fleck water treatment system installed today.  Almost. 

My friend Hannah's* husband Steve* came over this morning with their kids Stevie* and Letty* and by 2:45 or so had all the piping soldered and in place before he had to run to keep another obligation.  All I had to do then was finish replacing the old or missing hangers and fill the filter and softener with media and water and set them going.

Only one thing:  Steve's* not big on reading instructions, and though I printed out the directions last Saturday and skimmed them over, it slipped my mind to tell him one very important thing as I was assisting today:  You have to have the stainless steel bypass valve in the "Service" position before inserting the horizontal input and output fittings into it.  So there I was early this evening:  I'd gotten the filter tank all filled with media and water (from my neighbors' hose tap) and fitted with its valve, and I'd connected it into the water system with flexible connectors.  Now I could turn on and use my own water to finish filling the brine and softener tanks, assuming that the softener bypass valve, which as yet was hanging off the pipes separate from the meter and the tank, was on "Bypass."  It was, but from my reaction you would not have thought so.

"Oh, carp!!"  And I grabbed the instructions.  Oh, carp, carp, carp.  Steve had put the piping in with the valve in the wrong position, and now I couldn't turn it to "Service."  I tried calling the Ohio Pure Water people for advice, but it was after 6:00 and their phone was on the machine.

Steve came over later this evening and we took the stems off, unsoldering the 90 degree elbows from the vertical risers.

Well, you can guess what happened.  It's why this will be a short post, for me, with a paucity of pictures.  We couldn't get the elbows back onto the bottom of the verticals.  And of course, despite I'm embarrassed to say how many trips back and forth to Home Depot and Lowe's, I didn't have any spare 90 degree fittings lying around.  And it probable doesn't matter, since Steve thinks he'll probably have to cut off the soldery ends of the verticals anyway.  Meaning we'll need a couple of unions, too.

Steve plans to be over here at 9:00 tomorrow morning "to get this done and over with."  So guess who has to be up and over to the local Lowe's at the crack of dawn?
___________________________
>As it turns out, Steve's return trip was necessary anyway.  When I'd gotten it through my head that a) the softener valve was in the Bypass position, and b) that meant I could safely turn on the water, I found that he'd turned the service entrance valve off so hard that I couldn't budge the handle.  It's still off till tomorrow, and I'm making do with water I put aside for this project, and hand sanitizer.

Saturday, August 20, 2011

"A Stitch in Time . . . " . . . or Overkill?

Looks like it's going to be Tuesday morning before I can even think of priming and painting my Study ceiling.

Why? you ask.

Because earlier this evening (Friday) I was taking out the washers from the plaster repair I did on Wednesday, and I noticed three things:


  1. The screws were still a little sticky.  Oh-oh.  The adhesive I used in those was from the tube I'd cut open two years ago.  Does it go bad?  Maybe I'd better leave the rest of those washers in awhile longer, to make sure the glue is really cured.
  2. Yes, that crack was a paper tape repair that was coming loose.  No telling why it chose to delaminate now, but I should be grateful it did. Could've popped off after I'd repainted the whole ceiling.  At any rate, once I get the tape fragments and the loose paint layer and skim coat off, it's going to take a few coats of spackle/joint compound to smooth off.  At least. And . . .
  3. I was pushing on the plaster in that area.  Guess what.  Yeah, it gave.  Obviously, I didn't get it all secured on Wednesday.  The gap wasn't much, maybe an eighth of an inch of so, but enough to make me want to stop it now.
So around 9:00 I did the process and drilled in another handful of Big Wally washers, conditioner and adhesive behind.

Couple of hours later, I'm doing the push test again.  Did I just feel some give in the area around where I just did the previous repair?  Yes.  Guess I needed closer coverage.  So I went through the process again.

Hour later (by this time it's nearly midnight), I examined the ceiling slope and got nervous about a vertical crack farther into the room.  Taped up the dropcloth and drilled a couple of exploratory holes.  Yep, about an eighth of an inch between the lath and the plaster.  Better do it now or be sorry later.  Ten more holes drilled and vacuumed out, ten more holes conditioned and squirted with adhesive, ten more washers power-screwed in.

So let's do the calculations:  Allowing the full 48 hours for the newest ones to cure (and I think I'd better, this being a ceiling), that puts me to after midnight Sunday night.  Maybe I might get two coats of spackle in the holes applied, dried, and smoothed down on Monday.  Maybe.  And a last coat over the messy spot Monday night.

Which brings me to Tuesday.

But nothing's getting done on the 3rd floor on Tuesday, because that's the day my friend Hannah's* husband Steve* has said he's going to come over and help me install my water softener and filter.†

Wednesday, maybe?
_______________________________
My friend Frieda's* son Mike*, who incidentally is Hannah and Steve's nephew, called me last Saturday and told me his schedule wouldn't allow him to get to it till next winter.  So Steve's going to tackle it, and I hope he doesn't do it all, but teaches me how to solder.

Wednesday, August 17, 2011

Two Steps Forward, One Step Back

Or is that "one step forward, two steps back"?

No priming got done in the 3rd floor Study today, and none will till sometime on Friday.

Or not.

It's not so much that I've gotten perfectionistic about the ceiling patches I've been working on.  It's true that I've wet sanded and reapplied at least two more coats of spackle today, but that's because in the stark light of day I was able to see a lot of irregularities I missed last night.

No, something else is causing the slowdown.

Ever since the Great Plaster Disaster of 2007-2009, I've had the nervous habit of pushing on the sloped plaster ceiling of my Study wherever I notice a hairline crack.  I've had enough of crashing plaster for one house, and while I enjoy the pillowy, organic effect of my 3rd floor ceiling, I need to know, and know right away, if any curve or bow actually means key failure and imminent doom.

Enlarge to see cracks.  Sort of.
So I push, and I wonder, "Did that give, or was that just my fingers flexing?"  Worrywart!  It's just the fingers.  But early this afternoon, I was going round with the wet sponges smoothing out the spackle I applied last night, and there, towards the bottom of the ceiling slope on the northwestern side of the room, I saw a horizontal crack I hadn't noticed before.  Actually, it looked like some previous owner had used paper tape for a repair, and it'd picked now to begin to come loose.  Should I peel it and see what happens?  No!!  Give it the push test.

Oh, dear.  That gave.  That plaster definitely gave.

All right, I know what to do.  Time to call in Big Wally.

Downstairs I go.  Plastic dropcloths from the back porch.  Painter's tape and the unopened box of PlasterMagic adhesive from the living room.  Drill, drill bit, caulking gun, Big Wally's conditioner and anchors (with screws) from the basement workshop.

But wait a minute.  Where was the 3/16" masonry bit?  It should be in the top drawer next to the workbench.  And where, o where did I put the rest of my Big Wally's supplies?

Eventually I found the latter in their box underneath the workbench, safely out of the way.  But I could not find that drill bit anywhere.

O well.  I needed to go to Home Depot anyway to exchange that 10' length of copper tubing (that's another story).  So off I went, and while standing in the tool aisle consulting with the clerk, I realized that, Idiot! I'd been suffering from some sort of brain glitch and visualizing a three-eighths inch bit when I'd searched that drawer.  My 3/16" bit had been in plain sight all along.

No matter.  It was probably dull anyway.  It certainly is dirty.  And there was that copper to take care of.

Once I got home, I had the target area of the Study ceiling drilled and conditioned in good time (something to do while the oven was preheating for my supper pizza).  Earlier, I'd been happy to find one full tube and one partial tube of Big Wally's adhesive in the box under the workbench, the latter still in the spare caulking gun.  When it came time to inject it into the holes, I gave the handle a good hard squeeze to clear out the dried stuff from the tip, asking myself, "I wonder if this adhesive is still good and liquid?"


Gray smudges are on the camera lens, alas!
Whoop!!*  Yes, judging from what ended up spattered around the wall and on the file cabinet, it was.  That's when I realized that the bucket of water and the sponge needed to be brought back upstairs.

But that didn't take long to clean up, and I had the adhesive injected and the anchors screwed in in time for me to go down and eat my pizza.  And for my boikitteh Huw to get the oven door fully open and steal a piece, but that's another another story.

Got the repairs done a little before 6:00, which, if I gave the adhesive the minimum twenty-four hours to cure (directions say 24 to 48), would mean I could remove the anchors tomorrow evening, spackle over the holes, and maybe prime on Friday.

But now that looks doubtful, doubtful indeed.  For later this evening, I was doing the push test again.  And even though I indulged in what surely is overkill in the spacing of my holes and anchors, I was still detecting some give.  And then I let my nosy fingers range to the left, especially around another, vertical, hairline crack.  Push, push.  Oh, dear.  Let's put the drill bit back in and check.  Oh, dear, oh, dear.   That bit was going in way too far.  In a lot of places.  Definitely some significant plaster-lath separation along that crack, and in the field between it and my earlier repair.

It's treated now, and the only thing flexing in the push test is my fingers.  But the earliest I could think of taking out the anchors would be sometime Friday morning.  And the way spackle tends to sink in holes, that'll mean at least two applications to get them smoothly filled.  So Saturday, maybe, at the earliest, to be thinking about primer?

I can always amuse myself teaching myself how to sweat copper pipe in the meantime.
________________________
*Not the word I actually used.

Yeah, I Know, I Know!

I admit it.  I've been putting off patching my Study ceiling so it can be repainted.

In the first place, it's hot up there these summer days.  Even if I ran the air conditioning in my house-- which I don't-- it wouldn't adequately cool the third floor.  Last month sometime I went at the problem area to some extent with the 5-in-1, but that's where it's remained.

But all right, it's been cooler lately.  But there are so many other, more fun, things to do downstairs.  And sometimes I'm actually working.  For money!  So that doesn't get the ceiling patched.

Last Friday, however, I finished clearing the papers, magazines, files, tchotchkes, and so forth off the horizontal surfaces and stashed them down in the guest bedroom.  And yesterday, armed with the dull-razor-blade scraper, I took the long walk up the two flights and went to work removing anything else that was still loose.

Ha.  I knew it. It never ends.  I thought I was dealing with bubbling in the finish layer of the plaster.  No.  What had bubbled was the paint, all five or six layers of it, in various lovely shades of white and pink and green.  This was good in a way.  Much better than failing plaster.  But if the goal is to remove all the paint that's "loose," the project can go on forever.  There's no end of what that blade can get under.

Finally convinced myself it'd actually be a good thing if the joint compound could seep under the raw edge of the old paint a little.  And headed down the basement for the joint compound.

Ah. There we have it.  Another big reason for my procrastination.  I knew it, I knew it, that big five gallon tub of joint compound was moldy.  OK, so it was two and a half years old.  But the lid was on so tight I could hardly pry it off.  So why should it be moldy?  But it was, I wasn't about to put any of it on my ceiling, so it was off to Lowe's last evening for a less-ambitious quart of vinyl spackle.

Got that on last night.  It never goes on smoothly, no, it does not.  Surprise, finish plastering really is an art and profession. Tonight's task was wet-sanding the first, rough coat, and oh! I do not enjoy that.  Not fun, not fun, not fun.  And since I applied the second coat of spackle this evening, I have to do the sanding thing again tomorrow.

(Grumble-grumble-rumble)

But hey, once that's done, it's time for primer!  And paint!

Once some very heavy pieces of furniture get moved.  And the trim to be repainted gets washed.  And everything gets festooned in drop cloths and painter's tape. 

(Grumble-grumble-rumble)


Tuesday, August 2, 2011

Study in White, Gray, and Copper. And a Little Beige.

Since I posted last, I've taken an obligatory break from house renovating.  Had a couple of big exams to study for.  Found out today that I passed the first one, but I'm still waiting for the results of the one I took a week after that. 

But now I've got that behind me,* I've made some progress. Not a lot of progress, but some. 

Which is to say that last Wednesday, I got the coat of gritted Sherwin-Williams "Pearl White" onto the basement stair wall.  It was probably a good thing to let the primer sit since the first week in July.  That way I could see if any water stains bled through.  None did.  Missed a few spots, which I touched up on Saturday.  And it's nice that with the normal basement lighting and the radon exhaust pipe in the corner, the new.y-painted outside wall and the (unmildewy part of the) unrepainted interior wall match up pretty well.  I think I'd have to call attention to it for anyone else to notice they weren't the same.

This past Saturday I laid on the first coat of floor paint at the foot of the stairs.  Turned out the previous owners' can of Sear's "Natural Slate Gray" was not only still good, it was unopened and yet never used.  No, the color doesn't match the rest of the floor in the central part of the basement.  But from what I discovered when I gave the target area a good scrubbing Friday evening, it would have, once.  I only repainted a piece about 3.5 ft. by 6.5 ft.  That's all the floor space down there that's bare!  And it's enough so it looks all right from the upper landing.

Got a second coat of the gray on this evening.  It needed it.  It also needed two or three days for the first coat to fully dry.  I keep the dehumidifier going down there, but even so, it's humid these summer days.  I'll give the second coat time to dry, too, then move the metal pantry shelf back against the wall.  And touch up where its legs were.

That gray floor paint is odd, though.  I guess I'm used to the variegated appearance of the old floor, with the old red paint showing through along with glimpses of bare concrete under that, and dirt and miscellaneous spills over all.  I can't capture the effect with my current camera, but believe me, I look down from the landing and it seems that my basement stairs go down into a gray pool, whose uniform surface hides strange life.  I'm almost glad I have to step over the side stringer of the stairs to keep from treading on it.  I almost feel I'd splash in or some scaly gray hand would break the surface, grasp my ankle, and pull me down.

As for the copper, I made my trip to the Home Depot on Saturday and got the tubing and fittings to install my new water filter and softener.  My friend Frieda's* son Mike* dropped by a week or two ago, and says he can do it, but isn't sure when-- it's a longer job than he'd expected.  And now I've got the materials for whenever he can make the time for me.

At least, I thought I did.  Talked to an older guy after church on Sunday, a man who's been doing general contracting of the residential sort all his life, and he tells me that Home Depot copper is all seconds, and I should return it and get it at a plumbing supply store instead.  Oh, joy.  Anybody else hear anything like that?  I'm not unwilling to take his advice, but it was such a pain getting that 10 ft. piece of tubing home in my PT Cruiser, and now I've got to rope it in again and take it back?  And how am I supposed to explain why I'm bringing it all back?  And then I'd have to price out the local plumbing supply stores.  Fun, fun, fun.  Maybe I should talk to Mike and see what he thinks.

And the little bit of beige?  Maybe that should be "a little less beige."  Studying eight to ten hours a day for three straight weeks can get a little intense.  I didn't dare take a break online.  So I'd vary the routine by wandering around my dining and living rooms peeling off whatever pieces of old beige wallpaper that were willing to come loose.  I was pleased to see it was coming off the drywalled-over portions almost as well as it did off the plaster.  Maybe I won't have to order any special remover solvent after all.
_____________________________
*Should say, "Now that I've got that behind me for now."   These tests are in two parts each, and while I did very well on the multiple choice part of the second one, I didn't finish the essay in part two, and I'm told that spells certain doom.  So I'm looking at applying for a retake and trying again.

Thursday, July 7, 2011

It Never Ends

It occurred to me that none of the pictures from the 29th showed both white walls.  There they are, though not with the floor repainted.


That got finished up last Thursday and Friday.  Ended up repainting about a quarter of the laundry room floor, so the enamel table can go back and stay back, not to mention the new brine tank.

(Here's a highly-instructive progress shot of the corner where the water softener used to be.  No more red and gray.  [Please disregard the smudges from the camera lens: it needs cleaned.])

To my massive annoyance, between the first and second coats of pale green floor paint, I noticed that iron water stains in the mortar were showing through here and there on my nice, clean new paint job.  Tackled them with a spray can of aluminum paint (as much as I hate to put anything nonbreatheable on my basement walls).  Of course that meant another round of primer and paint.  Of course.

It's taken care of now, so as soon as my friend's son gets back from vacation, he should be coming over and maybe we'll make some progress towards actually getting the water treatment equipment installed.

However.  However.  It's true, I spent Sunday through Tuesday in the garden, back and front, putting in the last of this season's annuals (yes, they are the last!  Haven't I said so!?).  But I've been going up and down my basement stairs past a very disgusting and grotty brick foundation wall, and I've been poking at that wall here and there, and chipping loose paint off that wall, and I've been thinking how awful that wall looks in comparison to the Two White Walls in the laundry room.  And yesterday I said to myself, "To hell with it.  Something has to be done!"

After scraping, before scrubbing
Scraped as much old paint off it as I could persuade to flake off.  I regret to say that was a great deal. Usual scrub-down with TSP and bleach, then another scrub-down with DampRid.  Dirty, dirty, dirty.

Primed it this evening, along with six brick courses of the wall perpendicular to it, which also looked a little grungy at the foot.  (Not doing that whole wall now.  Too much junk to move.  Too much junk that presently can't be moved.)  Looks a lot better with just the primer on, but I can't be surprised if this wall should need a spritz or two from the aluminum paint can as well.

I've sometimes thought that if and when I sell this house I'd refer prospective buyers to this blog to show them what I've done to the place.  And I wish I had nothing but a bone-dry basement to report.  A local dry-basement expert told me a few years ago that my biggest problem is humid air and not water infiltration, and what I need is to keep running the dehumidifier.  The fact that I had mildew stains on the perpendicular wall supports this position, since it's an inside wall-- my workshop is on the other side.  Still, I'd be a lot more complacent on the basement waterproofing subject if I could get all the brick joints repointed. I mean, it couldn't hurt.

One thing I know for sure is that the two places where the actual bricks show signs of water damage, they're  right under the outdoor water faucets-- or in the case of the backyard tap, where it used to be before the POs-1 built the screened-in deck.  Think of nearly 100 years of leaky hoses and insufficiently-closed spigots . . .  And at least the brick in question was hard and not spalling when I painted it.  I sure don't have any standing water anywhere.

I'm going on faith that the POs' can of gray floor paint is still good.
Anyway, as before, I'll gave the primer a day or two to dry, since I really had to glop it into the joints.  I've got a big nasty teacher certification exam coming up next Friday the 15th and another one on the 22nd.  So no telling how soon I'll get the paint on.  On the other hand, considering that I'm not exactly feeling encouraged about my prospects of passing, I may get the Pearly White on the basement stair wall just to know I've accomplished something.