Showing posts with label electrical service. Show all posts

Saturday, March 23, 2013

Creeping Along

I really expected to be a lot more excited about this.

Reinstalling the trim in my 1st floor hall, I mean.

After all, it's been down and the space has been looking scabby since September of 2008.  On summer evenings these past four years, every time I've hung out with the neighbors on their front porch, I've looked through my hall window and been faced with the busted plaster that should be concealed behind the trim.  And I've thought, "Damn!  I can hardly wait till I can get that woodwork shellacked and back up. It sure looks like hell from here."

But like Martha in the Gospels I've been worried and distracted lately by many things and tired out by the flu and now that the time has come for me to remount the hallway trim, I'm not that enthusiastic about it.  But my intellect tells me it needs done and urges that I may feel better about things if the house is neat and assembled and orderly.  So here I go.

All this is to explain that each day I do what I'm up to doing, and when I get tired or feel like I'm about to scream, I stop.  Which may be all that can be expected, when I've already spent the bulk of the day substitute teaching.  Which cannot be stopped when one gets tired or feels ready to scream.

So, the thrilling and breakneck progress since Tuesday:

Wednesday, the big deal was to redo the switch to the outside light, the one over the front door.  The switch is cut into the jamb trim on the lefthand side of the doorway to the front room.  I'd been subjecting the previous owners--whichever one it was-- to direst obloquy because obviously they'd failed to install the switch in an electrical box, nor did they use a wire nut to secure the two neutral wires, the style of switch not having screws to fasten those into.  Instead, everything was wrapped with electrical tape.  How foolish and dangerous!

No box, no wire nut-- tsk, tsk
But as I was shoving the new box into the front of the trim and pulling the existing Romex through the knockouts, I had to notice that oh, look, the cutout in the trim is exactly the size and shape of a standard electrical box.  And it crept in on me that four and a half years ago when I took that trim down, I was afraid of messing with that switch myself (it had to be dewired to get the woodwork off the wall).  So oh, yeah, I got the professional electrician I was using at the time to come and pull it out for me, didn't I?  Along with the two in the long living room baseboard.  I now recalled him asking me if I wanted him to take the switch out for the time being, me saying No, I needed the light, and him, yes, taping everything up as a temporary fix, because what was the use of him putting it back in the box when it would just have to be taken apart again when I remounted the trim?

Back together and boxed
So who's the danger-mongering fool?  Nobody, I guess, since a pro did it for me.

Don't know what became of the original box.  I utilized one I bought for another location and didn't use.  Used the original switch, since it's more solid than the flimsy modern one I thought to replace it with.  It's all back together, the outdoor light lights, the jamb trim and the lintel are nailed back up, it's all fine.  Previous owners, my apologies.

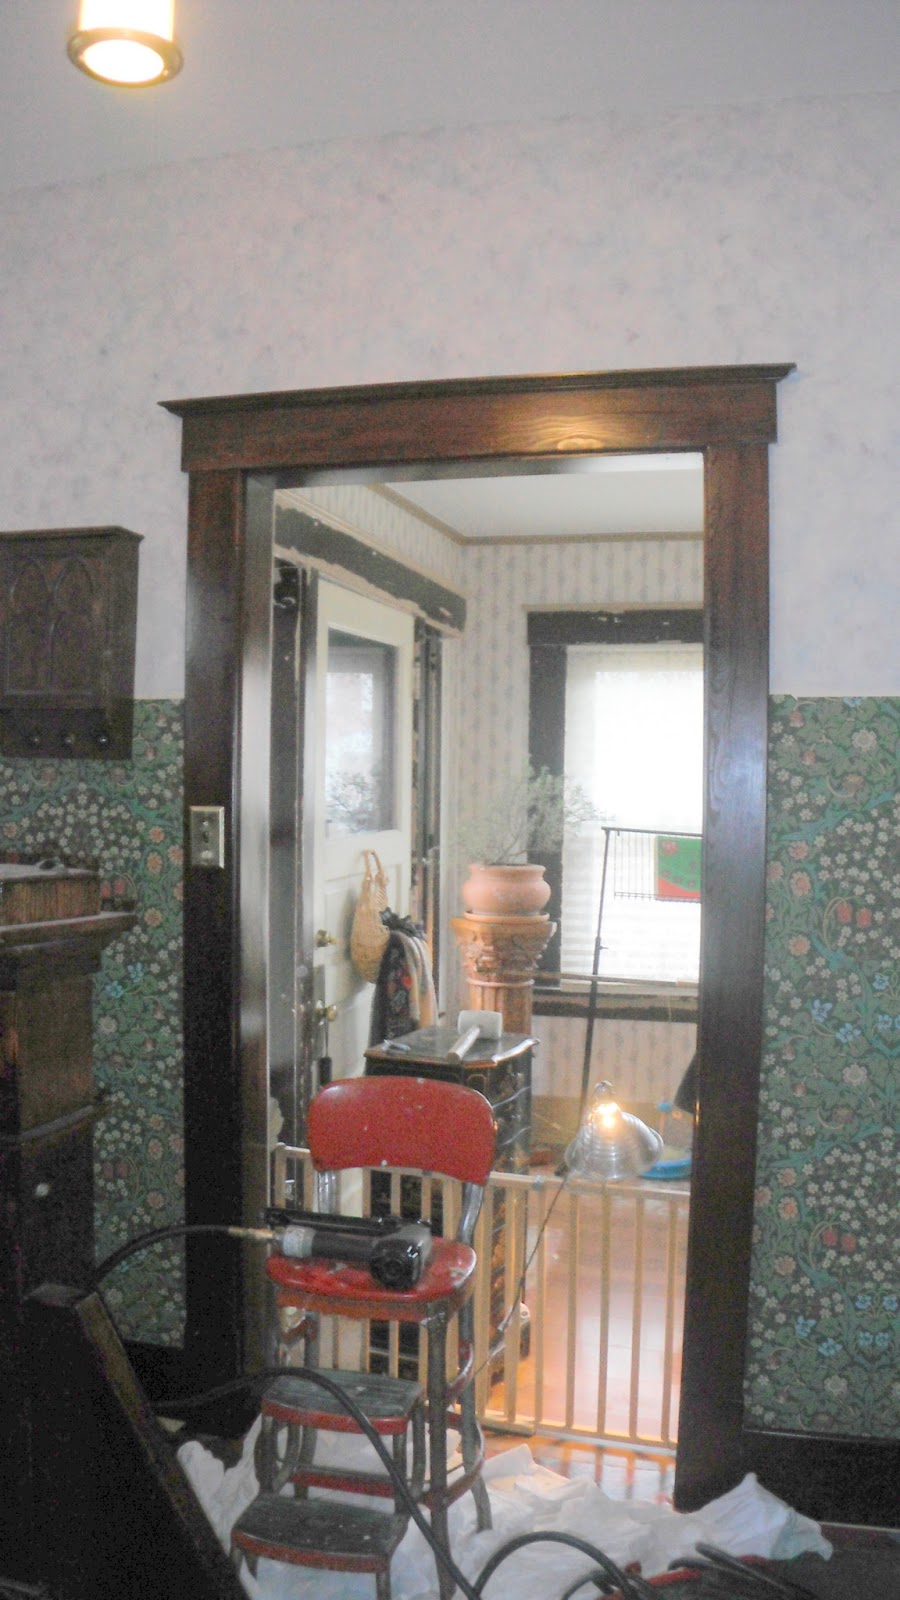
Then came a step that I really should get excited about. Wasn't excited Wednesday night, but I guess I'm getting there now. It's when I nailed together the replacement casing for the doorway to the kitchen and got it nailed into the ragged, nasty opening that's been taunting me for months and years on end.

New casing ready to rise

This casing is the thickness of the wall, unlike its predecessor
Fun, fun, the new white pine had a little warpage and on neither side did the jamb pieces automatically snug up to the edge of the cutouts in the plywood over-floor.  And they had to, or the plinth blocks would be sticking out into the opening.

Warped at the bottom

Blocked and shimmed into submission
Didn't feel like messing with it then.  I saved the fun for Thursday night.  Got them persuaded out as well as I could, but I think some caulk will be in order on the left side.

Other than that, Thursday and today, the jollification has been with the face trim in the northwest corner, between the portal to the living room and the doorway to the kitchen.  It was a bit of a Chinese puzzle, how it was all supposed to go back together, and I was glad I took pictures back in 2008 when I took it down.   There ensued a saga of blocking and shimming which I won't bore you with (though I have to say it amused me to be putting the original blocking back in, especially the pieces I used to test shellac colors)..  Some of it had to be done twice in the same place, when I realized (in time, thank God) that what the woodwork needed for proper reassembly was not notching and cutting and trimming, but a bit more blocking and shims behind a piece I'd already nailed up.

(Gimme that pry bar, will you?)


2nd attempt. This butt joint was really off before.
Finally together


So finally the vertical pieces are back up in the northwest corner, left of the kitchen doorway.

Not so the jamb trim on its righthand side.  It's overlapped by the nosing of the hall bench, and a notch was put in in days of yore so the trim could slide in between the bench nosing and the wall.  But when I test-fitted it, the trim sat a quarter of an inch too high.  In relation to its plinth, in relation to the head casing, in relation to the jamb trim to the left side of the doorway.  Weird.  Had no compunction about taking the Dremel and bringing the notch the required distance higher.  This piece of trim is presently down on the basement sawhorses in the process of receiving a few coats of shellac on the enlarged notch.

Enlarged bench notch in progress.  Dremel battery needed to recharge
But in addition to this, I couldn't get it to sit snug to the horizontal trim at the end of the bench.  Kept rocking, with the bench seat as its fulcrum. On Thursday I thought it had a bump I'd have to take out to get it to work.  But bother that.  The level says it's straight.  Silly to start butchering the woodwork.  Just pry the horizontal trim off and reinstall it flush left to the jamb trim once it's up.  Still have no idea why the gap is there, but since it is, it can go in the dark corner and get a bead of clear caulk.  Easier and less destructive that way.

A little retrograde motion


Well, easier and less destructive until I cracked the board down the middle prying it off.  I'll do my best to hold the pieces together and put it back up as is.  If I have to glue or fasten them, I'll ruin the shellac job.

That's all for tonight.  Once I get that jamb trim up, it really would be nice to get the lintels up.  The lack of them is what has been so glaring from the neighbors' porch.  But the way the cornices are mitred together, it may take an extra pair of hands.   Or two.

It's not like I don't still have plenty to do in there without tackling that . . .

Tuesday, April 10, 2012

Immer Zu

I'm still here.  Actually, I haven't really been any place much other than here.  Not working on the houseblog, no.  But working on the house.  Workingworkingworkingworkingworking ....

Tired, crabby, frustrated; no way I'll get done what I'd hoped to get done by the time my friend from England arrives on the 18th, but still at it, obsessed, devoted, immolated.

I'm only up at my computer now because I was seized suddenly by the fear that I'd forgotten in the throes of house idolatry to pay one of my credit card bills.  So I left the trim I was working on in the basement to run up to the 3rd floor study to make sure.

Yes, it was already paid.  And I'm paying this debt to houseblogdom, putting down a minuscule installment payment on what I owe to my two or three readers, to give you some indication on what's been going on at the Sow's Ear the past month.

Heaven help us, what hasn't?  The spray foam people finally came (no, that was February, but never mind, they did).  The roof repair contractor and his son showed up three or so weeks ago (he was originally scheduled for early December) and took care of everything on the list, and a couple-three other things beside.  What they couldn't rectify was the wet on the face of the chimney breast in the living room, which issue they diagnosed as being due to my having no liner for the hot water heater in my chimney-- the warm water vapor condenses on the cold brick et voilĂ ! failing skim coat and sticky old wallpaper paste on the living room side.  So I've had plumbing contractors marching through sizing up the height of the chimney, and I've accepted a bid from one who's supposed to come install me a metal liner early next week, hopefully before Janet* arrives.  And things have gotten to the point with my own work that I had to get the electrical contractors in to bid out installing properly-grounded circuits for the outlets that go in the baseboards that I hope soon to be reaffixing.  One bid was so astronomical I thought I should suck it up and rewire them myself after all; the other, from the guy who seemed to know more what he was talking about, was low enough to make me feel it wouldn't be worth the time and tribulation for me to try to do it myself.  And unlike the other guy, he can work with the trim installed.  I plan to have him come in May, if I've got the place reassembled by then.

But me?  Damn.  A short list, in no particular order: 
1)  Shellacking woodwork, starting with the stairhall's pieces and going on to the ones for the living room.
2)  Buying select white pine 1x boards and having my friend Steve* rip them to size to replace missing or hopelessly damaged yellow pine originals.
3)  Shellacking white pine replacement pieces to try to get them to match the yellow pine originals (semi-successful, if you don't mind a little streakiness). 
4)  Finishing up the Big Wally's plaster repair I started last month.
5)  Finding out that even Big Wally's won't get rid of a wall bulge caused by settling from the floor above.
6)  Doing an obsessive amount of research on how properly to hang my William Morris wallpaper, and finding out about blankstock liner paper and mix-it-yourself wheat paste and happening on a good source for both.
7)  In the course of said researches, learning about a homemade device that should make it easier for me to remove the old paper from the sheetrocked walls in the dining room and front room, and pulling together the pieces and parts and beginning to make my own.
8)  Trying repeatedly to get the old wallpaper paste removed from the living room walls and failing miserably, unless my goal is to take off all the previous owners' repairs.
9)  Carrying on an extensive email correspondence with the proprietor of the concern referred to in No. 6 and learning from him a) that I can use a Zinsser product called Gardz to encapsulate the old paste and size, and b) what "size" is and how to make it.
10)  Doing the Big Wally's routine on the east wall of the living room, especially down at the bottom along the line of the baseboard, where the plaster seemed to be flapping in the breeze.
11)  Ordering Gardz over the Internet (Lowe's and HD don't carry it around here) and applying a first coat on the north and east LR walls.
12)  Cutting to fit and screwing in pieces of drywall to replace the plaster that fell to pieces when I removed the baseboard along the east living room wall.
13)  Taping cracks in my living room walls with drywall tape and mudding, sanding, and mudding again.  (Which I hate-hate-hate!).
14)  Locating the most workable location for the outlet I've wanted for years in the 1st floor hall, and cutting the hole for it (happily, it falls right in the drywall under what I call the portal between the hall and the living room, where my POs-1 partially closed in what used to be a large doorway.
15)  Taking up the ridiculous sheet vinyl from the hallway floor, and discovering that the plywood underneath seems to be glued as well as nailed down.
16)  Doing the long-postponed measured drawing of the existing structure under the 1st floor hall, and submitting it to the John Bridge Tile Forum to find out if it can support ceramic tile.
17)  Getting an answer from one of the tile pros there that my structure might do, but unless I tear out both the plywood and the original tongue-and-groove subfloor and sink new plywood between the joists, I'll be way out of Code due to the odd riser height at the bottom stair.
18)  Saying O crap! and checking into linoleum tile and other, thinner alternatives, and deciding probably I'll clean up and smooth down the plywood that's there and paint a faux tile pattern instead.
19)  Using some medium red-brown paint left behind by my POs on the existing LR cornice moulding to even out the place where they or somebody got ceiling paint on it, then going over that with two coats of warm-walnut tinted shellac (north wall cornice is done; east wall in progress).
20)  Stripping, repairing, and sanding the trim that goes on the kitchen side of the doorway from the 1st floor hall-- nasty job, since it doesn't seem ever to have been shellacked, so the paint wouldn't just chip.
21)  Removing the rest of the wallpaper from the east and most of the south living room walls (yes, this should have come a lot sooner, but I just remembered).
22)  With the help of my friend Frieda*, remeasuring for the new chair rail for both storeys in the stairhall, sizing the lower part of the walls there, and hanging blankstock on them, but not before going back and filling and patching ten dozen dips and holes I never noticed till the work light was shining on them.
23)  Except for an occasional mowing and covering the roses when a frost warning's on, letting the garden take its own course this spring.

Did I say this was supposed to be a short list?  Gaw.  And I need to go back down the basement and prime that kitchen side trim and the trim for the doorway to my bedroom, because oh, yeah, I got the loan of a nail gun today, and if all goes well I can start rehanging trim this weekend and that needs to go up before-- well, never mind, it'd take too long.


Immer zu!  Immer zu!  Ohne Rast und Ruh'!

Sunday, October 23, 2011

Sometimes It's Good to Be Wrong

Tackled the attic insulation removal this afternoon and evening.  The process disabused me of a few false notions.

Starting at the back end, literally:  The knob and tube wiring I discovered yesterday is disconnected; it isn't live.  The receptacle I thought it served is wired up with standard white three-wire cable.  Nice not to have to be concerned about that.

(Incidentally, there's also a long disconnected strand of yellow three-wire cable [sorry, I should be able to remember the gauges of these things-- yellow is 12 gauge?  Or 14?  Oh, never mind!) on the back side of the knee wall; I uncovered it when I took a piece of cardboard tacked to the studs down, and happily, it's not live, either.  I think my electrician must've put that in; why didn't I have him connect it up?  I certainly could use another outlet under my work table!)

I was also wrong in thinking there was a lot of loose-fill rock wool between the batt insulation and the underside of the sheathing.  No, there was rock wool in there at one time; I could see little tufts of it stuck to the rafters and sheathing planks here and there.  But for the most part, it was gone.  So I didn't have to endure clouds of rock wool tumbling down on my head, as I'd anticipated.  True, I was encased in a hooded Tyvek coverall suit with attached booties, my face armored with an P100 anti-mold particle mask and goggles with no vents, but I hadn't fancied the prospect, all the same.

And I was wrong in thinking my roof is structured with 2x4 rafters.  No, they're 2x6s, or 1-5/8 x 5-3/4, to be exact.  The foam insulation guy was calculating on spraying on six inches, covering rafters and all, to get me to an R-value of 24, at least.  Not sure how this development will affect things.  Technically it could mean they could spray on eight inches or more, and maybe get me to the R-38 that's recommended for attics these day.  But that'd up the price beyond the just-barely-manageable figure I have from him now.

What else was I wrong about?  I was wrong in thinking that the black I was seeing on the back face of the kraft paper vapor barrior was mold.  Ha, silly me, that paper is black on the back side!  And, examining the insulation itself more closely, it's possible that the dark stuff I saw in the pink was only dirt, and not mold at all.  At least, it didn't look growy, just like dust.

Does that mean I was wrong about the whole project?  Not at all.  The batts were definitely damp that day in mid-September, and dirt is a classic place for mold to lodge in fiberglass insulation.  And with the facing paper hanging in tatters in so many places, the vapor barrier was grossly compromised.  I would rather not spend the money on this at this time, but it'll be money well-spent.

I was wrong in thinking the batts were held up solely by the lath battens that ran horizontally from rafter to rafter.  Yes, they gave some support, but mostly the pink stuff stayed put by means of staples-- lots of staples-- driven though the kraft paper wings into the rafters.  So I didn't have that stuff falling down on me, either.  Very glad to be wrong in this case.  And I was wrong in planning to roll up each batt in a piece of .5 mil plastic before I put it into the 55 gallon black bag.  I tried it once, on the first piece I took down, and the plastic got woefully out of control and simply would not stay put.  So I gave up on it and just rolled the batts in on themselves, taped them with cheap masking tape, and stuffed them in the bags.

Speaking of the bags, it's good that the insulation guy was wrong in predicting I'd end up with thirty bags of the stuff.  Nope.  Four bags of insulation and one of cardboard, small pieces of batten, and dirty dropcloths.

I've mentioned the cardboard.  It appears I was wrong in thinking that it was a pis aller employed by my POs-1 (who were, I believe, the ones who installed the pink insulation) to cover the gaps at the toe of the batts.  In the first place, the batts ran all the way down below the floor level, into the soffit space.  In the second place, it was abundantly evident that that cardboard dated from way, way before than my previous owners two back.  The cardboard lining the brick gable wall on the north end was clearly installed before the wood floor.   It was wedged between the floorboards and the brick and I had to cut it out with a utility knife. Whether it dates from the time the house was built in 1915 or so, or whether it was put in to protect the wall when the attic was finished later, I don't know.  I'm pretty sure that the room I use as my study wasn't original, as the 1916 tax assessment only lists three bedrooms.  But I saw at least one place where cardboard was used as shimming between structural members, so it's entirely possible that the house was built with a wholly-floored attic, with exposed rafters and the stairs leading up to it, and the knee walls and plaster came later.  I estimate that the room was done fairly early; pre-WWII, at least, since the trim matches what's downstairs (sans cornices) and the woodwork was originally shellacked, like the rest of the house.

Found something else curious, deeper in towards the front of the house:  There are three or four bays where the tongue-and-groove flooring doesn't go almost to the toe of the rafters, but there are wide planks of removable joinery notched in between the rafters instead.  I didn't lift any of them out the whole way, but when I shifted them I saw galvanized metal below.  Duct work?  A cold air return?  From where?  I think this would be over my dressing room, but the location is all wrong.  This really looks original.  What can it be?  Those planks will be immovable once the foam is in; will that matter?

In fact, speaking of the cardboard again, I found vestiges of heavy cardboard nailed to the underside of the rafters (which I found about impossible to remove, by the way), and I strongly suspect it was used to contain the rock wool that used to be in the roof.

On the back faces of some of this cardboard I saw evidence of water marking.  But it was dry now and I can only hope that that was from earlier leakage, like that which moved the POs-1 to remove the slate roof and put up fiberglass shingles.  (I found a piece of a slate at the eaves!).  There was also some water staining on the floor near the stub of the old kitchen chimney.  I don't say I won't give that a good scrubbing with borax, but it was dry, too.  In fact, the whole space was dry, and in some cases, too dry.  I didn't like the way pieces of wood would flake off some structural members when I was brushing them clean after the insulation was down.  I'm thinking a nice coat of spray foam will protect them, yes?

There were some things I was wrong about that I don't find so gratifying.  The Tyvek suit was a success, overall (pun!), and getting one that fit me by ordering online was the right way to go.  But I wish I'd gotten the gloves with the longer arms to them.  The 12" cuff kind I got you'd think would be long enough.  But the sleeves of my sweatshirt kept pushing them down, and they would creep out from under the elastic cuff of the suit.  I did pretty well at keeping fiberglass itchies off my skin-- except for that half inch of so at my wrists.

And despite my trying to order goggles in a "women's" size, they were still too big and conflicted with the particulate mask.  Great goggles, great mask, but my head simply isn't that big.  The two pieces of equipment got in each other's way and prevented me from having a proper seal on either.  The goggles quickly fogged up so I was working half blind, and the mask didn't sit tightly, so stuff still got up my nose and made it run.  Every three batts or so I'd have to take off the mask and blow my nose, it was so bad.  I'm still rather stopped up now.

But getting the headlamp was a fine idea; really, the only way to go, even though it barely perched on what was left of my forehead.  From the packaging I'd expected the batteries to last only five hours, but they kept going a lot longer, and are still good now.

I mentioned the 55-gallon bags.  My bright idea of throwing them out the north window once they were filled didn't turn out quite as planned.  The first one rolled off the back porch roof quite easily, but the next one landed square in the middle of the roof and stayed there. And my attempts to use the second and third to dislodge it only succeeded in creating a logjam.  So there I was, at maybe 11:00 o'clock at night, out on my porch roof trying to shove these big black trash bags down into the yard.  Still in the Tyvek suit, which wasn't the cleverest thing I've done all evening.  The booties on it give no traction whatever, so walking on the shingles was out of the question.  I had to lie on my side and kind of slither down till I could put a foot to the bags and send them over.  Of course they wouldn't go the with the first kick, and I had to creep lower and lower towards the eaves, hoping to gracious that any momentum I gave the bags wouldn't carry me over with them.  "Wrong" wouldn't've half described that!

They finally teetered on the edge of the gutter and rolled down, taking their sweet time about it.  Meanwhile, I saw that my thirteen-year-old calico cat had taken advantage of the open window from the guest bedroom to hop out onto the roof and do a little exploring of her own.  Happily, I had no compulsion to go lunging after her.  I slithered back up the way I came and called her to me once I was back on the sill.  She came, but changed her mind at the last moment and veered off.  Too bad, my girl! and I picked her up by the scruff of her neck and hauled her safely in. 

One last happy example of my being wrong:  It only took about three and a half hours to get the insulation down, rolled, bagged, and out the window.  It took the other three and a half hours to brush down the rafters and sheathing, remove stray pieces of rock wool, and clean up the floor.  One push-broom and three vacuum cleaners that took!  I think the hose of my shop vac is almost shot, which doesn't help.

Is the job done?  Well, almost.  I found there's rock wool in the soffit space, and I haven't removed it, since I'm not sure how that'll interface with the spray foam.  I want that area insulated, but somehow I don't see filling that whole space with the icynene.  I mean, won't that drive up the price, and what if I do get a chance to remove the aluminum exterior trim and the wood board underneath needs replaced?  On the other hand, does the foam have to run all the way to the gutter to prevent ice dams?  I may have to cut 1x boards and run the floor all the way to where the roof comes down.  Job for the portable circular saw, I expect.

I have the same question about the rock wool in the far southeast corner behind the lefthand closet.  There's a little triangle of space with insulation blown into it; will they foam that, or do I need to create a barrier to separate the two?

There should be no question about the old birds' nest materials in the northeast corner behind the old chimney.  It's got to go.  But somehow I didn't want to remove it out tonight.  Don't know why.  May have something to do with the kink in my shop vac house.  Maybe I want to see if there are any ornithological specimens in the mess.  But I'd rather deal with it in the daytime.

All cleaned up, barring the camera lens
Just sitting here typing this, I can feel that the room is colder than usual.  Even failing, that batt insulation did a reasonable job keeping the 3rd story warm.  Here's to the spray foam doing the job even better.

Thursday, August 7, 2008

Things I Need to Consider

Last night before last (meaning early this morning), while basking in the virtue of having gotten some woodwork stripping done, I lay in my bed wondering what pieces needed to be taken down and done next.

And the facts confronted me, stolid and grim: The long baseboard pieces in the dining room have to be done now, in the summer, while I can still strip them if need be on the back porch.

So this afternoon, I took up spear and cudgel-- I mean hammer, five-in-one, and pry bar-- and set to work.

But as I am a sensible being (mostly), I started with the shorter baseboard pieces, in the walls with the doorways. This was not a means of avoiding work. No. These pieces on the south wall are the ones with the electrical outlets in them. And for the baseboard to come off, the outlets had to be disconnected and pulled out.

Happily, by now I know which circuit they're on-- the same one that controls the basement lights and all the outlets in the house, except the ones in the kitchen and the third floor study. Turning it off decommissioned all the phones except for the one up in the heavenlies-- lovely when you're expecting a call back from a job search committee chairman and you run all the way up to find it was only a telemarketer. And so nice to have to reset all the clock radios once the power is back on. But we make these sacrifices for Art.

What was not at all artistic was how these two outlets are wired. It's not just that the wiring is only one notch up from knob-and-tube, it's also that on one of them, the clever improver back in the '40s or whenever neglected to put the bloody mess in a box.
Oh, golly, don't I feel safe?!

Five years ago when I was purchasing the Sow's Ear, the electrical inspector hired by my real estate agent said these outlets needed attention because they weren't grounded. But redoing them would only cost $250, he estimated, well under the $500 floor set by the sales contract that would've required my sellers to deal with it. I was 900 miles away in Kansas City when this inspection took place. So I do not know if this clever inspector was aware of the um, frugal job made of this particular recepticle.

But oh, damn, I'm aware of it now. And I shall have to get my electrician (not the same bloke) out to rectify matters.

But when? Before or after I get the trim stripped, replaced, and shellacked?

Or both?

Couldn't get him over today, that's for sure. So I pried the wires off the screws, pulled the recepticles free, wrenched off the baseboards, and then, using the photos I took along the way, replaced the old ivory outlets with brown ones that'll match the woodwork better. Don't worry, I know what I'm doing-- my dad was an electrician!

But I'll still feel happier if I can get Mr. Coffey out here soon to make a proper job of it.

But there's another thing I have to consider: When my previous owners put in the fake Pergo, they ran it up against the existing baseboard, then put quarterround over the crack. This made the baseboard pieces harder to remove.

But it also raises the question of how and whether I'm going to replace the laminate flooring with proper oak boards, and when. I'd really like to install the new floor under the baseboard, and dispense with the quarterround altogether. Seems it'd be a lot cleaner look. But I can't afford new flooring right now! And I don't want to wait to put the baseboards back until I can!

I shall have to figure this out. Meanwhile, I'm marking and saving the existing quarterround pieces, if I have to use it after all. I don't plan on stripping them, but they'll do for patterns for the new stain-grade material

Tuesday, February 12, 2008

Electrified

Through snow and slop and slick conditions, the electrician, Harrison Coffey of Coffey Electric (I told him I'd give him a plug-- so to speak) appeared right on time this noon to install the new circuit and outlets in my basement and workshop.

First order of business, get rid of the culprit that'd left my workshop in the dark-- a faulty screw-in recepticle from the workshop pullchain light. It went into the recycling.


Then, install a new 20-amp circuit in the breaker box and run the wire.


Then comes a new recepticle in the workshop.


And two new ones in the main basement.


And a fourth one (on a different circuit) mounted on the furnace, so the condensation pump can be plugged directly into it, and no longer into yet another pullchain light.

Two and a half hours later, all done! I went down to experiment with the new outlets.

I started with my worklight, trying to plug it into the new recepticle on the south basement wall. But it wouldn't go! Maybe the prongs needed to be spread?

"Just give it a shove and push it in," Mr. Coffey said. "Those 20 amp recepticles have tighter slots."

But my fingers were still on the plug prongs as I pushed.

"Hey!" said the electrician.

"Oh! right!" I took them away, just before the plug went in. Whew!

"You make contact with that, you'd know it. It'd throw you across the room!"

Right. Not an experiment I care to make.

After Mr. Coffey went on his way, I did not run downstairs and start stripping woodwork. Took care of some other things this afternoon and evening-- of which more anon.

But I've got me some proper outlets in the basement! I can plug the heatgun in without shorting out the house! Electifying!

Saturday, February 9, 2008

In the Meantime

I can't strip wood trim down the basement until after the electrician comes next Tuesday.

There's not enough light down there to use the chemical stripper (which arrived safely last Tuesday). There's no outlet to plug in the heat gun.

But I can still make progress. I can chip away-- literally-- at the loose paint on the stair stringers.

Here I present my progress after last night.

Before--Outside wall with previous work:


After--Outside wall stringer, dry-chipped (and pink kitten):


Before--Inside stringer, with beige paint (and tabby kitten):


After--Inside stringer, with progress in de-beigeing:


It's true that the stairway looks narrower with the dark wood than it did with the beige paint. But I'm not going to let that concern me. The house was built with woodwork dark natural, and dark natural it shall be.

Monday, February 4, 2008

Waiting

On the 30th I forecast that I should be able to get a good twelve or more pieces of trim stripped and ready to refinish in the next week.

Yeah, right.

For one thing, the refinisher shipment hasn't arrived yet. That's what I get for being cheap and choosing ground freight.

For another, it wouldn't make a whole lot of difference if it had. I was down in my workshop Saturday night, about to switch out the 3/4 extension drawer glides for some 1" overtravel glides on a self-assemble wooden file cabinet I've been meaning to put together since the middle of last fall. All I had plugged in to the screw-in recepticle in the pullchain light was the radio and the fluorescent light over the workbench. And the pullchain light itself was on below it.

Then suddenly, darkness and silence. The connection had gone out on me. Got up on the stool and tried screwing the recepticle fitting in tighter. It was tight already. And warm.

It was fried.

So there will be no using of worklights or heatguns or anything of that nature until the electrician comes and installs my new 20 amp circuit. My usual guy got back with me today and his bid was better than that of the other firm whose rep came out when the connection went dead a couple weeks ago.

But he can't make it till the 12th. He's up to his eyeballs wiring a new house somewhere.

So I'll wait. And in the meantime, I can always dry-chip the loose paint off the stair stringers and upstairs hall trim. It's pleasant, clean, mindless work, as long as you mind not gouging the woodwork and making sure the cats don't eat the paint chips . . .

Friday, February 1, 2008

About Them Baseboards

Did a little exploratory surgery on my baseboards today.

Took off the quarterround shoe on one short piece, expecting to see the new fake wood flooring installed all the way up to the face of the original baseboard. This would make the base difficult to remove for taking down the basement to refinish.

No, there's a 3/8" to 1/2" gap between the finish floor and the baseboard.

This is good.

So I proceeded to take the faceplate off the electric outlet installed in the baseboard, to see if I could just pry the base off the wall and pull it off around the outlet box.

Whoever notched these outlet boxes in was a real craftsman. He (I assume it was a he) cut all round the box and fit it in really tight.

This is good, in re: the crafts- manship.

But not so good, regarding my easily removing the base trim. The actual recepticle screw flanges extend past the cutout for the outlet box. It'll take some twisting and contorting and maybe disconnecting the wires before the recepticle will be out of the way of the woodwork. That means figuring out which circuit controls the dining room recepticles and getting them shut off before I go pulling the baseboard away.

This is not good.

Though maybe it is. I really ought to know what circuit these are on. And I need to replace the ivory-colored recepticles with brown ones, anyway.

And in the end, it may not be feasible to refinish these baseboards down cellar. Two of them measure twelve foot long or so, and I don't see getting them down the basement steps without major damage to walls and paint.

So maybe I'll strip them in place after all.

Once the wallpaper is all removed, that is. No way I'm using the heat gun anywhere close to the wallpaper. Do not want to test what my insurance agent says, about my house being covered for full replacement value.

Monday, January 14, 2008

Making the Right Connections

When I retired to bed last night (ok, early this morning), I noticed that the lamp in my bedroom wouldn't turn on. Nor would the space heater. And the clock radio was dark. And the phone display was blank.

In short, all my bedroom outlets were kaput.

I could not figure this out. How could an electrical overload in my basement affect the outlets in my second floor bedroom?

Well, it was too late to work it out now. I'd see what the electrician would say on the morrow.

This morning, I was happy to find that the furnace had been working all night-- no frozen delight in the toilet bowl! But there was water ponding across the basement floor-- courtesy of the non-functioning condensation pump.

That was not unexpected. What I didn't understand is why the first floor phone, which is plugged into an outlet in my living room, was getting no power. And the lamp that shares that recepticle wasn't working, either.

Huh? Did last night's electrical fry extend that much influence over the house's whole system?

Or could it be that-- oh, no, not again! I thought I'd solved all that two or three years ago!

"All that" refers to the circus that was POs'-1 idea of upgrading the electrical system in this house. Yes, they used code-approved wiring and connectors, but they joined and over-joined outlets, switches, and appliances all over the house on single circuits. For instance, all the kitchen appliances and the back porch lights were on one circuit and my POs had to have someone out to untangle it: I've got the invoice in my house file as testimony. Shortly after I moved in, I discovered (thanks to an overload), that just one circuit was carrying the 3rd floor outlets, an outlet in the guest bedroom, the outlets, microwave, and dishwasher in the kitchen, and the outlet in the basement bath.

I got an electrician in to rectify that. But now are you telling me that the basement lights, my bedroom outlets, and the living room outlets are all on one circuit, too? Is anybody really sure where anything from my panel box really goes?

Well. When the electrican sent by the home warranty company made his appearance around 1:30 PM, that's exactly what he did tell me. Not only that, but he showed me that my workshop and main basement lights are on the same circuit, too!

No idea how I managed to trip the circuit last night, but that's all it was-- I simply hadn't shoved the circuit breaker far enough over to turn it all the way off, then back on again.

And as for the initial outage-- that was due to a loose connection in-- well, let's just say the only source of power in my workshop is a screw-in recepticle in the pull-chain ceiling fixture, with the bulb screwed into that. From thence, an extension cord or two snakes down to a power strip, into which I'd plugged my worklight, my radio, and a heatgun drawing maybe 2500 watts. The electrician tested the power draw, and it was about to the limit. He theorizes that the furnace condensation pump must have kicked in, and with the tenuous connection in the light fixture recepticle, it was too much.

So when it came down to it, nothing really was broken. That doesn't mean, though, that nothing needs fixed. That light-fixture recepticle arrangement gives me the willies, especially after last night.

So I asked the electrician how much he'd charge for a surface-mounted duplex outlet in the workshop and two in the main basement room. He suggested they all be on the same circuit, 20 amp rating. Should be enough for the power tools, work lights, and all.

He named what sounds like a reasonable price. But my regular electrician is coming by tomorrow night to look at things and give me a second bid.

Whomever I decide to use, if I'm to keep using the heat gun to tackle the woodwork stripping, I need a power source that can take it. I have a lot of items on my electrical improvements wish list, but the basement outlets have just moved up to No. 1.

Acute Overload

Tonight (meaning Sunday evening) I was down the basement making my weekly offering on the altar of woodwork stripping.

Used the Western Wood Doctor refinisher to take one piece of dining room-kitchen casing down to the bare wood. Dry-chipped the paint off the cornice of the lintel. Used the heat gun to take the paint off the top of the cornice of the long lintel on the dining room side of the casing between the dining room and living room.

Then after a break that lasted till after 11:00 PM, I went back down cellar to tackle the other piece of the casing going from the dining room to the kitchen. This piece was definitely a heat gun job, since it would not dry chip at all. Most of my woodwork has only three layers of paint: off-white, cream, and mushroom-beige; this piece adds a lichen green, among other colors, to the mix. Don't know what it was doing on the dining room side: Maybe it was originally in the kitchen and got moved when the POs-1 did their kitchen remodel.

So there I am at 1:30 AM or so, almost done stripping this thing with the heat gun, all but a few inches on the side edges. I'm on a roll. I could see me cleaning it off with the liquid refinisher before I was done tonight!

Then, suddenly, as I moved around to get a better angle on the remaining paint, the heat gun turned itself off. As did the work light, and the radio, and the pull-chain ceiling light in my workshop.

I should explain, perhaps, that I do my woodwork stripping in the main room of the basement of my foursquare. The workshop is under the former front porch, and it's too long and narrow to set up sawhorses. But there are no outlets in the main room, unless you count the one in one of the pullchain lights, into which is plugged a strange extension cord that leads to something on the furnace that does I know not what. Think it has something to do with the drain thingy that carries water through a long tube and ultimately drips it in my laundry room sink.

So if I want to plug anything in where I was working, I have to use the plug strip just inside the door of the workshop. But obviously, it wasn't just the plug strip that wasn't working, it was the circuit for all that room.

But I had lights where I was, and after shutting off the heat gun, I immediately checked the circuit panel.

Hmm. No circuit switches were tripped.

Tried the one marked "Basement." That turned off the lights in the main basement room.

Turned them back on, and tried a couple more switches that weren't marked.

No effect on the workshop lights.

Tried a couple more. Including, for some cockamamie reason, the one marked "Basement." It turned off the lights again, but when I pushed it back to On, they stayed Off. And that circuit switch is now limp.

Tried flipping the mains switch. No effect whatsoever, except that now I have to reset various electric clocks throughout the house.

There was nothing more I could do tonight, but sweep up the stripping mess by the light of the laundry room ceiling light. (Do not want the cats sampling the paint chips.)

And put in a call to my home warranty company. I may not be covered for this, but at least getting into the automated system will get an electrician out here to see.

(The really fun thing about this is the furnace. There's supposed to be a separate circuit for that; at least, that's what's marked in my panel. But what if that weird cord up to that pullchain light actually controls something essential, Without Which the Furnace Will Not Work?

I guess I'll find out if the toilet bowl water is frozen over in the morning . . . )