Friday, October 5, 2012

Living Room Wallpaper Pictures

 As promised . . .


Though it looks like I took pictures from only one angle.  So I'll make do with a shot of my back door with a couple coats of new red paint on it.
 

And here's the back door lintel spray-painted Rustoleum "Hammered Bronze" . . .


. . . With a little "Before" action to bid a proper farewell to yet more beige:


And here's the vent cover for the 2nd floor hall wall duct spray-painted bronze . . .


. . . because I can't afford the Arts & Crafts style register I really want and this will have to do.

And oh, yes, here's a the new middle mortise for the new-old screen door:


Once I sanded the paint off the doorposts I found traces of the original surface-mounted hinges, which later were supplanted by the mortised ones, and later still with the aluminum screen/storm assembly.  But barring the latter, always before there were only two screen door hinges, top and bottom.  My door, however, came with three, and all three are going in.

Thursday, October 4, 2012

Checking In

No business being up this late, but wanted to check in and say work is getting done around here.  The screen door still isn't installed on the back, but I've got a lot done with sanding off the old paint on the doorframe (so it'll fit!), cutting and sanding stock for to make stops for both the inner and outer doors, painting the steel lintel, and so on.

Frieda* came over this evening for a couple hours and we got some more of the red Owen Jones wallpaper up in the living room.

Pictures?  Yes, I should post pictures.  But my computer is slow and maybe, just maybe I might get called in to work in the morning.  Which could be in three hours.

Yikes.

Monday, September 17, 2012

Beige Again

No, not really.  For a little while, only.

Frieda* came over Saturday afternoon and helped me hang manila-paper blankstock in the living room.  Top strips only, the 12' ones that needed two ladders and four hands, because she had to leave by 7:00.  I worked till after 2:00 in the morning and finished blankstocking the three walls we started, and it really does look better already.

Even if the stuff is beige.

I'd hoped to get the fourth wall, the one with the fireplace, done this evening, but my feet hurt so badly when I got home from teaching that I lay down and um, rested a little.  Actually, I fell asleep.  For two hours, until Frieda* woke me up calling to find out how much more I'd gotten done on Saturday.

When I did get to the blankstocking this evening, I discovered the paperhanger guy is right-- if you're not going to finish up your mixed wheat paste all at once, splash some Clorox into it.  I didn't, and it was starting to smell.

Didn't feel like mixing up a new batch, so I've left it for later.  I've cut and labelled all the blankstock pieces for the fireplace wall.  That's enough for this evening.

Meanwhile, yesterday was nice out so I demounted the back door (again!), took it out to the sawhorses on the porch, and this time I got the old shellac finish off it.  It wasn't as difficult as I'd expected to dig the white filler out of the gouges (dog claws?) at the bottom of the stile on the lock side.  It was just spackle, and scrubbed out with a toothbrush and liquid remover.  Filled those and other major flaws with wood filler, and laid on a second coat of it this evening where the depressions were still apparent.

So what shall I do tomorrow?  Sand down the back door or hang blankstock?  Something to contemplate when I need to distract myself from the trials of teaching 7th grade algebra in the morning.

Saturday, September 8, 2012

Not What I Had in Mind

When I got up this morning, I was a woman on a mission.

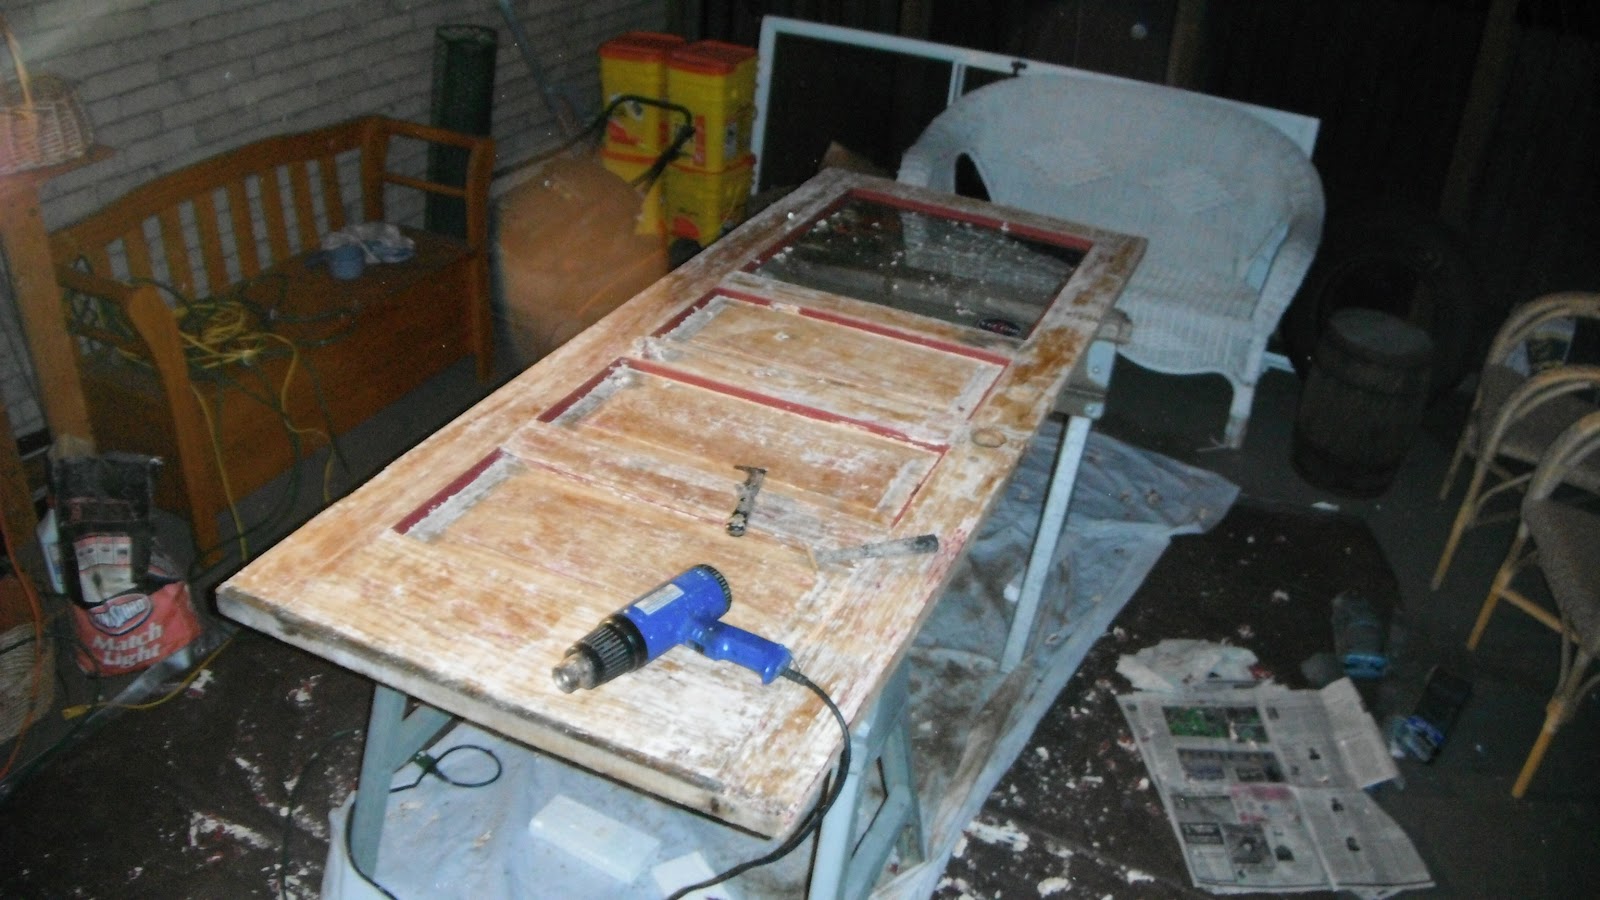
Now that the stripped-screw, hinge-hanging, barely-closing-anymore aluminum screen/storm door and its frame are off the back entry, it was time to finish what I started two days ago when I gave into the temptation to peel the paint off the outside of the big wooden entry door.  I was up by 6:30, and by 8:00 my breakfast was eaten and my morning chores were done.  The good baby gate (the one with the pedal-operated door) was wedged in the open back doorway to keep the pets in the house.  I'd confiscated a dead chipmunk from my going-on-fourteen-year-old calico, sent her inside, and given the rodent a proper burial-- in the garbage can.  Time to demount the big wooden door, lay it across the sawhorses on the back porch, take the Wood Doctor to its exterior to finish the stripping, fill the bad gouges, sand it as required, lay on four or five coats of shellac (to the exterior only), and hang it back up.  Today.  Before I went to bed.  I didn't want to have to wrestle that door back onto its hinges more than once, and I certainly wasn't leaving the back side of the house wide open while I was catching my Zzzzzs upstairs.  So if it meant staying up till 3:00 in the morning to get this done, by gum, I'd do it.

What is it they (maybe it was Bobby Burns) said about the best laid plans . . . ?

First off, I seriously underestimated how much paint still had to be removed from the stop moulding profiles.  Over two hours worth with the door still hanging, using the heatgun while sitting on a low stool in the open doorway with a cold rain and wind lashing the yard outside the deep back porch.  

Well, fine.  Don't want the door out on the porch till the weather settled down a bit anyway.

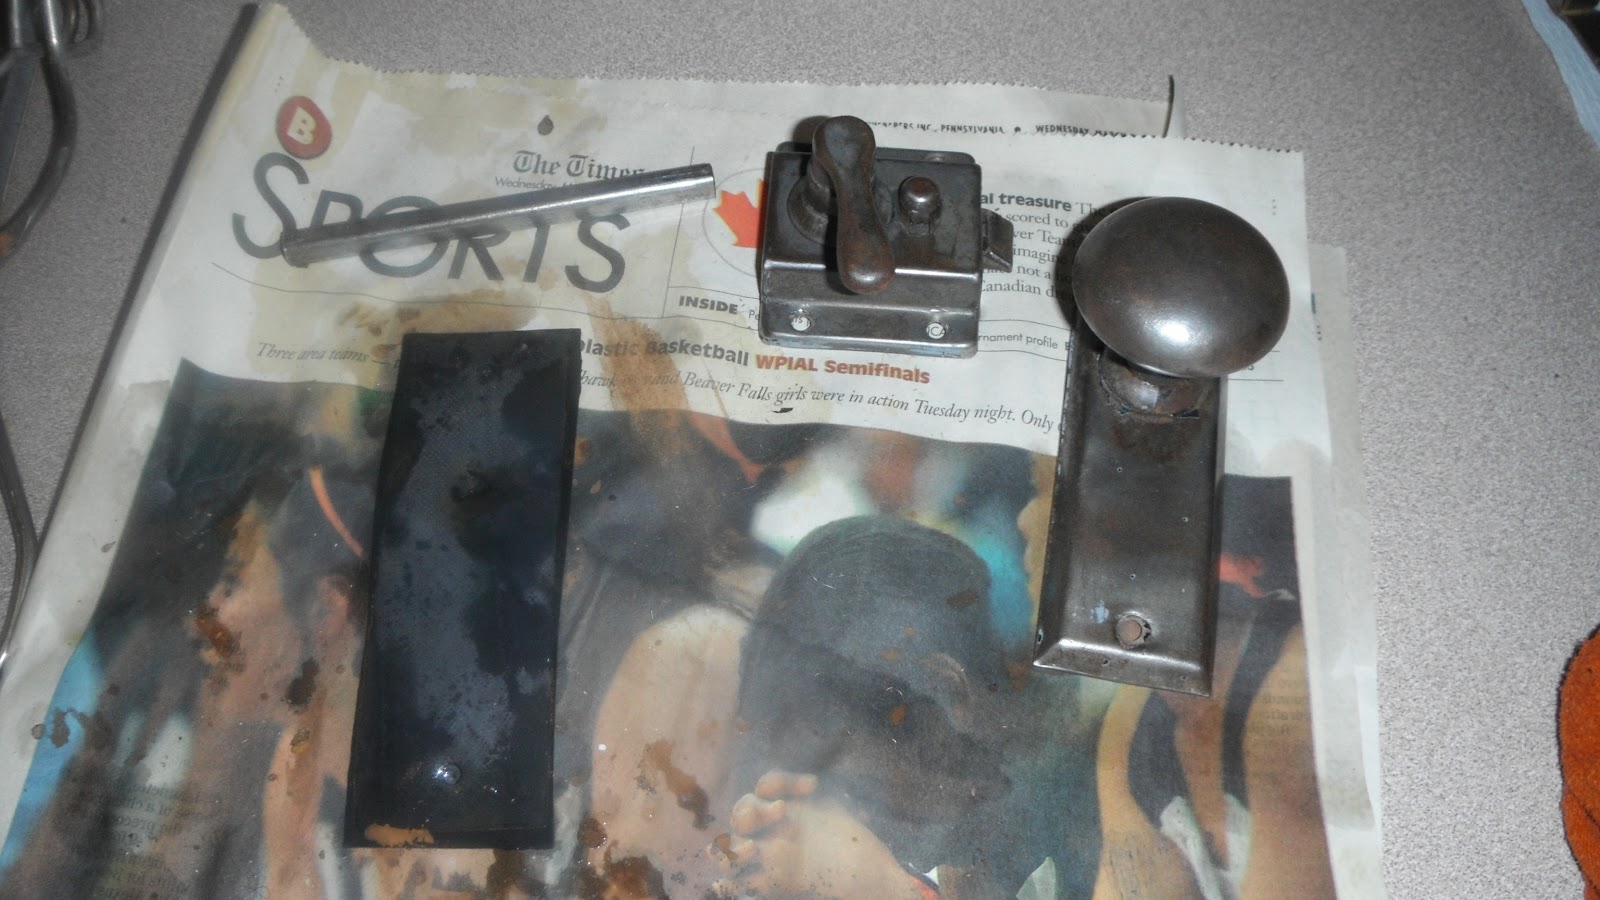
But then came the hardware malfunction.  A little after 9:00, I was ready to bubble off the paint trapped behind the knob and lock.   The deadbolt assembly came off easily enough, though there was a piece of metal I didn't notice until I was putting the parts into the berry picking carton for safekeeping.  (I hoped I could figure out where it belonged.)  And when the deadbolt cylinder casing came away from the interior face of the door, it pulled off a lot of the red paint and exposed the beigey-cream color underneath.  Boy, that'll look great repainted . . . not . . . (Cue ominous music.)

Likewise, it was simple getting the interior knob detached, too.

But the exterior knob, and the latch assembly . . .  ?  Oh, my.  It wouldn't budge.  Yes, I knew those little holes in the knob shaft probably gave access to some release mechanism.  Got the finest gauge brads I could find out of my workshop and found one small enough to go in.

Didn't do any good.

I put off thinking about it.  Finished heat-gunning the paint off the outside of the door, trying not to give in to the low blood sugar/useless adrenalin influx my setback with the knob was inflicting on me.  By around 10:15, I'd taken off all the paint I could reach and I had to deal with it.  Took several trips upstairs to look up sites on the Internet that might help me (this, and the Schlage spec sheet, were the most useful).  Repeatedly pushed, pulled, and turned the knob, to no avail.  Wandered outside to see if any of my neighbors had ever changed out a knobset.  Sorry, no.

Around 11:30, I called the local hardware store that cut all my keys.  Clerk suggested I try the hole on the other side of the knob.  Hmm.  Substituted an unbent paper clip for the little brad and tried to poke it in.  Not going.  Maybe, I suggested to the hardware store clerk, the holes in the knob stem are misaligned.  I'll try fixing that.  Still on phone, I pushed in the latch bolt so the innards of the knob stem wouldn't move, and turned the knob.  It clicked around, then stopped.  Oh, joy, now I've got the knob frozen up and the latch bolt is stuck retracted in door.  And the store's locksmith isn't in today.  Maybe Monday?

I really didn't want to have to spend money on a locksmith.  It wasn't what I'd had in mind.  But after more futile pulling and turning, I called and talked to one.  Despite my very specific explanation, he didn't have a clue what I was talking about.  Had I tried removing the screws from the rose?  No, I repeated patiently, this model has little holes, and no visible screws. He quoted me a price:  $29 just to come out plus $35 labor, not including parts and tax.  I found his patronizing lack of imagination disquieting.  Told him it was early yet (12:30 PM), and I'd like to call some other locksmiths to compare.

Back downstairs.  More turning (rather, not turning), pulling, and frustration.  More lightheadedness.  Not that many locksmiths in the phone book.  Called what there were.  No answer, or got an answering machine, or the same company as I called the first time, under a different name.  Ate something, felt a little better.

And got a sensible idea. Why not try Craig's in New Brighton, the hardware store I'm in an out of every weekend and ask what locksmith they recommend?  Clerk gave me the name and number for a guy named  Elmer W., and said he was good.

The reason I don't give Elmer's full name and with it a reference is that, strangely, he didn't bring any tools in with him-- he used mine.  But he arrived at the house in very good time and got the job done in short order, primarily by knack and main force.  Took a certain amount of pushing and pounding to get the outer knob cylinder free of the door.  When it and the latch assembly came out, he showed me the point of a nail protruding 1/8" or more into the circle of the bore hole.  Probably it was there to hold in the block that filled the mortise where the original mortise lock used to be.  And that's what everything was getting hung up on-- a little present from a previous owner.

Elmer only charged me $10.  As I was writing the check, I asked him what that little tongue of metal was that had come out of the deadbolt.  It's the piece that actually makes the bolt go in and out, and shouldn't there be another one of them?  Hadn't seen any, I told him.  Well, then, maybe not.

By the time the locksmith left, it was rising 3:00 o'clock.  It was nearly seven hours since I started this morning.  The door was finally on the sawhorses-- I moved it while waiting for Elmer to get here-- but   the ancient alligatored shellac was still on the door.  And it remained on the door, and remains to this time, because . . .

Because I took a good hard look at the inside face of  this door.  I saw the paint I'd pulled away with the deadbolt cylinder.  I saw how the red color I applied in 2004 had begun to chip and fade.  I visualized the effect of liquid stripper running down the edges and making inroads into the paint.  I imagined how impossible it would be to remove that paint at some future time without destroying the shellac job I was about to apply.  It wasn't what I had in mind, but it had to be done:  The interior surface had to be stripped.

First, then, I had to remove the metal retainer piece from the long-departed weatherstripping at the bottom of the door.   Screws painted over a million times took repeated heatings to clear off enough paint to get at the slots.  Once the metal strip was off, I saw that it was original to the door-- the wood underneath it was bare.

Then there was the sliding bolt my previous owners attached to the bottom of the door.  I hated losing that, in a way.  But it was loose and bent and I needed to get at the paint under it.  But try as I might, I couldn't convince it to reveal its screws.  Had to pry it off.  Some of the wood came off with it.  Oops, well, that's some more patching to do.

Ate something to recruit my strength.  Then finally, finally, got to the stripping.  On the painted side of the door.  Barring 45 minutes or so for supper, I worked nearly six hours straight. Used the best heat gun, the one that goes to 1200 watts, which I now read isn't the best idea with lead paint, since it vaporizes it.  I admit, my throat was a little irritated until I had the sense to put on a mask.  That side of the door has, as I suspected, always been painted, so though the paint came up pretty well under the heat, it didn't sit up and beg to come off the way the two layers of latex on the exterior had.  The scraper jumps, gets stuck, and hesitates from time to time.  Result?  Some not-so-pretty five-in-one tool marks in the wood.  In fact, the inner surface of the door looks downright rustic.  It'll need sanded, or filled.  It needs sanded anyway, because the bottom-most layer of paint isn't entirely off.  Yeah, that'.s the thick white leadbased one.

At 9:10 PM I still had paint in the profiles.  Not to mention what there was around the window glass which I wasn't going to tackle with that heat gun, for fear of breakage.  Time to give up for the evening.  Didn't have enough light to keep myself from gouging the wood, and my left hand holding the heatgun was literally shaking.  It's not what I had in mind, but I wrestled the door back and rehung it.  Then I shop vac'd the back porch, and cleaned up all the hard crunchy curlicues of paint.  And set out to reinstall the deadbolt for the night.

This is where I learned that Elmer the locksmith had been right the first time:  There were supposed to be two of those metal tongues in that lock.  And it dawned on me that the metallic-looking "strip of paint" I'd vacuumed off the backdoor welcome mat a few minutes before was probably the piece I needed.

Not to panic.  That's one thing nice about shop vacs-- if necessary, you can open them up and retrieve what's been sucked inside.  Gloved up again, selected a metal plant prop from my gardening tools, and began to fish around.

No joy. But here's where I had a sensible idea, and it worked.  Fetched a strong magnet and stuck it on the end of the plant prop.  My "rod" thus baited, I did better.  The missing tongue soon attached itself and I hauled it up.

And believe it or not, I didn't have too much trouble getting the lock back together-- once I'd consulted a photo I took earlier and got it oriented the right way up.  It locks just fine, and the knob hole I've stuffed with an old towel. 

I am knackered.  Don't know how much I'll get done on this tomorrow.  At the moment, I'm too tired and achy to have much of anything in mind.  In consideration of the luckless chipmunk my kitteh slew this morning and the shellac that's still on the door, I sign off with this:


But Mousie, thou are no thy-lane,
In proving foresight may be vain:
The best laid schemes o' Mice an' Men,
Gang aft agley,
An' lea'e us nought but grief an' pain,
For promis'd joy! 

                            ---Robert Burns, "To a Mouse, on Turning Her Up in Her Nest with the Plough"

Friday, September 7, 2012

Back Door Project Addition


Look upon it and lament; ye shall soon see it no more.
My friend Frieda* came over tonight and in short order she and I together removed the falling-off aluminum back screen/storm door and its frame.  It marked the End of an Era, an era that would have ended three or four years ago if I'd gotten around to it.

R.I.P. aluminum screen/storm door
(Moment of silence for the aluminum door.)

Now that the screen door is down and I've pried off one piece of trim from the hinge side of the door,  I've been able to make some observations about the back door and its surround, historical, structural, and other-al:
Hooray for friends wielding power tools
  • The wood trim on the outside is not original.  Bless me, I'd been thinking for years it was, and had been working out in my mind how to repair the ogee that was cut out when they installed the aluminum door.  It was Frieda who said, "I don't think that's what was on the house.  I think it's modern."  You know, she's right.  In fact, I have a couple lengths of the very material down the basement.  The POs-1 also used it for trim under the portal sill between the living room and front hall.
  •  
  • The original brickmould was probably like what still surrounds the openings from the front hall and the living room in the front room, which used to be the front porch.  I've spent some time tonight online (no, really!?) researching and I think I can get a reasonable facsimile of it from a lumber and millwork dealer down in Pittsburgh.  If they aren't to the trade only.
  • The original house trim finish was a dark brownish-black stain or dye.  No paint, no shellac.  Just stain.  This fits with what I encountered in the front room when I was stripping the openings there.
  • The door frame itself is a big ole 3x6.  It's not in the best of shape-- plenty of nicks and dings-- but it will do.  Maybe by itself until I can get some new trim.
Gap needing filled
  • There's a gap maybe ¼" to 3/8" wide between the 2X6 doorframe and the brick.  I intend to clean it out and fill it with backer bead and caulk, whether I get new brickmould in there or not.
  • Frieda and I brought the new-old screen door up from the basement and set it in the opening, just to see how it fits.  It does, basically, but there are some absurd gaps between the door and the frame here and there where the frame has gotten out of square.
Funny and inadequate screen door stop
  • The funny little blocks nailed against the stop mouldng halfway up the door height look to be the only stops the original screen door, whatever that was like, ever had.  The stop moulding I've been working so hard this week to sand clean measures ½" by 1¾", and is eased on the vertical edge towards the exterior of the house.  It comes 1¼" short of the inside face of the replacement wooden screen door.  No sign of any other stop moulding a screen would have closed against, just those little blocks.  As much as it pains me to remove any original element like the stop moulding (especially after I've worked so hard to strip it), I may well do it and replace it with ½" by 3" material that my screen door can close against.  Those gaps I saw between door and frame pain me even more.
So this is more work added to the back screen door project, which was only supposed to involve stripping and repainting a salvaged door and hanging it on its hinges.  And here I have to get up at the crack of dawn to finish stripping the wooden back door, another thing added to the fun . . .

Thursday, August 2, 2012

If I Had a (Pneumatic) Hammer

Pete Seeger's got nuthin' on me.  This picture doesn't tell you a lot, and that's not just the fault of the camera that's embedded the wrong rotation code..  No, this picture reflects a good half hour or more of work yesterday evening trying to countersink the nails in the plywood with a claw hammer and a center punch, and blast me if it did any good at all.

This is not working this is not working this is not working!  And I can't do anything more with that floor until those nails are hammered in.  They have to be covered over so I'll have a decent surface to paint.

So I went upstairs  and started looking things up on the Internet, hoping to get a better idea.  I learn it could be the previous owners used ringshank nails to pin down that plywood (the mandatory 2" on center around the perimeter and 4" oc apart in the field.  Or closer), and that's why I couldn't get them to budge.  I mean, I can countersink a very pretty nail and have in my day, many a time.  Something is different in my hall, and I doubt it's because the nails are bewitched.

This is the most useful idea I came up with in my research.  It's a palm impact nailer, it uses regular standard nails and not the strip sort you use with typical nailguns.  YouTube videos I watched tell me I could use it to force existing nails deeper into the wood, as well as driving new nails into a countersunk position in the first place.

You can also get it in a smaller version, which apparently does the same thing, if a bit more slowly.  It's a lot cheaper and less fatiquing, too, being a third of the weight.

But I really don't need to be buying new power tools at this juncture.  And these things need to be connected to a compressor.  I know of one I can borrow, but not for another three or four weeks.  I don't want to wait that long to deal with this floor; because painting will involve my sleeping downstairs for awhile, I want to get the project finished before the new school year starts and I go back to work.

So this afternoon I went to the used tool paradise up in Beaver Falls.  Biggest reason was to see if they had any ½" pipe long enough to use with my pipe clamps to put the screen door back together.  But I also wanted to ask them if they had any ideas about countersinking those nails.

Guy there thought they had one of those little impact nailers for sale, used.  But no, it'd been sold.  He tells me I could rent one from his boss, and a compresser, too.  Hmm.  For what that'd cost I could buy the smaller nailer and have it-- assuming I could borrow the air supply.

Came home with a new (to me)36" pipe clamp assembly and a ¼" diam. centerpunch.  Tried the latter on the plywood floor.  Oh, crumb.  I can make a dent with it, but not a dent with the nailhead sunk in.  .

Fresh ideas welcome.  But I know what I wish I had so I could get things over with . . .


Tuesday, July 31, 2012

Meanwhile, Down the Basement . . .

The last of the wood filler.  I hope.
Paint stirrer to the rescue
I'm making progress on tarting up with reclaimed screen door.  Except for a couple of places I discovered when I (thought I) was finishing up the sanding, both the door and its insert are both filled and sanded.  The patches in the old hinge mortises are dry, planed, filled, and sanded.  (I confess it-- I used pieces of clean paint stirrers).  Of course I had to make extra work for myself and put a dent in the moulding of the stile when pipe-clamped those mortise filler strips a few days ago.  Oh, well.  Yesterday I put the travel iron and a wet washcloth to work, and the squished place popped back up, good as new.

Note idiot clamp dent on near side.

A little steam should revive it.

Good as new.  (Under the circumstances)

Note vet tape in lieu of clamps.  Now I remember what I should use!


Cut the new pegs this afternoon.  2-3/8" each.  Not sure why, but I'd looked forward to/dreaded that task as some kind of mile stone.  Like maybe it means this thing is actually going to get done, for realz.  And maybe now that's true.

(Hope I don't have to fiddle around with cutting them shorter.  I mean, didn't I spend enough time drilling out those holes?)

Scraping Along

Midmorning today I was glaring at the old dried-up vinyl flooring glue around the perimeter of my stairhall floor, and decided, oh, phooey, I've got the stuff, I'd give the radically-misnamed "EasyRelease" adhesive remover another shot.

Only this time I really disobeyed the instructions.  This time I mixed it with water one-to-one.  Thanks to that, or maybe because yesterday's application had some residual effect, this time it worked.

Not until after two hours of soaking with periodic reapplications, and not without a good three or four hours of scraping.  But at least today the scraping yielding results with less wasted effort and frustration than yesterday.

Didn't bother to sequester the kittens today.  Barricaded the wet strip with a very wide baby/pet gate a friend let me have when she moved.  But they got a whiff of the chemical and made themselves scarce.  But once I started working I barely prevented my going-on-14 calico from jumping down into the open heat register to explore the ductwork.  Oh, no, you don't!  Outside with you!  The dog, however, was content to watch from the front room. 

Started with the west wall.  Didn't start spraying the bit at the foot of the hallway bench on the east side until I started scraping the first application.  I was thinking maybe it might help to keep the work area wet.

Maybe it did.  At least, I got the result I wanted-- the old adhesive off the floor.  I also got a few gouges in the plywood, but the filler material will deal with that.  At this moment, I Do Not Care.

Monday, July 30, 2012

What You Callin' 'Easy'?

Remover applied
I've always wanted ceramic tile in my 1st floor hall.  Had it all picked out.  I'd doodle my tile job detail during choir practice--underlayment, Ditra, thinset, tile, and all.  Then late last winter I got the depressing news:  A trustworthy tile pro informed me I shouldn't do it unless I tore the whole floor out and sunk a new one between the joists.  For even if I reinforced the springy place in the existing floor I'd still be out of Code with a too-shallow bottom  step.  Feasible, but pricey.

Frankly, I'm out of Code already, thanks to the ½" plywood my previous owners two back slapped down to underlay the ever-so-(un)attractive sheet vinyl they chose.  The bottom riser is that much shorter than the rest even now, and it doesn't bother me.  Would another half inch or so of tile, etc., matter that much?

Test for riser comfort/safety
Late in May I bought one of my chosen tiles at the Big Orange Store, set it on the floor at the bottom of the stairs with some thick cardboard under it to simulate the setting materials, and walked down the stairs a few times.  No.  Ow.  Yep, it would matter.  "Watch that bottom step, Ethel, it's a doozy."

Well, maybe I could pry up the plywood and make something out of the original tongue and groove floor beneath. 

It was no go.  I think the POs-1 didn't merely nail it, they glued it down as well.  And I wasn't up to getting down with the circular saw and cutting it up into little puzzle pieces and heaving them up one by one.  No telling what that'd do to the T&G.  And there'd still be the dried adhesive to deal with.  Hmm, no.

Withal, I've decided, the only thing for it is to fill and sand the plywood (which is a decent, regular, knotless, interior grade) and paint it.  In a faux tile pattern that'll simulate the Gothic Revival tiles I always wanted.  But first, I have to get the vinyl adhesive residue off.

The product in question
Could be worse.  It's only around the perimeter of the L-shaped space and along the verges of the floor heating register.   I rejected trying to sand it off.  Chemical methods should be easier and more economical, I thought.  So I bought a bottle of Henry EasyRelease Adhesive Remover a few weeks ago, and today, I tried it.

Ohhhhhhh, my.  Easy release?  Not so much.  The label says to dilute it 4 to 1 with water, apply it to your dried, hardened glue, then wait one to two hours for the loosening action to work.  I sprayed on the first application around 2:30 PM and according to the instructions renewed it every so often (every twenty to thirty minutes) to keep it wet and working.

After two hours, I went at the (theoretically) softened glue with my 5-in-1.  No joy.  It barely made a dent.  Tried adding more adhesive remover to the bottle to make the mix more like 3 to 1.  Squirted it on and waited another hour or so, reapplying at intervals.

The ordeal begins
By this time it was nearly 5:30 PM.  Upstairs in my bedroom my two younger cats were sequestered behind the closed door, to keep them and their tender paws out of the adhesive remover.  Neither of them was happy to be held captive, and might have been plotting all sorts of dire revenge in the form of poo in the shoes or smelly yellow puddles on the bed.  They had to be sprung as soon as possible.  Meanwhile, the dog, exiled to the back porch, was leaping at the screen door and barking in protest at having to be outdoors without me.  (My oldest cat would stay outside all day and all night if I let her.)  Okay, kids, I'm working as fast as I can!  I went at the old glue again with the 5-in-1, a putty knife (useless) and the paint remover hook.   And went at it, and went at it, and went at it.

Done, barring the gunk hung up on the nailheads
I'm tired, I give up
The old glue started coming up, but it was hard work.  I kept at it steadily but by a few minutes before 8:00 I had less than half the ring of residue removed from the plywood, my knees were hurting, red, and swollen despite the pads I wore, and I was thoroughly fed up.  If this product brings up adhesive residue easily, I'm Mike Holmes' new forewoman.  I had to stop.  Rinsed the application sites with cold water per the directions, including the places I'd sprayed with remover but didn't/couldn't scrape, put everything away, and liberated the captive pets, indoors and out.  Thank goodness the kittens (five-year-old kittens) had controlled themselves.

Still to do, and only part of that


I'll try to get the rest tomorrow.  Pretty tired and disgusted now.  The sander might be an option after all.

Sunday, July 29, 2012

Arrières Pensées

Yves Tanguy, Arrières-pensées (Second Thoughts), 1939
The prep work in the living room is finally done.  The last of the old beige moiré paper has been stripped, loose plaster has been resecured and patched, large missing pieces (behind the baseboards) have been filled in with drywall, the old wallpaper size/paste has been scrubbed down and stabilized with Gardz sealer, cracked have been taped and mudded and nailholes spackled, the silly skinny cornice moulding impinged upon by the ceiling paint has been given a faux natural wood finish courtesy of some brown paint I found in the basement and three or four coats of walnut-tinted shellac, and all four walls have received a coat of wallpaper-compatible primer.  Including the wall above the fireplace, where the wet places used to be.  The holes and flaws in the door frames are filled with wood filler and wiped smooth with alcohol on fine steel wool to avoid raising dust.  The door and window frames need a few coats of shellac, but otherwise, everything is prepared and ready for wallpaper.

But I'm not jumping up raring to hang it.  It may have something to do with a dream I had recently . . .

    I was in a house, and it was my house, though it looked nothing like it.  I was in a large room, beautifully wallpapered, and  the papering job was mine.

        The predominant color was a kind of deep warm rose-pink, with subtle pattern of more orangey-reds, with accents of darker and lighter colors running through it.  The effect was very rich, and though the paper wasn't any of my William Morris patterns, I knew it was very expensive, like something you would get from Bradbury & Company.  The most striking thing was a border about five inches high that ran horizontally around the room about four feet above the floor.  This wasn't applied over the other paper; no, it was integral with it.  The paper came in five foot widths, and I'd hung it as directed, horizontally, so the border showed as it ought, with the upper width overlapping the lower.


        I stood there admiring the effect, when all of a sudden the upper five-foot strip began to come loose from the wall, just to the left of the doorway.  Oh-oh!  I'd better go get some paste and stick it back up, fast.  But I wasn't sure where the paste was, because now it seemed that I wasn't in my own house, but this was a room I was living in in a house owned by somebody else, maybe my older sister, and I didn't want to go upstairs and bug her.


        My bed was opposite the door, I was tired, and I thought maybe I could leave this till morning.  But as soon as I sat down on my bed, more of the top width of wallpaper started peeling off.  No!  I ran over and literally caught it in my arms as it came loose from the wall.  I saw that underneath it the other, coordinating paper was also railroaded, and it went from baseboard to ceiling.  And as I stood there struggling, it, too, began to cascade down.


        All around the room the beautiful expensive paper was coming off the walls, and rippling down wrinkled and ruined, so it couldn't be put back up and reused.  What did I expect, I told myself.  This was a basement room, so maybe it was damp.  But I thought I'd taken that into consideration when I'd done the papering!


        Then I looked up, and saw that I'd also papered the ceiling in the deep rose-pink paper, complete with an ornamental border with special motifs in the corners.  And this, too, began to peel off and hang down.


        I was distraught!  All that work!  All that money!  The job was ruined and I was ruined!  What could I do?


And the only thing that saved me from utter nightmare misery was making myself wake up enough to remember that the only room I have wallpapered so far is the stairhall, and it's in William Morris "Blackthorn" and it's only on the bottom of the walls and it's adhering very nicely, thank you very much.

 At the time this seemed like only a frivolous dream, and I was more frivolous still for writing it down.  But maybe not.  Maybe it's me trying to come to terms with what I'm going to do with the red on red "Owen Jones" wallpaper I bought for the living room, if I don't get lucrative work soon and have to put the house on the market in the foreseeable future.  The price of the paper has nearly doubled since I laid in my supply three years ago.  And what about all the blankstock I've bought, too?  Maybe it might be better just to paint the living room walls and those in the dining room as well and get the trim back up, then wait and see what happens to me financially before I blow the expensive Morris paper on it.  Because if I hang it and have to move, sure as shooting the realtor will tell me I should take it back down in order to sell the house.  Or the new owner will take it down and all my effort will be wasted.

I don't know.  I have to consider that not using what I've got would mean blowing money on more paint, with no guarantee that I'd want to use the papers I have in my next house, if any.  And if I'm renting or boarding with somebody, how could I?

No decisions yet.  I still have a lot of work to do on the screen door and on the floor in the 1st floor hall.  I'll see what my local DIY friends think.  And if any of my DIY cyber friends want to weigh in, please do.


Friday, July 20, 2012

Transformation

If my DIY life were a piece of music, it'd be a Baroque fugue with two or three themes running in counterpoint to one another.

Upstairs we have the work on the living room walls-- scrubbing, sealing, patching, and all the rest.  Down the basement I'm still getting the last of the paint off the salvaged screen door.  But up in the kitchen the last few days there's been a variation on the screen door theme-- transforming its original hardware.

Please pardon rotation fail.  Technical difficulties.
I've mentioned before what a jolly hard time I had even getting the pieces off the door.  Then I struggled to free the hinges from the aluminum shims the door's previous owner for some reason had to use.  Bought a new drill bit at the hardware store a couple Saturdays ago to drill out the last four screws, and that worked great on exactly two of them.  Just drilled in to weaken the remaining screw from the top, then pivoted the aluminum pieces and hit them off with a hammer.  But the last two screws were stuck in one hinge, so that technique wouldn't work.  Oh, I tried the drilling part.  Bit went dull on me and gave up any pretense to removing any material.  Ditto with one I had lying around.  So it was back to the hardware store this past Saturday to buy another bit and see if they had any other ideas.

Hinges boiled once
Happily, they did.  One of the owners simply took the offending hinge into the shop and drilled the stuck screws out for me.  Thank you, thank you, thank you!  Bought a new 5/8" bit anyway, since I'd trashed the other two.

Curses, boiled again!
Now that all the hardware was off and ununcumbered, I could start having fun.  The hardware as I got it was a brown tone, and if I weren't too particular I could've claimed it was patina and left it as was.  But I knew better. Using the recipe from the StuccoHouse blog, I boiled the hinges and latchset (separately) in water laced with baking soda.  The first half-hour boil made a disgusting mess on the stove (because the pan leaks and the lid doesn't fit tight) and bubbled up the brown top coat of paint.  The pieces looked rather like melted chocolate, but not a particularly good or appetizing brand, if you catch my drift.  The second 30 minutes in the pot loosened the black underlayer. 

The black may have been the finish as it came from the store, but it was compromised in many places and had to go.  Scraped and steel-wooled it off, just as I had the brown.
Yummy!

So by last Sunday night I had a set of nice,
Hinge parts, clean and draining
Latchset, clean
clean (if a little rusty) screen door hardware draining on my kitchen counter.  And the rust mattered, because even though this door isn't going to be directly exposed to the elements, it'll still be on the exterior and subject to humidity and moisture.  I didn't want to paint it again; what could I do to protect it?  I kept thinking "oil-rubbed," but that usually applies to bronze.  Can you have oil-rubbed steel?

A little research online unearthed a promising but alarming article on oil-rubbing, replete with instructions about heating up your metal pieces to burning-hot and melting your oil, wax, whatever, into them.  No thanks, don't want to destroy my kitchen counters or burn the house down.  The promising part came when it told me I could apply tung oil cold.  And that it was especially effective on metal that was pitted.  You want pitted metal?  I got your pits right here.

One coat of tung oil. Getting there.

Two coats of tung oil.  Much better
I found my bottle of tung oil in the workshop, but believe it or not, it took me a day or two to figure out how to get the safety cap off.  But after the ViseGrips came to the rescue, I applied two coats of the oil to all the pieces except the screws, waiting 24 hours between coats as recommended.

Finished yesterday and I think they look really neat, almost as if they were bronze.  All they need now is a coat of paste wax-- once I remember where the dickens I put the can.