Showing posts with label cats. Show all posts

Saturday, September 8, 2012

Not What I Had in Mind

When I got up this morning, I was a woman on a mission.

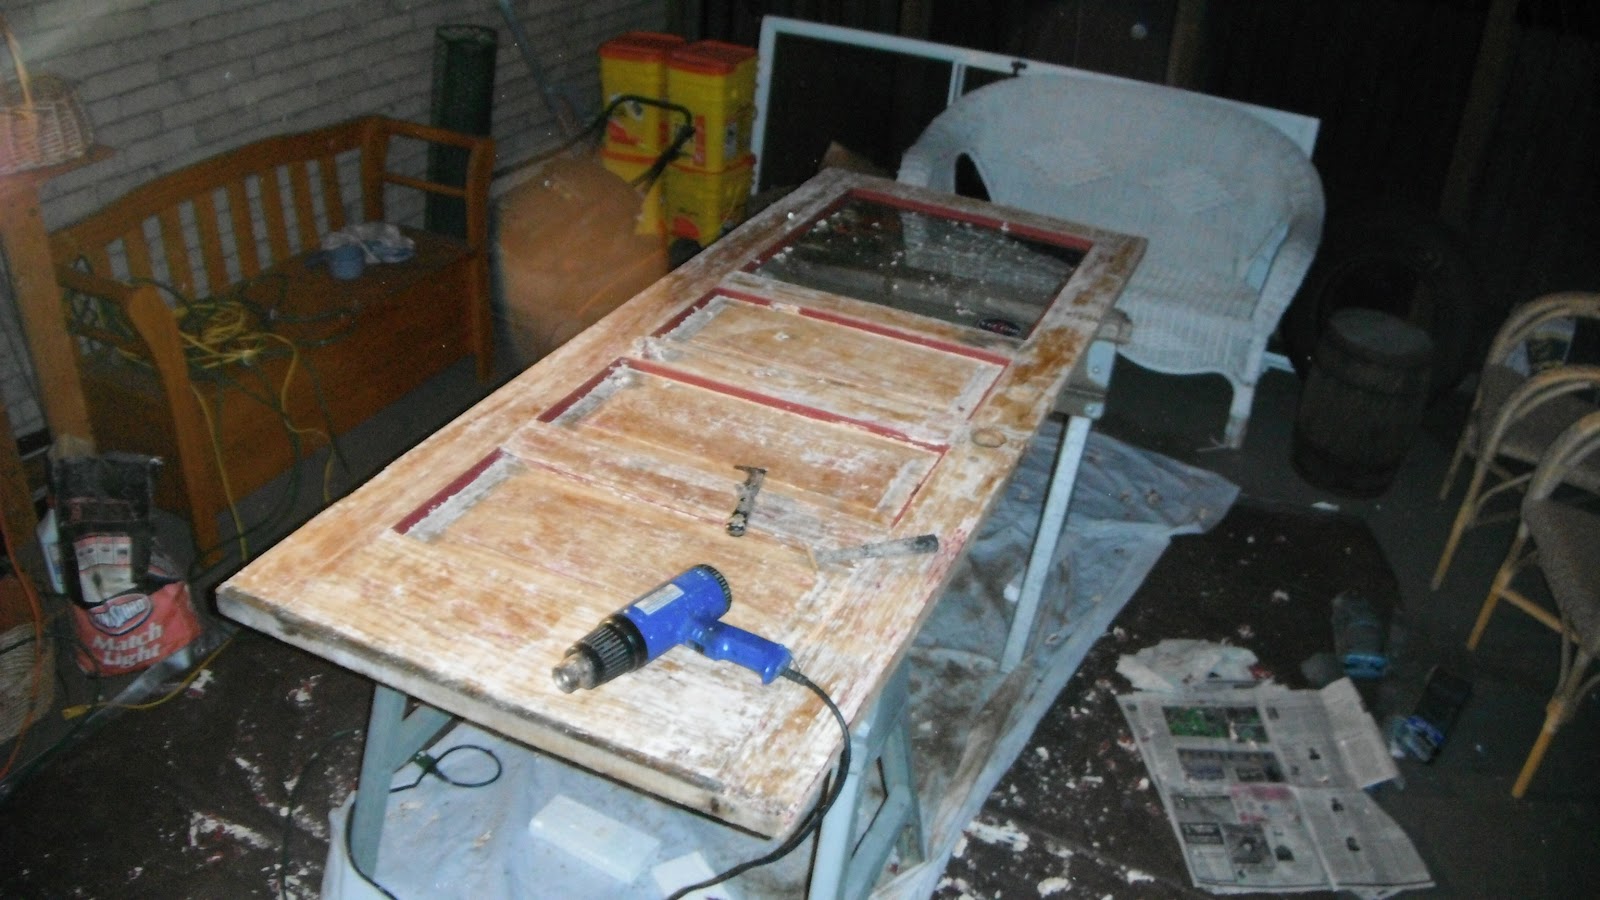
Now that the stripped-screw, hinge-hanging, barely-closing-anymore aluminum screen/storm door and its frame are off the back entry, it was time to finish what I started two days ago when I gave into the temptation to peel the paint off the outside of the big wooden entry door.  I was up by 6:30, and by 8:00 my breakfast was eaten and my morning chores were done.  The good baby gate (the one with the pedal-operated door) was wedged in the open back doorway to keep the pets in the house.  I'd confiscated a dead chipmunk from my going-on-fourteen-year-old calico, sent her inside, and given the rodent a proper burial-- in the garbage can.  Time to demount the big wooden door, lay it across the sawhorses on the back porch, take the Wood Doctor to its exterior to finish the stripping, fill the bad gouges, sand it as required, lay on four or five coats of shellac (to the exterior only), and hang it back up.  Today.  Before I went to bed.  I didn't want to have to wrestle that door back onto its hinges more than once, and I certainly wasn't leaving the back side of the house wide open while I was catching my Zzzzzs upstairs.  So if it meant staying up till 3:00 in the morning to get this done, by gum, I'd do it.

What is it they (maybe it was Bobby Burns) said about the best laid plans . . . ?

First off, I seriously underestimated how much paint still had to be removed from the stop moulding profiles.  Over two hours worth with the door still hanging, using the heatgun while sitting on a low stool in the open doorway with a cold rain and wind lashing the yard outside the deep back porch.  

Well, fine.  Don't want the door out on the porch till the weather settled down a bit anyway.

But then came the hardware malfunction.  A little after 9:00, I was ready to bubble off the paint trapped behind the knob and lock.   The deadbolt assembly came off easily enough, though there was a piece of metal I didn't notice until I was putting the parts into the berry picking carton for safekeeping.  (I hoped I could figure out where it belonged.)  And when the deadbolt cylinder casing came away from the interior face of the door, it pulled off a lot of the red paint and exposed the beigey-cream color underneath.  Boy, that'll look great repainted . . . not . . . (Cue ominous music.)

Likewise, it was simple getting the interior knob detached, too.

But the exterior knob, and the latch assembly . . .  ?  Oh, my.  It wouldn't budge.  Yes, I knew those little holes in the knob shaft probably gave access to some release mechanism.  Got the finest gauge brads I could find out of my workshop and found one small enough to go in.

Didn't do any good.

I put off thinking about it.  Finished heat-gunning the paint off the outside of the door, trying not to give in to the low blood sugar/useless adrenalin influx my setback with the knob was inflicting on me.  By around 10:15, I'd taken off all the paint I could reach and I had to deal with it.  Took several trips upstairs to look up sites on the Internet that might help me (this, and the Schlage spec sheet, were the most useful).  Repeatedly pushed, pulled, and turned the knob, to no avail.  Wandered outside to see if any of my neighbors had ever changed out a knobset.  Sorry, no.

Around 11:30, I called the local hardware store that cut all my keys.  Clerk suggested I try the hole on the other side of the knob.  Hmm.  Substituted an unbent paper clip for the little brad and tried to poke it in.  Not going.  Maybe, I suggested to the hardware store clerk, the holes in the knob stem are misaligned.  I'll try fixing that.  Still on phone, I pushed in the latch bolt so the innards of the knob stem wouldn't move, and turned the knob.  It clicked around, then stopped.  Oh, joy, now I've got the knob frozen up and the latch bolt is stuck retracted in door.  And the store's locksmith isn't in today.  Maybe Monday?

I really didn't want to have to spend money on a locksmith.  It wasn't what I'd had in mind.  But after more futile pulling and turning, I called and talked to one.  Despite my very specific explanation, he didn't have a clue what I was talking about.  Had I tried removing the screws from the rose?  No, I repeated patiently, this model has little holes, and no visible screws. He quoted me a price:  $29 just to come out plus $35 labor, not including parts and tax.  I found his patronizing lack of imagination disquieting.  Told him it was early yet (12:30 PM), and I'd like to call some other locksmiths to compare.

Back downstairs.  More turning (rather, not turning), pulling, and frustration.  More lightheadedness.  Not that many locksmiths in the phone book.  Called what there were.  No answer, or got an answering machine, or the same company as I called the first time, under a different name.  Ate something, felt a little better.

And got a sensible idea. Why not try Craig's in New Brighton, the hardware store I'm in an out of every weekend and ask what locksmith they recommend?  Clerk gave me the name and number for a guy named  Elmer W., and said he was good.

The reason I don't give Elmer's full name and with it a reference is that, strangely, he didn't bring any tools in with him-- he used mine.  But he arrived at the house in very good time and got the job done in short order, primarily by knack and main force.  Took a certain amount of pushing and pounding to get the outer knob cylinder free of the door.  When it and the latch assembly came out, he showed me the point of a nail protruding 1/8" or more into the circle of the bore hole.  Probably it was there to hold in the block that filled the mortise where the original mortise lock used to be.  And that's what everything was getting hung up on-- a little present from a previous owner.

Elmer only charged me $10.  As I was writing the check, I asked him what that little tongue of metal was that had come out of the deadbolt.  It's the piece that actually makes the bolt go in and out, and shouldn't there be another one of them?  Hadn't seen any, I told him.  Well, then, maybe not.

By the time the locksmith left, it was rising 3:00 o'clock.  It was nearly seven hours since I started this morning.  The door was finally on the sawhorses-- I moved it while waiting for Elmer to get here-- but   the ancient alligatored shellac was still on the door.  And it remained on the door, and remains to this time, because . . .

Because I took a good hard look at the inside face of  this door.  I saw the paint I'd pulled away with the deadbolt cylinder.  I saw how the red color I applied in 2004 had begun to chip and fade.  I visualized the effect of liquid stripper running down the edges and making inroads into the paint.  I imagined how impossible it would be to remove that paint at some future time without destroying the shellac job I was about to apply.  It wasn't what I had in mind, but it had to be done:  The interior surface had to be stripped.

First, then, I had to remove the metal retainer piece from the long-departed weatherstripping at the bottom of the door.   Screws painted over a million times took repeated heatings to clear off enough paint to get at the slots.  Once the metal strip was off, I saw that it was original to the door-- the wood underneath it was bare.

Then there was the sliding bolt my previous owners attached to the bottom of the door.  I hated losing that, in a way.  But it was loose and bent and I needed to get at the paint under it.  But try as I might, I couldn't convince it to reveal its screws.  Had to pry it off.  Some of the wood came off with it.  Oops, well, that's some more patching to do.

Ate something to recruit my strength.  Then finally, finally, got to the stripping.  On the painted side of the door.  Barring 45 minutes or so for supper, I worked nearly six hours straight. Used the best heat gun, the one that goes to 1200 watts, which I now read isn't the best idea with lead paint, since it vaporizes it.  I admit, my throat was a little irritated until I had the sense to put on a mask.  That side of the door has, as I suspected, always been painted, so though the paint came up pretty well under the heat, it didn't sit up and beg to come off the way the two layers of latex on the exterior had.  The scraper jumps, gets stuck, and hesitates from time to time.  Result?  Some not-so-pretty five-in-one tool marks in the wood.  In fact, the inner surface of the door looks downright rustic.  It'll need sanded, or filled.  It needs sanded anyway, because the bottom-most layer of paint isn't entirely off.  Yeah, that'.s the thick white leadbased one.

At 9:10 PM I still had paint in the profiles.  Not to mention what there was around the window glass which I wasn't going to tackle with that heat gun, for fear of breakage.  Time to give up for the evening.  Didn't have enough light to keep myself from gouging the wood, and my left hand holding the heatgun was literally shaking.  It's not what I had in mind, but I wrestled the door back and rehung it.  Then I shop vac'd the back porch, and cleaned up all the hard crunchy curlicues of paint.  And set out to reinstall the deadbolt for the night.

This is where I learned that Elmer the locksmith had been right the first time:  There were supposed to be two of those metal tongues in that lock.  And it dawned on me that the metallic-looking "strip of paint" I'd vacuumed off the backdoor welcome mat a few minutes before was probably the piece I needed.

Not to panic.  That's one thing nice about shop vacs-- if necessary, you can open them up and retrieve what's been sucked inside.  Gloved up again, selected a metal plant prop from my gardening tools, and began to fish around.

No joy. But here's where I had a sensible idea, and it worked.  Fetched a strong magnet and stuck it on the end of the plant prop.  My "rod" thus baited, I did better.  The missing tongue soon attached itself and I hauled it up.

And believe it or not, I didn't have too much trouble getting the lock back together-- once I'd consulted a photo I took earlier and got it oriented the right way up.  It locks just fine, and the knob hole I've stuffed with an old towel. 

I am knackered.  Don't know how much I'll get done on this tomorrow.  At the moment, I'm too tired and achy to have much of anything in mind.  In consideration of the luckless chipmunk my kitteh slew this morning and the shellac that's still on the door, I sign off with this:


But Mousie, thou are no thy-lane,
In proving foresight may be vain:
The best laid schemes o' Mice an' Men,
Gang aft agley,
An' lea'e us nought but grief an' pain,
For promis'd joy! 

                            ---Robert Burns, "To a Mouse, on Turning Her Up in Her Nest with the Plough"

Tuesday, July 31, 2012

Scraping Along

Midmorning today I was glaring at the old dried-up vinyl flooring glue around the perimeter of my stairhall floor, and decided, oh, phooey, I've got the stuff, I'd give the radically-misnamed "EasyRelease" adhesive remover another shot.

Only this time I really disobeyed the instructions.  This time I mixed it with water one-to-one.  Thanks to that, or maybe because yesterday's application had some residual effect, this time it worked.

Not until after two hours of soaking with periodic reapplications, and not without a good three or four hours of scraping.  But at least today the scraping yielding results with less wasted effort and frustration than yesterday.

Didn't bother to sequester the kittens today.  Barricaded the wet strip with a very wide baby/pet gate a friend let me have when she moved.  But they got a whiff of the chemical and made themselves scarce.  But once I started working I barely prevented my going-on-14 calico from jumping down into the open heat register to explore the ductwork.  Oh, no, you don't!  Outside with you!  The dog, however, was content to watch from the front room. 

Started with the west wall.  Didn't start spraying the bit at the foot of the hallway bench on the east side until I started scraping the first application.  I was thinking maybe it might help to keep the work area wet.

Maybe it did.  At least, I got the result I wanted-- the old adhesive off the floor.  I also got a few gouges in the plywood, but the filler material will deal with that.  At this moment, I Do Not Care.

Monday, July 30, 2012

What You Callin' 'Easy'?

Remover applied
I've always wanted ceramic tile in my 1st floor hall.  Had it all picked out.  I'd doodle my tile job detail during choir practice--underlayment, Ditra, thinset, tile, and all.  Then late last winter I got the depressing news:  A trustworthy tile pro informed me I shouldn't do it unless I tore the whole floor out and sunk a new one between the joists.  For even if I reinforced the springy place in the existing floor I'd still be out of Code with a too-shallow bottom  step.  Feasible, but pricey.

Frankly, I'm out of Code already, thanks to the ½" plywood my previous owners two back slapped down to underlay the ever-so-(un)attractive sheet vinyl they chose.  The bottom riser is that much shorter than the rest even now, and it doesn't bother me.  Would another half inch or so of tile, etc., matter that much?

Test for riser comfort/safety
Late in May I bought one of my chosen tiles at the Big Orange Store, set it on the floor at the bottom of the stairs with some thick cardboard under it to simulate the setting materials, and walked down the stairs a few times.  No.  Ow.  Yep, it would matter.  "Watch that bottom step, Ethel, it's a doozy."

Well, maybe I could pry up the plywood and make something out of the original tongue and groove floor beneath. 

It was no go.  I think the POs-1 didn't merely nail it, they glued it down as well.  And I wasn't up to getting down with the circular saw and cutting it up into little puzzle pieces and heaving them up one by one.  No telling what that'd do to the T&G.  And there'd still be the dried adhesive to deal with.  Hmm, no.

Withal, I've decided, the only thing for it is to fill and sand the plywood (which is a decent, regular, knotless, interior grade) and paint it.  In a faux tile pattern that'll simulate the Gothic Revival tiles I always wanted.  But first, I have to get the vinyl adhesive residue off.

The product in question
Could be worse.  It's only around the perimeter of the L-shaped space and along the verges of the floor heating register.   I rejected trying to sand it off.  Chemical methods should be easier and more economical, I thought.  So I bought a bottle of Henry EasyRelease Adhesive Remover a few weeks ago, and today, I tried it.

Ohhhhhhh, my.  Easy release?  Not so much.  The label says to dilute it 4 to 1 with water, apply it to your dried, hardened glue, then wait one to two hours for the loosening action to work.  I sprayed on the first application around 2:30 PM and according to the instructions renewed it every so often (every twenty to thirty minutes) to keep it wet and working.

After two hours, I went at the (theoretically) softened glue with my 5-in-1.  No joy.  It barely made a dent.  Tried adding more adhesive remover to the bottle to make the mix more like 3 to 1.  Squirted it on and waited another hour or so, reapplying at intervals.

The ordeal begins
By this time it was nearly 5:30 PM.  Upstairs in my bedroom my two younger cats were sequestered behind the closed door, to keep them and their tender paws out of the adhesive remover.  Neither of them was happy to be held captive, and might have been plotting all sorts of dire revenge in the form of poo in the shoes or smelly yellow puddles on the bed.  They had to be sprung as soon as possible.  Meanwhile, the dog, exiled to the back porch, was leaping at the screen door and barking in protest at having to be outdoors without me.  (My oldest cat would stay outside all day and all night if I let her.)  Okay, kids, I'm working as fast as I can!  I went at the old glue again with the 5-in-1, a putty knife (useless) and the paint remover hook.   And went at it, and went at it, and went at it.

Done, barring the gunk hung up on the nailheads
I'm tired, I give up
The old glue started coming up, but it was hard work.  I kept at it steadily but by a few minutes before 8:00 I had less than half the ring of residue removed from the plywood, my knees were hurting, red, and swollen despite the pads I wore, and I was thoroughly fed up.  If this product brings up adhesive residue easily, I'm Mike Holmes' new forewoman.  I had to stop.  Rinsed the application sites with cold water per the directions, including the places I'd sprayed with remover but didn't/couldn't scrape, put everything away, and liberated the captive pets, indoors and out.  Thank goodness the kittens (five-year-old kittens) had controlled themselves.

Still to do, and only part of that


I'll try to get the rest tomorrow.  Pretty tired and disgusted now.  The sander might be an option after all.

Thursday, December 8, 2011

Heading in the Right Direction

12:45 AM

     Here I am in the front room, contesting possession of the sofa bed with a very determined dog.

    Yes, I've finally, finally made the long-awaited move downstairs to keep me and the animals off the staircases and 2nd hall floor until they're refinished and cured.  No, I haven't finally, finally got any new shellac on the staircases and/or the 2nd floor hall floor. 

    I have vacuumed the whole lot, and used a dental pick to clean the cat hair out of the joints between the treads and risers of the set to the 3rd storey.  Those were wiped down with a damp washcloth and dried off, then I went over them lightly with 220-grit sandpaper.  Then wiped them off with a tack rag, then with the damp washcloth again.

    The cardboard and brown paper is off the hallway floor, and I see I have a darker strip at the bedroom door where the bare boards weren't covered all these months, as well as residue on the floor from the painter's tape I stuck the paper down with.  I gave those places a bit of a sanding, and it seems to be evening out.

    The joints to the steps down to the 1st floor I haven't defuzzed yet.  It was rising  midnight and I felt it was a good point to leave it.  Still had to pull out and make the bed.  And go down and get ready for bed in the basement bathroom for a change.  And try to convince the dog to let me into the bed at all.

    The fun thing will be sleeping with all the electric candles around this room.  And the glare from the neighbors' Christmas lights outside.

   Not to mention the cats making noise trying to find a way around the barriers I've erected in all the stairhall openings.  Never mind.  I'll deal with that in the morning.

Tuesday, October 26, 2010

I'm Finally Doing It

Finally, finally, after months and years of reading and researching, talking and blogging, ordering and mixing, tinting and testing, I'm finally doing it.  I'm finally laying shellac onto a surface here at the Sow's Ear.

As you might have guessed, I'm starting at the top, with the treads of the stairs to the 3rd floor.  The treads are going on in and 1.5 pound cut of Kusmi #1 button lac dissolved in 195 proof denatured alcohol and tinted with mahogany aniline dye.   I'm not staining or dyeing the wood first, but putting the tone down in layers, so I can get the color I want.

I can't find the sample I did a few weeks ago, but I know it took six coats to get the right color.  It's all right, because freshly-mixed shellac dries quickly (you can recoat in forty minutes to an hour), and more coats diluted to a thinner consistency makes for a more durable finish.  Actually, I'm adding a nitch of isopropyl alcohol to retard drying so it won't get tacky before I get the brush marks blended in.

Here's today's progress.  Please note that my camera renders the color entirely too reddish, no matter how I adjust it.

11:35 AM:  The stairs to the Study stripped, sanded, dusted, and ready to be finished.

12:11 PM:  All taped to keep the mahogany-toned shellac off the risers.  Those'll be done in a warm walnut to like what was on them before.

(Wait a minute.  Almost  all taped.  Missed a spot.)

12:16 PM:  The top treads, without finish, and

12:27 PM:  The same, with one coat.

12:45 PM:  Making progress.

3:39 PM:  Two coats on.


6:27 PM:  After a light 220-grit sanding, ready for coat No. 3


7:10 PM:  Three coats applied.

8:43 PM:  Ready for No. 4

9:19 PM:  Four coats completed.  I'm running low on shellac, so I'll need to dissolve the rest of the buttons I have before I can finish this stage of the job.

And finally,

9:29 PM:  Huw the boikitteh, thoroughly disgusted with me for enleashing all those funny smells and for not allowing him to go up to the 3rd floor study, all day.

What I've Been Up To

A pictorial tour of the last couple-three weeks at the Sow's Ear:

Late on Tuesday, October 5th:  Flaws, holes, dings, and dents filled with Zar filler tinted with mahogany aniline dye dissolved in denatured alcohol.

Wednesday the 6th:  Nothing accomplished on the stairs.  Made quince jelly instead.


Saturday the 9th:  The five top stairs sanded down with 80-grit sandpaper.


Baby gate put at bottom of the stairs to keep the dog and his claw marks off the bare wood.


Sunday the 10th, approximately 7:00 AM:  The boy cat knocks the metal gate on the floor.  Replaced it with a wooden one.


Monday, 11 October:  One more tread and part of another medium-sanded.


Meant to do more that day, but I was watching my friend Hannah's* daughter Letty*, who was off school for Columbus Day.  We went to the riverside park and picked up windfall crabapples.  Twice.


Tuesday the 12th:  No stair work: made quince cheese.


Wednesday the 13th:  Medium-sanded the rest of the treads. 


Used the travel iron and a wet washcloth to raise the dents where I knocked the mouse sander and the canister vac down the stairs.


Dotted in some more tinted wood filler where I'd missed some spots.  Went a little nutty and used the rest of it on the hallway floor.


Raked and bagged leaves in the back yard while the filler was drying.


Thursday the 14th:  Fine sanded the stairs. 


Steamed the bottom tread again where I lost control of the mouse sander and let it plow into the wood. 


Decided I couldn't stand the stray nail tip some previous owner rammed through a riser from the closet below, and figured out a way to cut it off and countersink it.


Discovered I'd missed some holes and dings I should have refilled and sanded.  Too bad.  Any more material comes off these stairs, they'll have no intregity left whatsoever.

Since then, I've raked more leaves, gone to my second wedding of the month, gathered up the drop cloths and cleaned up a prodigious amount of sanding dust, substitute-taught a few times, gotten a sore throat, spent this past Sunday in bed, and, yesterday, had my final chemo session.  What I've been up to today, Tuesday the 26th, can wait for a separate post.


Saturday, July 31, 2010

Some Finish Decisions. I Think.

Early last week, after the previous post, I'd made a decision on what I was going to do about my shellac.  I was going to buy a great big gallon of the Zinsser Bullseye Amber at the blue and gray store, tint it with the aniline dyes I've mixed, and use it on all my floors and trim.  The buttonlac I'd save for a few furniture pieces I have to do.

But Tuesday afternoon I showed up at Lowe's, and the Bullseye shellac can didn't say what the pound cut was.  And there's this other shellac product Zinsser has called SealCoat, and it's 100% dewaxed.  Meaning the other kind isn't.  But the SealCoat can didn't list the pound cut, either.  And the kid behind the paint counter hadn't a clue.  I wasn't about to blow upwards of $25 on the wrong thing, so after getting the scissors I needed to cut sandpaper, I went home and did some research on line.

OK, Bullseye is still 3-pound cut, and SealCoat is 2-pound.  Hmm.  If wax is not that great, maybe I can just tint the SealCoat and put on three coats of that, with a couple of thinned-down coats of polyurethane over it?

Did some more research.

And ended up back on the Shellac.net site, where I'm reading about the buttonlac I already have, and it says this: 

"Buttonlac is a unique shellac product preferred by restorers and those looking for a very protective shellac finish.  It is superb for French polishing due to its hardness. Button Shellacs are prepared by the hand made process of heating the seedlac in a cotton tube. The resin secretes through the pores of the cloth and the molten shellac is formed into buttons. The processing heat polymerizes the resin, resulting in a very tough & moisture resistant finishing material.  Button Shellac is preferred for finishing floors and interior woodwork."

Oh.  Floors and interior woodwork.  I do seem to recall having a phone conversation to this effect with Ron at Shellac.net.  Just about a year ago, it was.  I shot him off an email Tuesday evening, full of questions about poly over shellac, could I get the right tint with the red mahogany and dark walnut dyes I already have, what if my dog peed on a shellacked floor, etc., etc.  A few minutes later, I got impatient and called him.

He said yes, I wanted to leave the wax in the Kusmi #1 I'd mixed.  Yeah, I could do poly over the shellac . . . if I laid on a coat of the dewaxed kind first . . . and if I really don't mind losing the repairability of the shellac finish.  Up to me.  As to the dyes, he didn't think I'd need to lay in a supply of golden oak or anything of the sort.  Just try a very little bit of red mahogany, and the natural tone of the yellow pine would supply the gold.  And if I ran out of the buttons for the floors, he could have more to me in three days.

That put me firmly back in the do-it-myself buttonlac camp.  On Wednesday I sanded down some original yellow pine floorboards (what was left of them after I'd sliced them for gap-filler strips) and on Thursday I tinted up some of the Kusmi #1 mix with a wee bit of the mahogany dye (we're talking 1/4 teaspoon in 3/8 cup of 1.5 pound cut shellac-- is that 1/72?).  Over the next two days I brushed on six (count 'em, 6) coats of this mixture on three different old floorboard remnants, and I think I have a reasonably good tone for my hall floor and stair treads.  (Note that the piece shown above is fully-coated only on the left.  Otherwise we have a 6-5-4-3-2-1 sample).  Ron was right-- the yellow in the boards was enough.  Some might think six coats is too much, but I like the easy way the 1.5 lb. cut goes on and everything I've read tells me that several thin coats will hold up better than fewer thicker ones.  I tried splashing some water on it and it beaded right up.

(Two boards have shellac only at the ends; I was reserving the rest in case I needed to test other tones. Yeah,
there's a stripe of build-up next to the bare or less-coated wood.  I've read I can avert that by starting to brush the shellac on about an inch or so away from the end of the workpiece, continue to the other end, then quickly brush back all the way to the first end, picking up and evening out that first deposit of finish on the way.  Should work if I can keep the tread shellac off the stair stringers in the process.)

All this led to a decision:  Instead of successively coating the 3rd floor stairs, 2nd floor hall, and the main stairs (which had long been my assumption), I would now start on the 3rd floor stairs alone.  I'll give them five or six coats of shellac only, then live with them for awhile and see what the dog, cats, and I do to them.  If I think they still need a layer of polyurethane over, I can repair any damage to the shellac and go from there.  Meanwhile, I can be working on the hall floor and the stairs down to the 1st floor.

But today, I had a brainstorm.  You know how I've been stressing over how to keep the animals off the work?  I already had figured out that I can use my tension-sprung baby gate to exclude them from the 2nd floor when I'm doing the stairs to the 3rd.  But I was looking down the stairs to the 1st floor today, and I said to myself, "You know, if you replaced the balusters to the stairwell first, you could put that gate at the bottom of the stairs between the wall and the newel post, and do the upstairs hall and maybe even some of the steps below without the cats and dog in the way."

Hmm.  But that means mixing up the dark shellac for the woodwork in the stairhall and refinishing all that first.

What of it?  A lot of it is vertical surfaces, and maybe it'd be better to have that done before I do the floors.

So tonight I mixed up another jar of button shellac, a pint and a half of 2-pound cut Kusmi #2.  It's still getting shaken and dissolved.  This batch I plan to keep more of, as this time I won't be trying fruitlessly to get rid of the wax!