Thursday, January 29, 2009

Bathroom Secrets

A house can be made to give up a lot of its secrets at the point of a heat gun and a chemical-soaked pad of steel wool. Night before last, my bathroom revealed some surprising things about its past.

For one thing, this bathroom of mine used to be painted baby pink. Not just the trim; the walls as well.
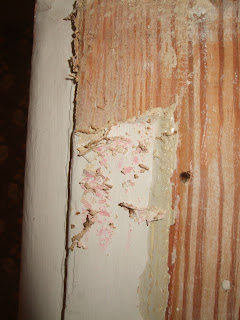
I know this was a fashionable color, especially in the 1950s. But why any self-respecting American male would allow what was probably the only bathroom in the house to be done up in pink tile, let alone pink paint, I cannot fathom. But then I reflect that for over fifty years this house was inhabited solely by a single lady, with and then without her widowed mother, so I supposed she had only her own taste to consider.

Then there was the simulated running-bond subway tile I discovered when I pried off the door trim. I shouldn't have been surprised-- I'd seen this wall treatment, with "joint lines" inscribed in the plaster, at the back of the built-in linen cupboard. But I guess I didn't expect to see an unpainted strip of it peeking out from behind the existing tile.

Once I'd stripped the paint off the bathroom side of that same casing, I could see that at some point there was an issue with the door sticking. The woodwork above and below the strike hole (the actual strike plate has been missing from before I moved in) had been roughly planed or chisled down a good 1/16". Funny thing is, now it's hard to keep the door closed. My animals are constantly barging in on me. Not opportune, for privacy or for keeping the heat in.

The most curious thing of all was seeing what somebody (my POs-1?) did when they installed the present 4x4 white ceramic wall tile. For awhile I’d noticed that the jamb trim on the righthand side of the bathroom door sticks out badly at the bottom. It hangs (or did hang) out over its plinth by a good quarter inch or so, and you could see maybe 3/8" between it and the casing. I’d thought that problem was fairly recent, and I intended someday to fetch the rubber mallet and knock it back into place.

But night before last I pried that trim piece off the wall. It wasn’t as easy as I’d expected, because the tile butted into it and not vice versa. But I got it down, and when I did, I found that that piece must've been cockeyed for years-- and they'd notched the tile to fit the way it stuck out! You'd think redoing the bathroom would be the ideal time to make it straight, but I guess not!

What I'd dying to know now is what's under the faded sheet-vinyl flooring. I'm not holding out for a pristine black and white hexagon ceramic mosaic floor, but I can hope. I could ring up the POs-1 and ask what it was they covered up. But I think I'll preserve the mystery until I actually redo the bathroom. No need to make it give up its secrets all at once.

Wednesday, January 28, 2009

Back in the Saddle Again

As soon as my adorable boy cat gets away from in front of my computer monitor, I can tell you what I’ve been doing since 5:30 yesterday evening.

. . . . All right, then. I’ve gotten back to stripping woodwork, in the 2nd floor hall.

My first object was the jambs and head of the hallway window. I made sure to cover the window sash and glass with kraft paper-- I didn’t want to take off the finish the way I did with one of the windows in the living room.

Guess what? Kraft paper does nothing whatsoever to keep the old caulk and foam insulation from smoking and off-gassing from the heat gun! (Duhhhh!!) Not needing constant accompaniment from the smoke detector mounted on the hallway ceiling, I took out the battery. And kept a squirt bottle at hand to wet down any undesired hot spots.

After dinner, I finished the job on the window casing with the Western Wood Doctor chemical stripper. It did its usual effective job, and by the time I finished, it was 9:00 PM. Ah, the night is young! Plenty of time left to take care of the jambs, head, and stops of the door to the bathroom.

Don't ask me why I'd thought that wouldn’t take long at all. Maybe because I’d envisioned doing each jamb, etc., and its stop as one piece. I’d get a twofer as to my tally, and the members to be stripped are so skinny, the work should fly by.

Oh, yeah, right.

After a bit of paint removal, I saw that stripping the stops in place would cost me a lot more time, difficulty, and potential damage than stripping them down.

So, I pried off the stops.

Oh, look at that. Now that the stops are gone, looks like I'd have to strip both exposed portions of the inner faces of the jambs and head, the one towards the hall and the one towards the bathroom. Maybe I could keep the heat gun away from the bathroom side, but not the chemical stripper. Besides, what am I supposed to do, finish the hallway side all beautifully then come back when I do the bathroom and mess it up again?

So I plied my little heat gun and got as much paint as I could off the outer edge reveals (toward the hall) and the inner faces. I’d strip the edge reveals on the bathroom side when I redo with the bathroom. Which given the current economy, might be never.

But that’d get me into the same predicament: How to do it later without ruining any refinishing I do now? But to strip those edges in this campaign would mean prying off the door trim on the bathroom side.

Oooh, no, I don’t want to do that now! I don’t want to go anywhere near dealing with the bathroom for a long, long time!

Too bad. I’d messed up the reveals when I stripped the jamb and head faces. And though I’m not keen on stripping woodwork that’s just going to be painted again, that bathroom trim is lumpy, bumpy, gloppy and sloppy, full of pits and craters and utterly disrespectable in appearance.

So off came the bathroom door trim. I labelled it, set it out in the hall, and finished the heat gun job on the jamb reveals on that side.

And that's all for tonight.

There's a few things I discovered about my bathroom as I worked this evening. But I'll save them for tomorrow-- I mean, later today, after I've gotten some sleep. I'm up to 193 pieces stripped (not counting the ones partially done) out of 336 (not counting the bathroom trim I took down tonight-- ouch), the floor is swept and shop-vac'd, and the supplies, tools, stools, etc., are pulled together, piled up, and gotten out of the way.

And oh, yes, I remembered to put the battery back in the smoke alarm.

Thursday, January 22, 2009

Good Enough

Tuesday I finished the paint job and got the shelf piece rehung on my study wall (I waited till today to post so I could get the room clean enough for respectable After pictures). I think-- I hope-- that this time it should stay put.

I had to replace only one mollie with a toggle bolt, the one that pulled right out when the unit fell last November. Handy thing, working with a wall that's finished on one side only-- I could creep into the storage space behind and screw the toggle onto the bolt from the back side. So no drilling a gaping great hole that could be seen from the front.

So I got the fallen bracket secured and made sure the screws on the other one were tight and then placed the shelf piece back on them.

And it was crooked. At least 1/4" lower on the left than on the right. What the--? I'd put that righthand bracket back where it was before; I know I did, because the lower screw went back into the mollie that was still good. And I'd never noticed that shelf piece being crooked before! It's been mounted there the past five years!

Or did I just have so much stuff on top that I never noticed?

Well, no time for regrets or recriminations. This was one of those situations when a DIYer's gotta do what a DIYer's gotta do.

And it wasn't taking the unit back down and moving either one of those brackets up or down a quarter inch.

No.

I went down the basement and rummaged my collection of furniture bumpers and pads and found some twenty-five-cent-piece-sized black rubber ones. I stacked them two and two on the top of the wooden part of the bracket, and made up the deficiency.

Well, mostly. It's good enough.

Sunday, January 18, 2009

Repairs

I admit it: Amongst hacking early winter bronchitis, squeezing the last possible juice out of my student AutoCAD program, and Christmas activities (I finally got the last of my "Christmas" letters out last Thursday), I've done Nothing. What. So. Ever. on woodwork stripping since November 23rd.

And there's a little something, a tedious, boring, but essential little repair, that I have to do before the Woodwork Stripping Express again gets underway.

On November 9th last, I was in my 2nd floor hall prying door trim off the walls when I heard a crash from my study above. I ran up the steps and this is what I saw:


Oh, bugger. Silly shelf piece had fallen off the wall again. Upper mollie of the righthand bracket had pulled right out.


Blessedly, the way it fell, nothing was broken. But for the past two months and more I've been studiously ignoring the mess in my study and doing ten other things other than remounting my shelf piece.

No more. My holiday tasks are over (barring taking the decorations down, but that's another issue) and there's a chance-- a happy, tentative chance-- that I'll need my drafting board to do some actual, paying design work. I've got to get that piece rehung and the mess cleaned up.

I've made progress. I've filled the crater (with that new DAP DryDex spackle that goes on pink and dries white), sanded the patch, located and drilled the new screw hole, primed the patches, and applied one coat of new paint. I'll wait till tomorrow to do the second coat, because I'm not totally sure the touch up paint I bought Friday exactly matches. Close, but I might have to mess with it a bit.

This wall backs onto an accessible storage space under the roof. Looking at it from that side, I've determined what's wrong: the mollie at that point goes into the plaster between two laths. With the weight of the shelf piece, the papers and things that I keep in it, and the cats that sleep in the inbox above the righthand bracket, no wonder this is the second time it's failed.

So here's the plan: This time, I'm using a toggle bolt. But I'm not drilling a big hole in the plaster to put the toggle through. No. The bolt will go through from the study side, then the toggle will screw on from the attic storage side. With a strip of wood between the lath and the toggle to span the lath at right angles for bracing.

I may draft a neighborhood kid to help with one side or other of the assembly; I may see if I can take care of it myself. Either way, I should get this repair done and the shelf piece rehung sometime tomorrow.

And then I can go back to woodwork stripping.

Oh, joy.